What Cyclosporiasis Says About Industrial Scale Food Systems
In case you missed it: there is a huge, nation-wide, outbreak of a rather nasty food-borne illness called cyclosporiasis. The illness causes violent diarrhea and can last for weeks. Thousands of people have become sick across many states. Health officials from state and federal government have traced the outbreak to lettuce from an industrial-scale lettuce farm: Taylor Farms. Taylor Farms is so large that it has many labels and sub brands. In fact, when writing this post they have even obfuscated which labels/sub brands they own making it difficult to know which stores and restaurants they serve. So what does that tell us about industrial scale agriculture?
First, it shows (again) how fragile the industrial food system is. Taylor farms corporate farm is so large that it contaminates SO much food that it gets tens of thousands of people sick. Not only that but it took weeks to months to trace back to the source. Worse yet, they’re so large that through having multiple labels and branding they make it difficult for consumers to know which lettuce is from them and which is not. That’s not transparency. That’s not food safety. That doesn’t have the best interests of consumers at heart. It’s only a matter of time before another outbreak happens and food becomes scarce.
Second, it shows how industrial farms always put profits over people. We hear about outbreaks every year. Avian flu, swine flu, romaine lettuce recalls, and so many more in recent memory. They all came from industrial scale farms where the only incentive for these corporations is profit. They don’t care about worker health. They don’t care about your health. They don’t care about soil health.
Third. Small scale farms can be the solution to food system fragility. When you buy lettuce from our farm you know the person growing the food. You can ask us questions about how it was grown, what our food safety practices are, if we’ve ever gotten anyone sick with our food (nope!) and so much more. There’s a level of trust that cannot be replicated in the industrial system.
Finally, consumers can and will find us when they need us. Let’s flip the script so that the industrial food system is the “backup” and the local producer is the first choice. We have seen a HUGE uptick in our lettuce sales in the past couple weeks. We’re consistently selling out at the farmers market and we’re bringing more lettuce than we’ve ever brought before. We know it’s because of this outbreak and while we are happy for the extra business there is a level of frustration that goes with it. Where were these customers before the outbreak happened? Why did they start with the industrial food and switch to us only when safety became a concern?
And let me end by thanking our existing customers, CSA members, farm friends and family. Those of you who we know by name and who ask how our kids are doing. You are ahead of the curve and understand why local food is important. You’re our MVPs and we appreciate you!
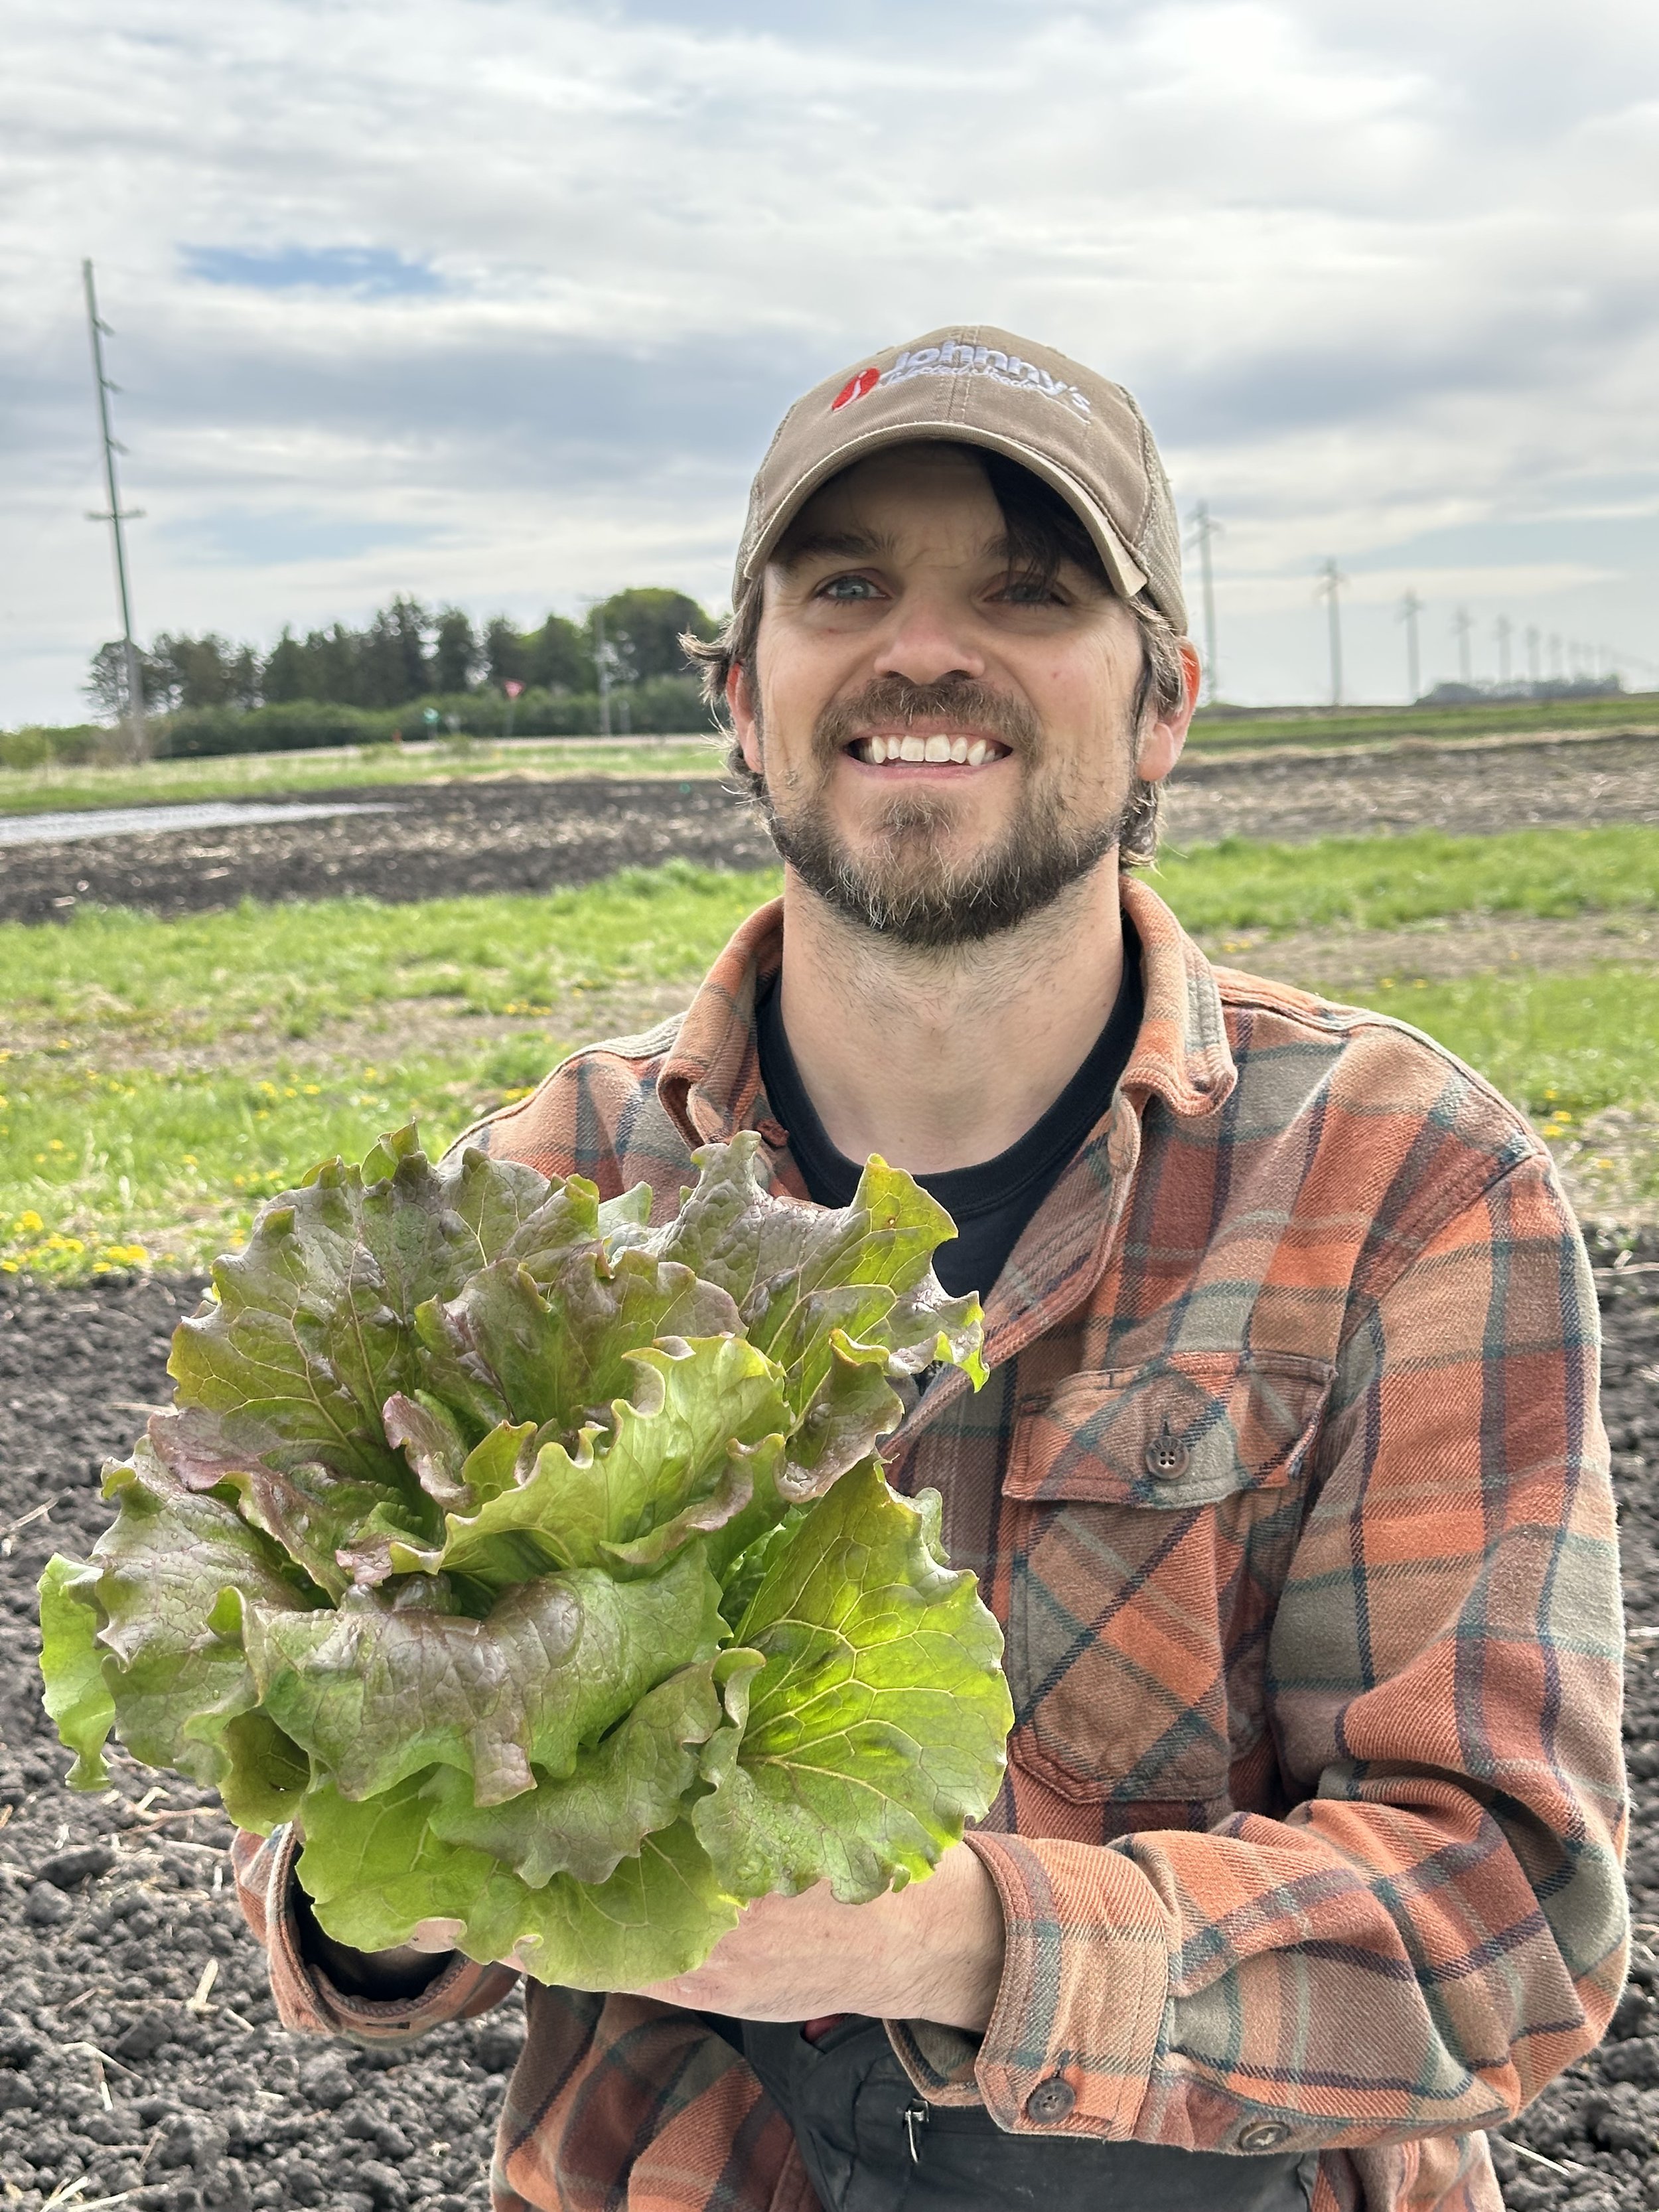
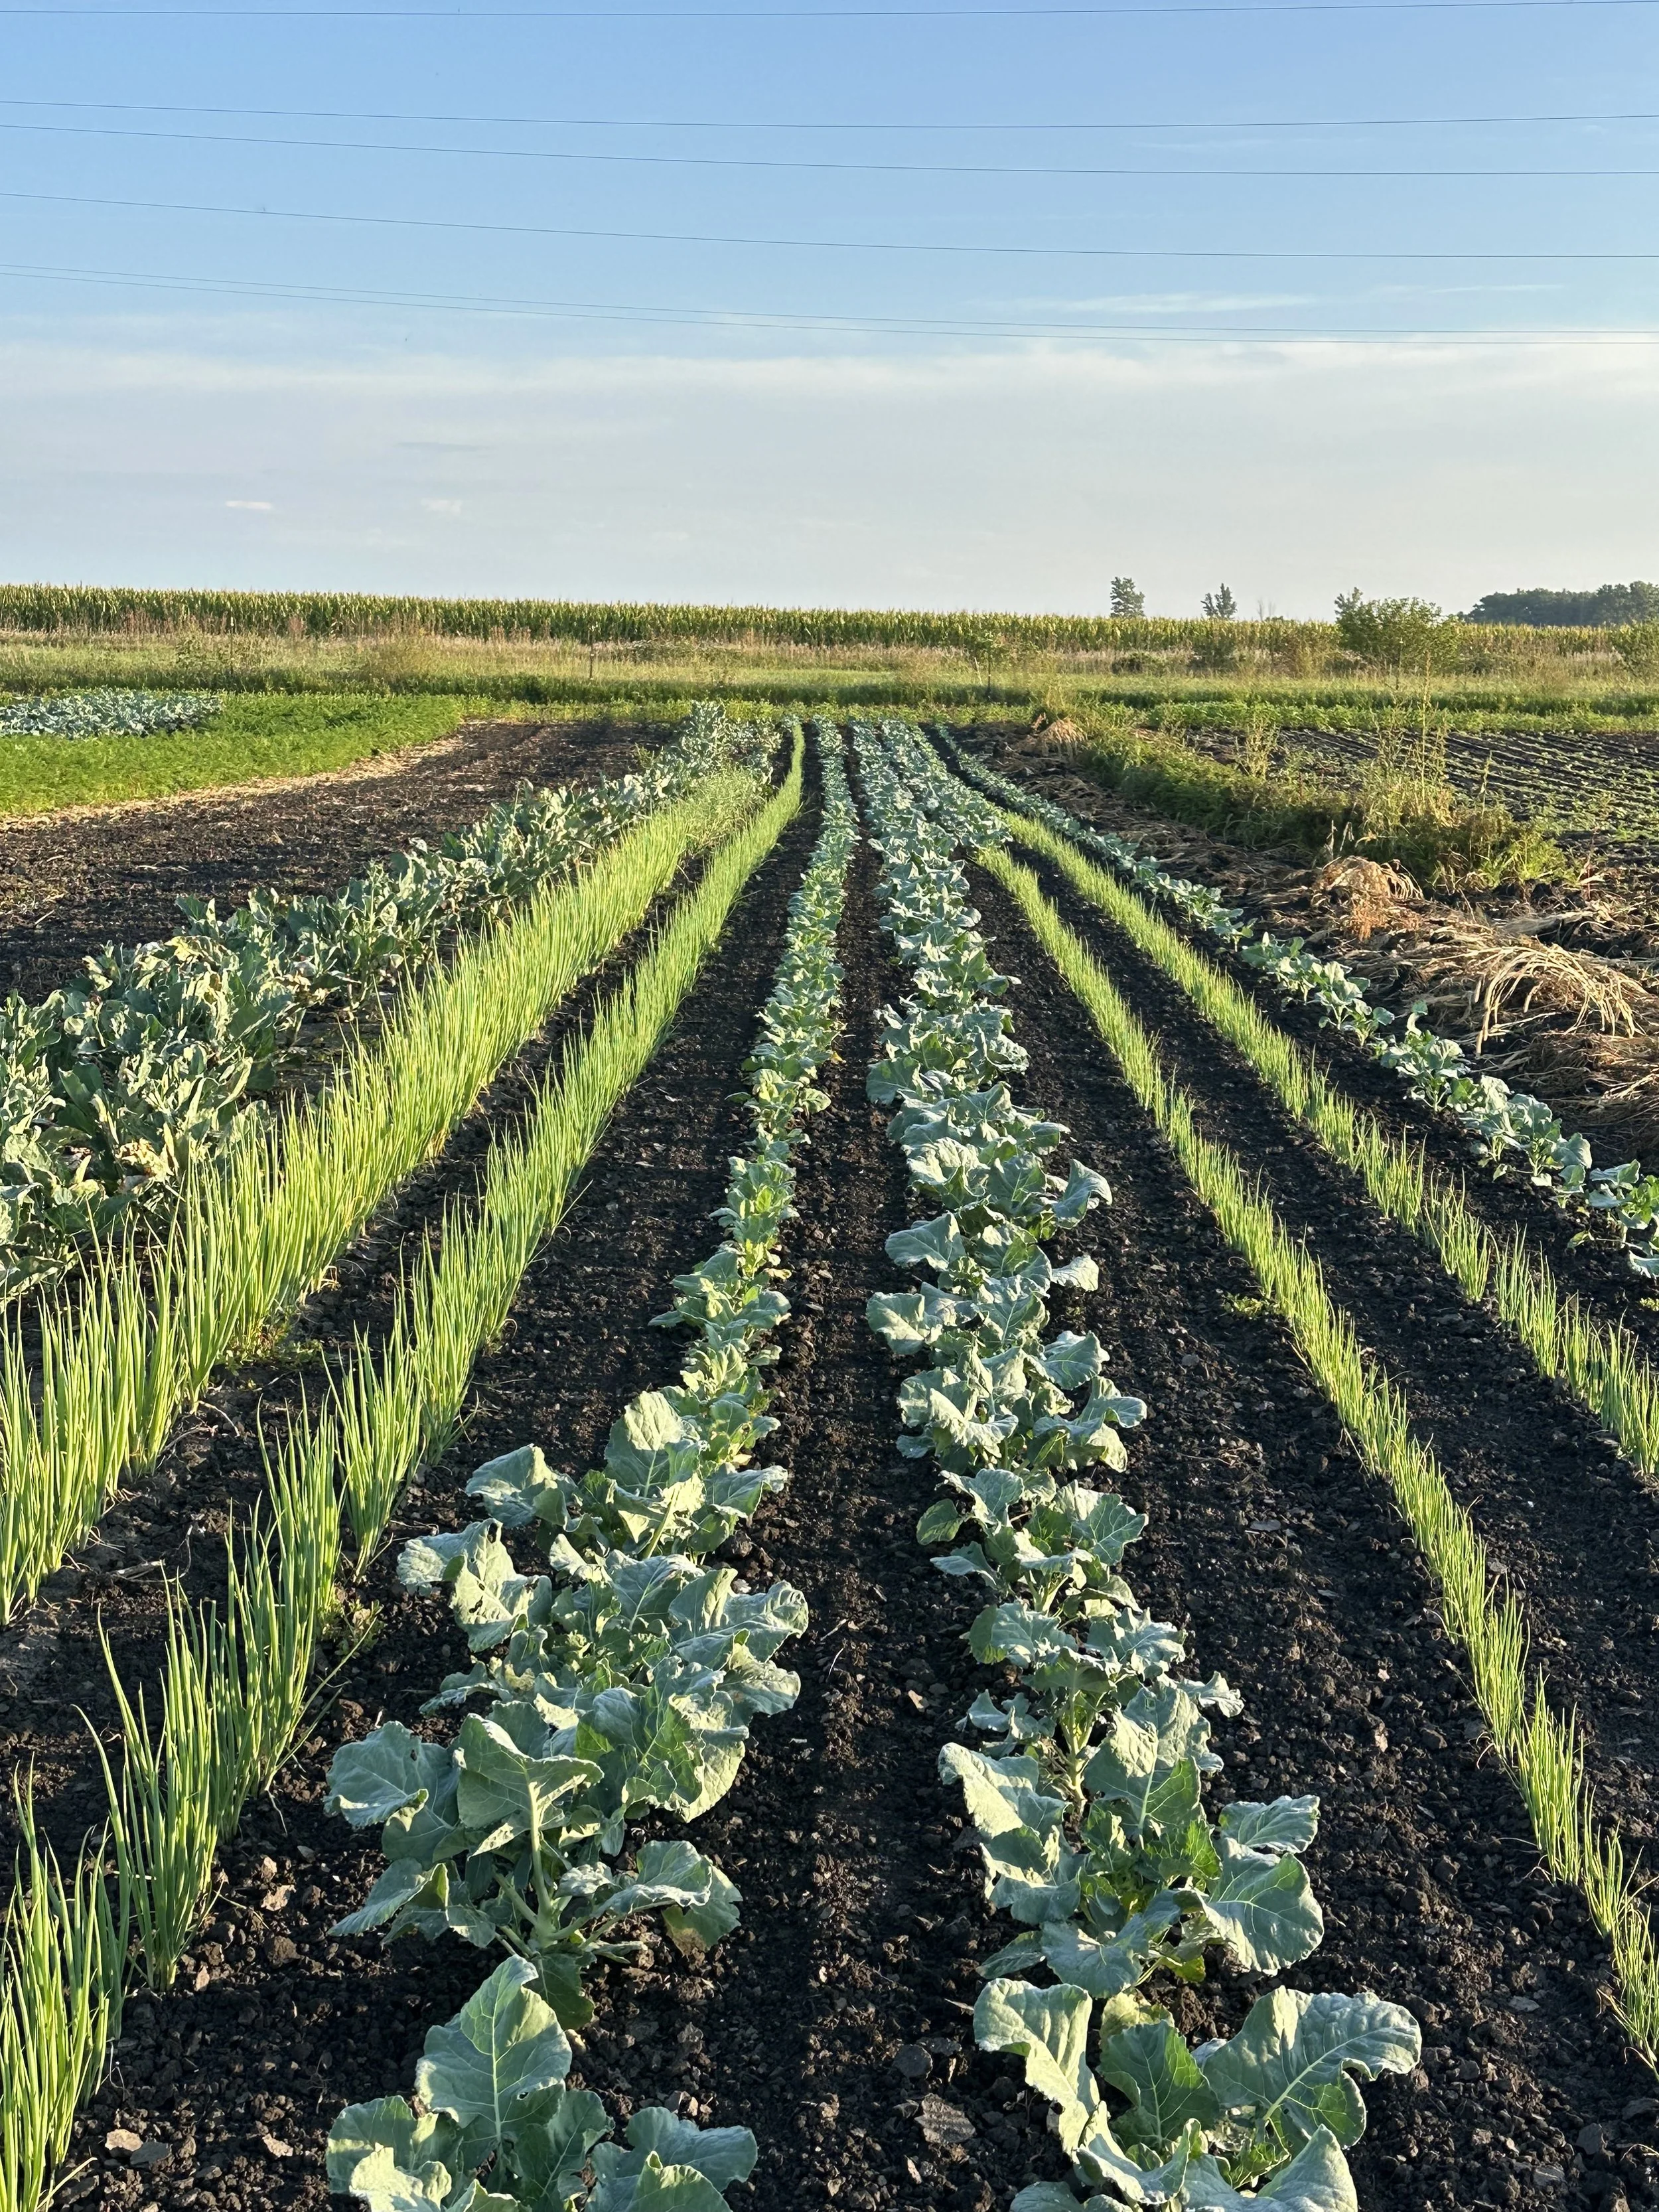
I’m very proud of the lettuce we grow!
Greenhouse Tomato Management
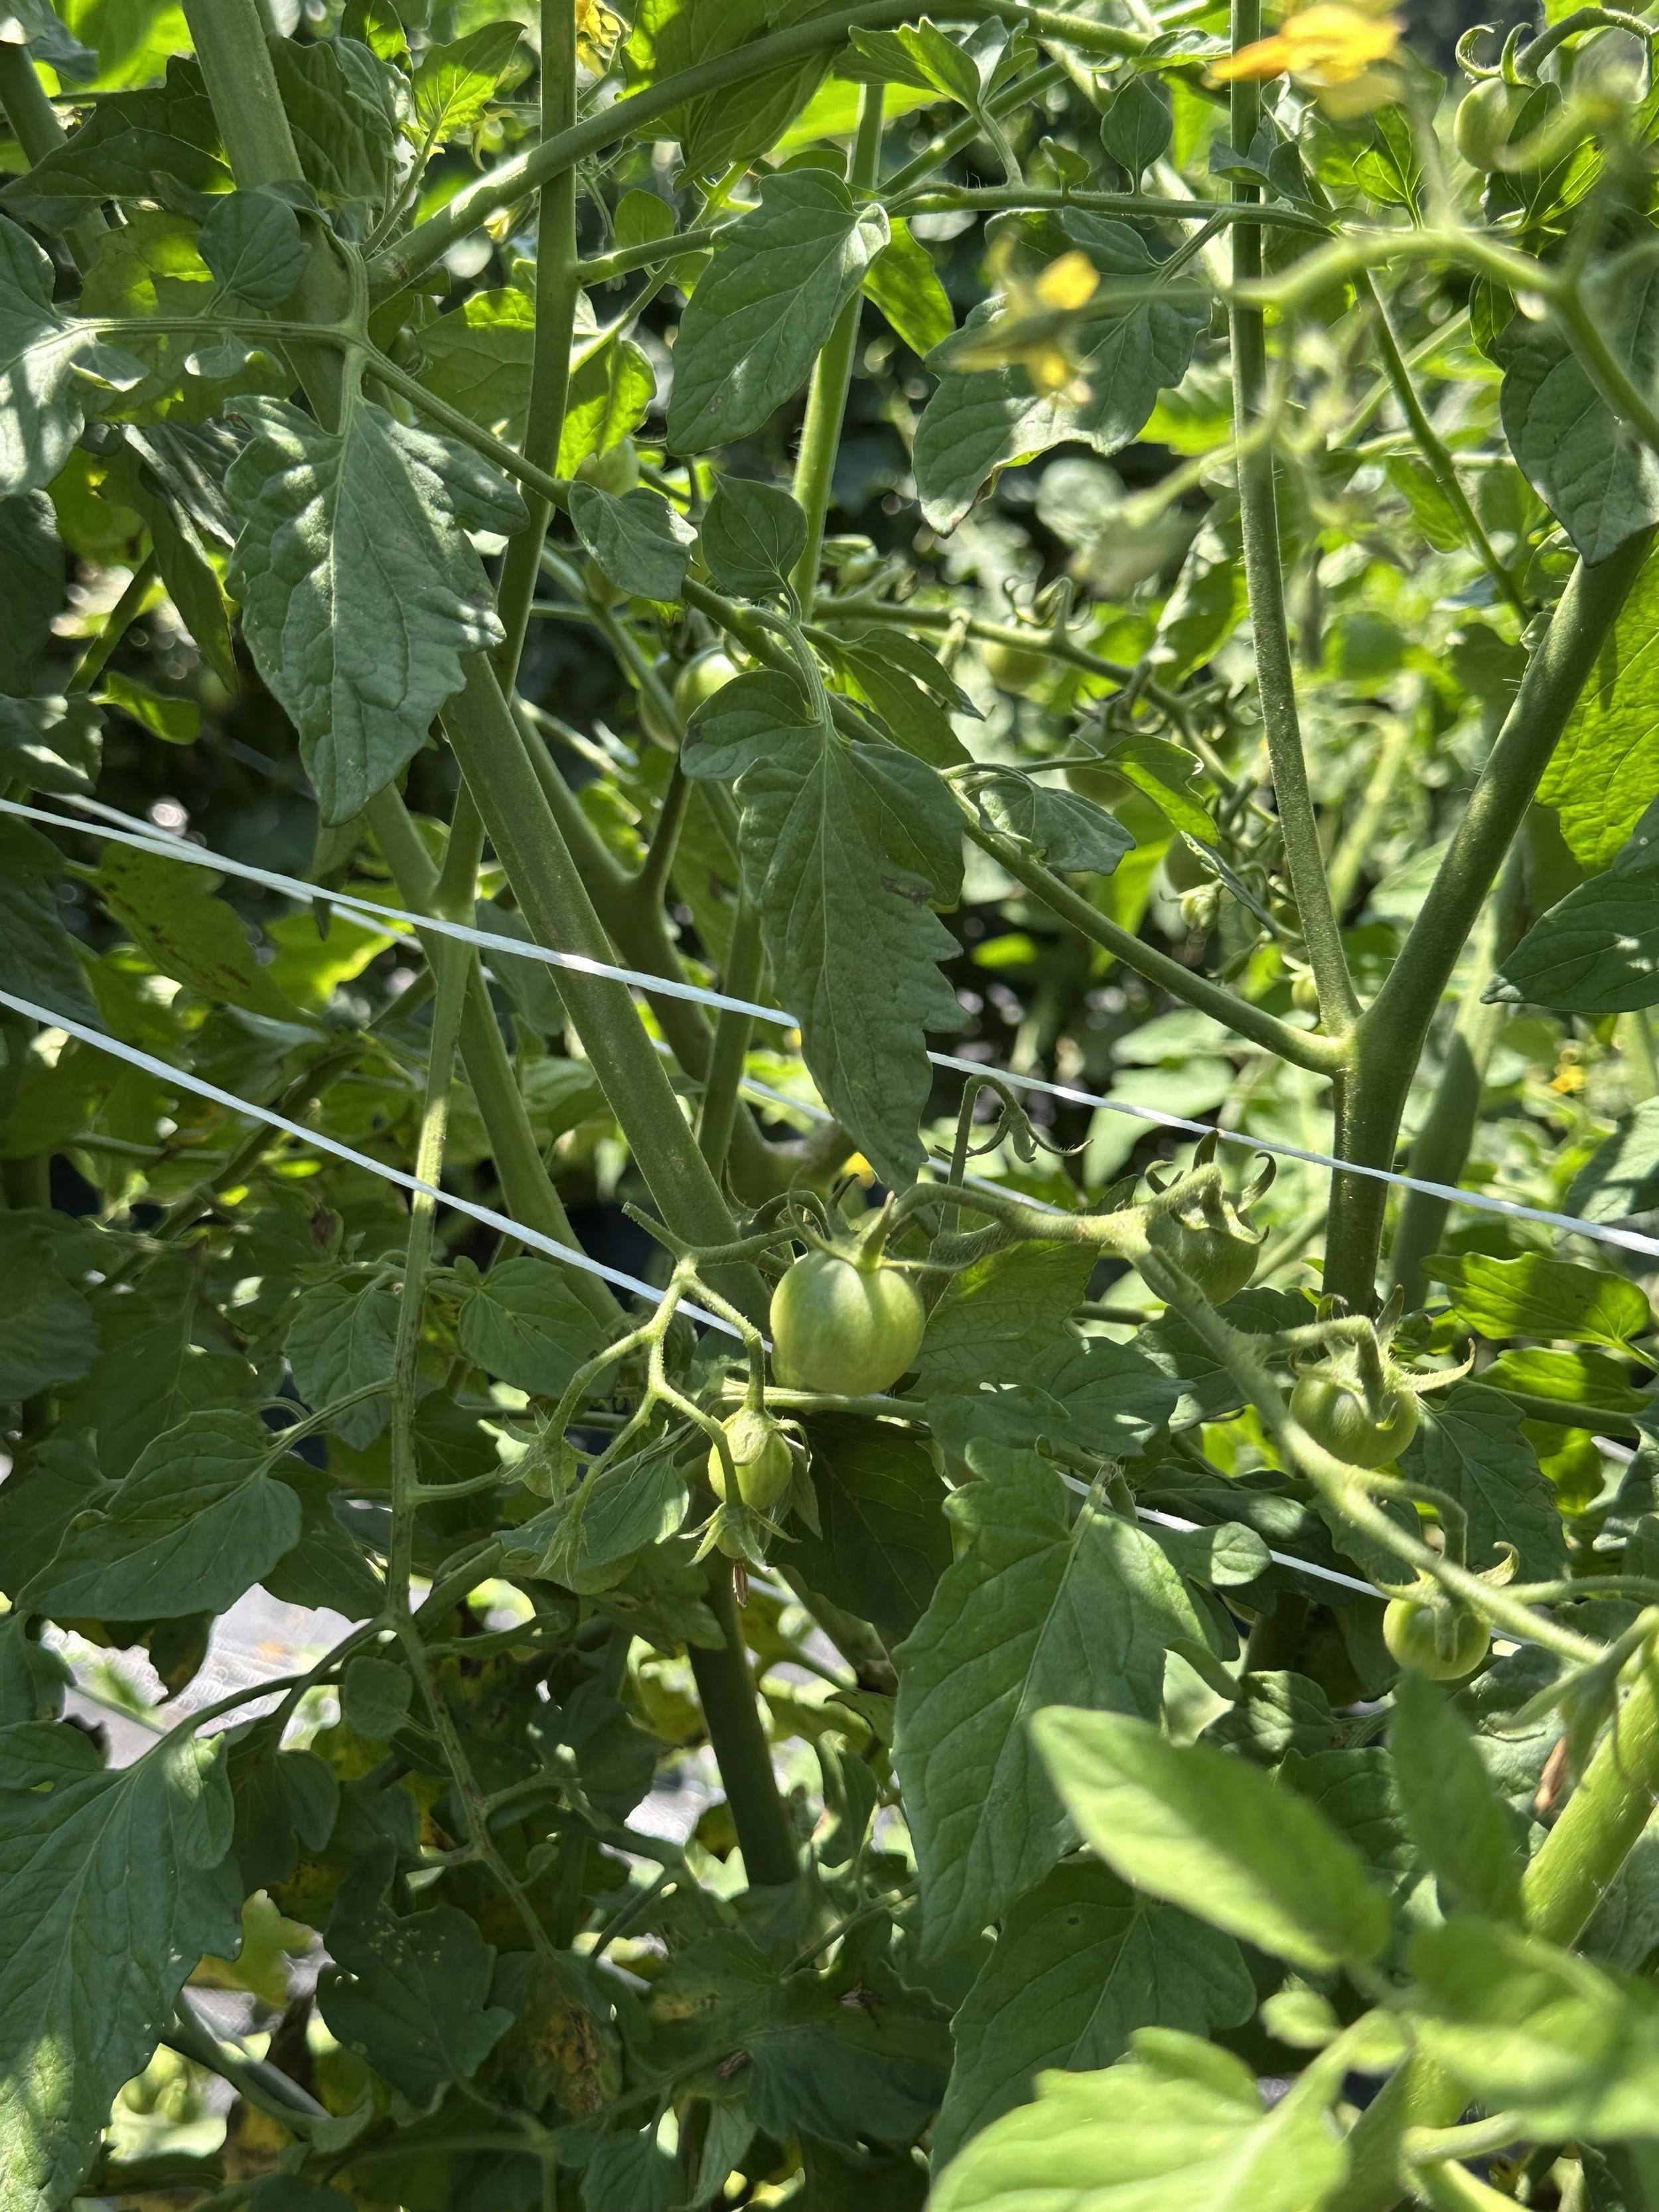
Now that we’re in the full swing of our greenhouse (tunnel) tomato season I thought it would be timely to share how we manage this crop inside a greenhouse. I’ll share a few photos of our tunnel tomatoes and talk about our pruning and trellising strategy. Both of which are very important to getting a good harvest of delicious, healthy, summery tomatoes.


We prune and trellis our tomatoes for a number of reasons that all help us with our goal of harvesting lots of large tomatoes from healthy plants for the duration of the season. Let’s talk about pruning first. When we prune tomatoes we’re pruning two things: lower leaves and “suckers.” We prune lower leaves from the plant to help improve airflow in our tunnel which helps reduce the risk of disease in our tomato tunnel. We prune suckers to both encourage the plant to produce larger tomatoes and to make the plants more manageable.
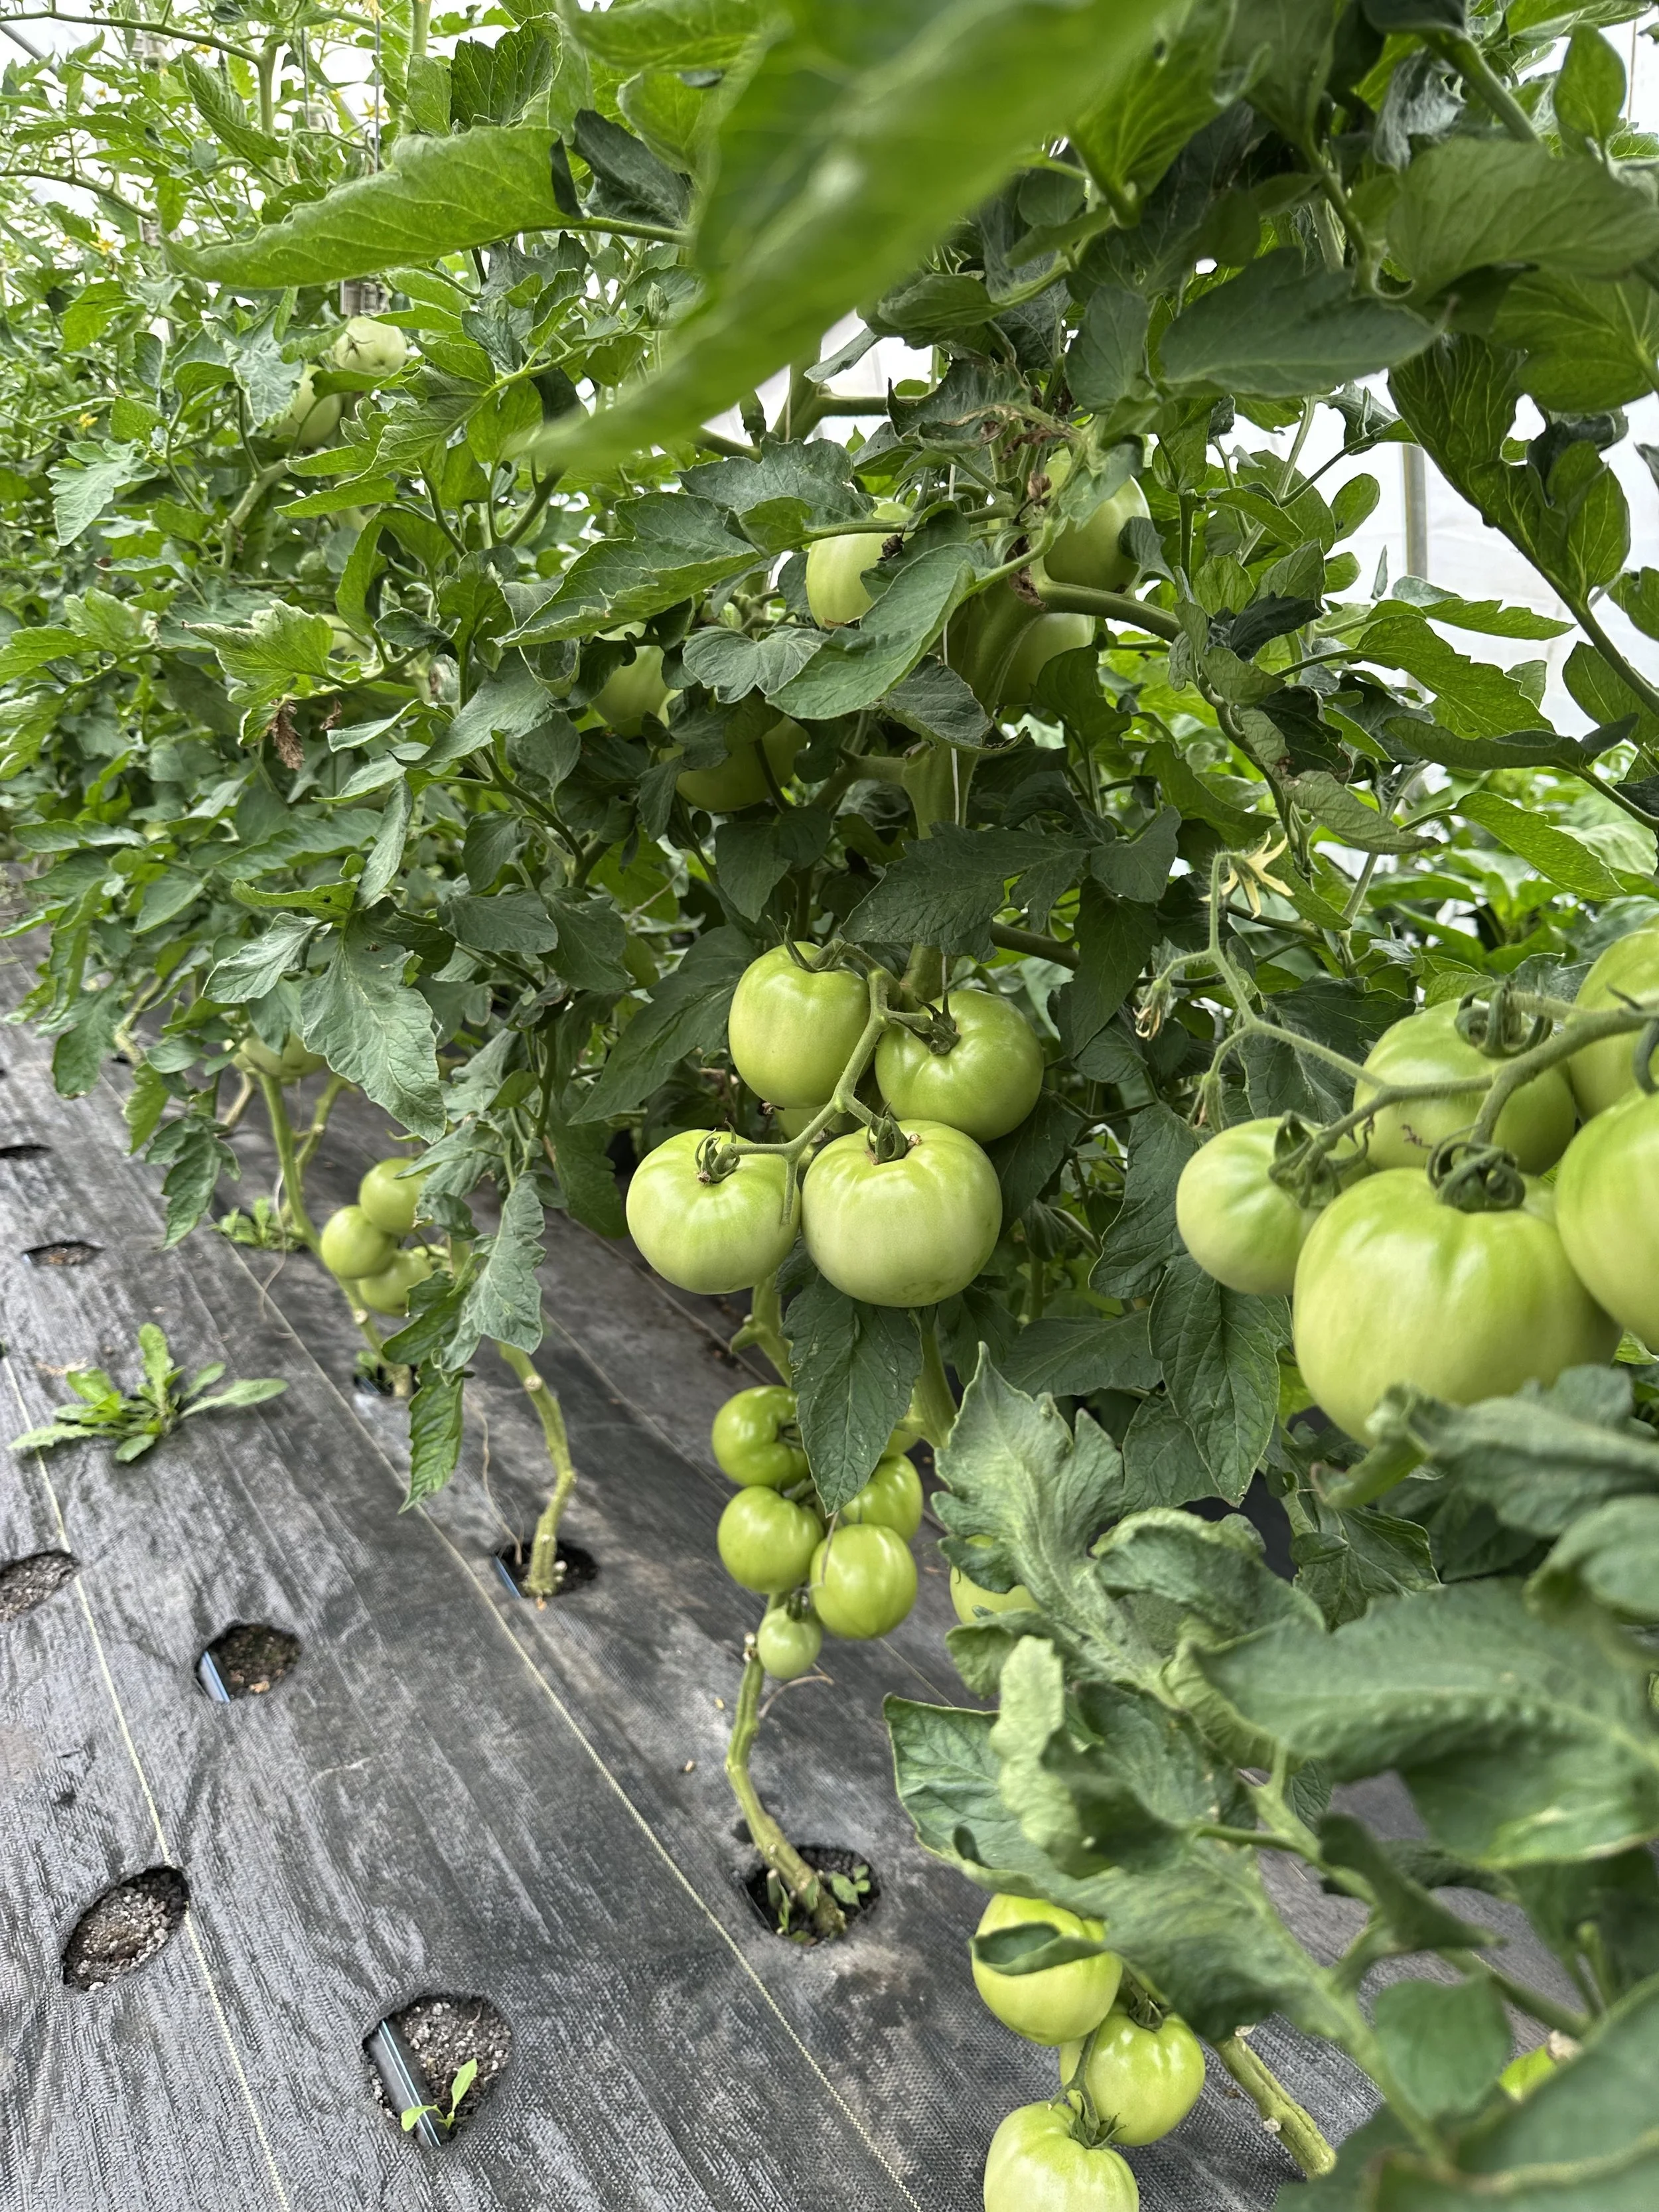
This years tunnel tomato crop. We’re very happy with the fruit set on these plants.
We’ve been using the QLIPR system for practicing the lower and lean tomato trellis system. The idea is that the growing season is long enough and that our tomato grow tall enough that we run out of vertical space in our tunnel. Because of this, we need a way to manage the length of the tomato vines and lower the plants down and leaning them to one side or another allows us to easily manage that height.
QLIPR is unique in that it utilized two clips that leap frog each other on our weekly prune and trellis system. It also allows us to do all of our tomato management (pruning, leaning, harvesting) from the ground instead of a ladder.

Each plant gets a wire hook and two foam lined clips. The clips move along the vine as it grows allow us to keep the “business end” of the tomato at chest height. Clips can be seen on the far top right of this photo.
Tomato management has become one of my favorite things on the farm and tomatoes continue to be a very important crop on the farm. We hope to expand our tomato offerings in future years including growing some of our cherry tomatoes using this system as well as adding other heirloom tomatoes.
How We Manage Field Tomatoes
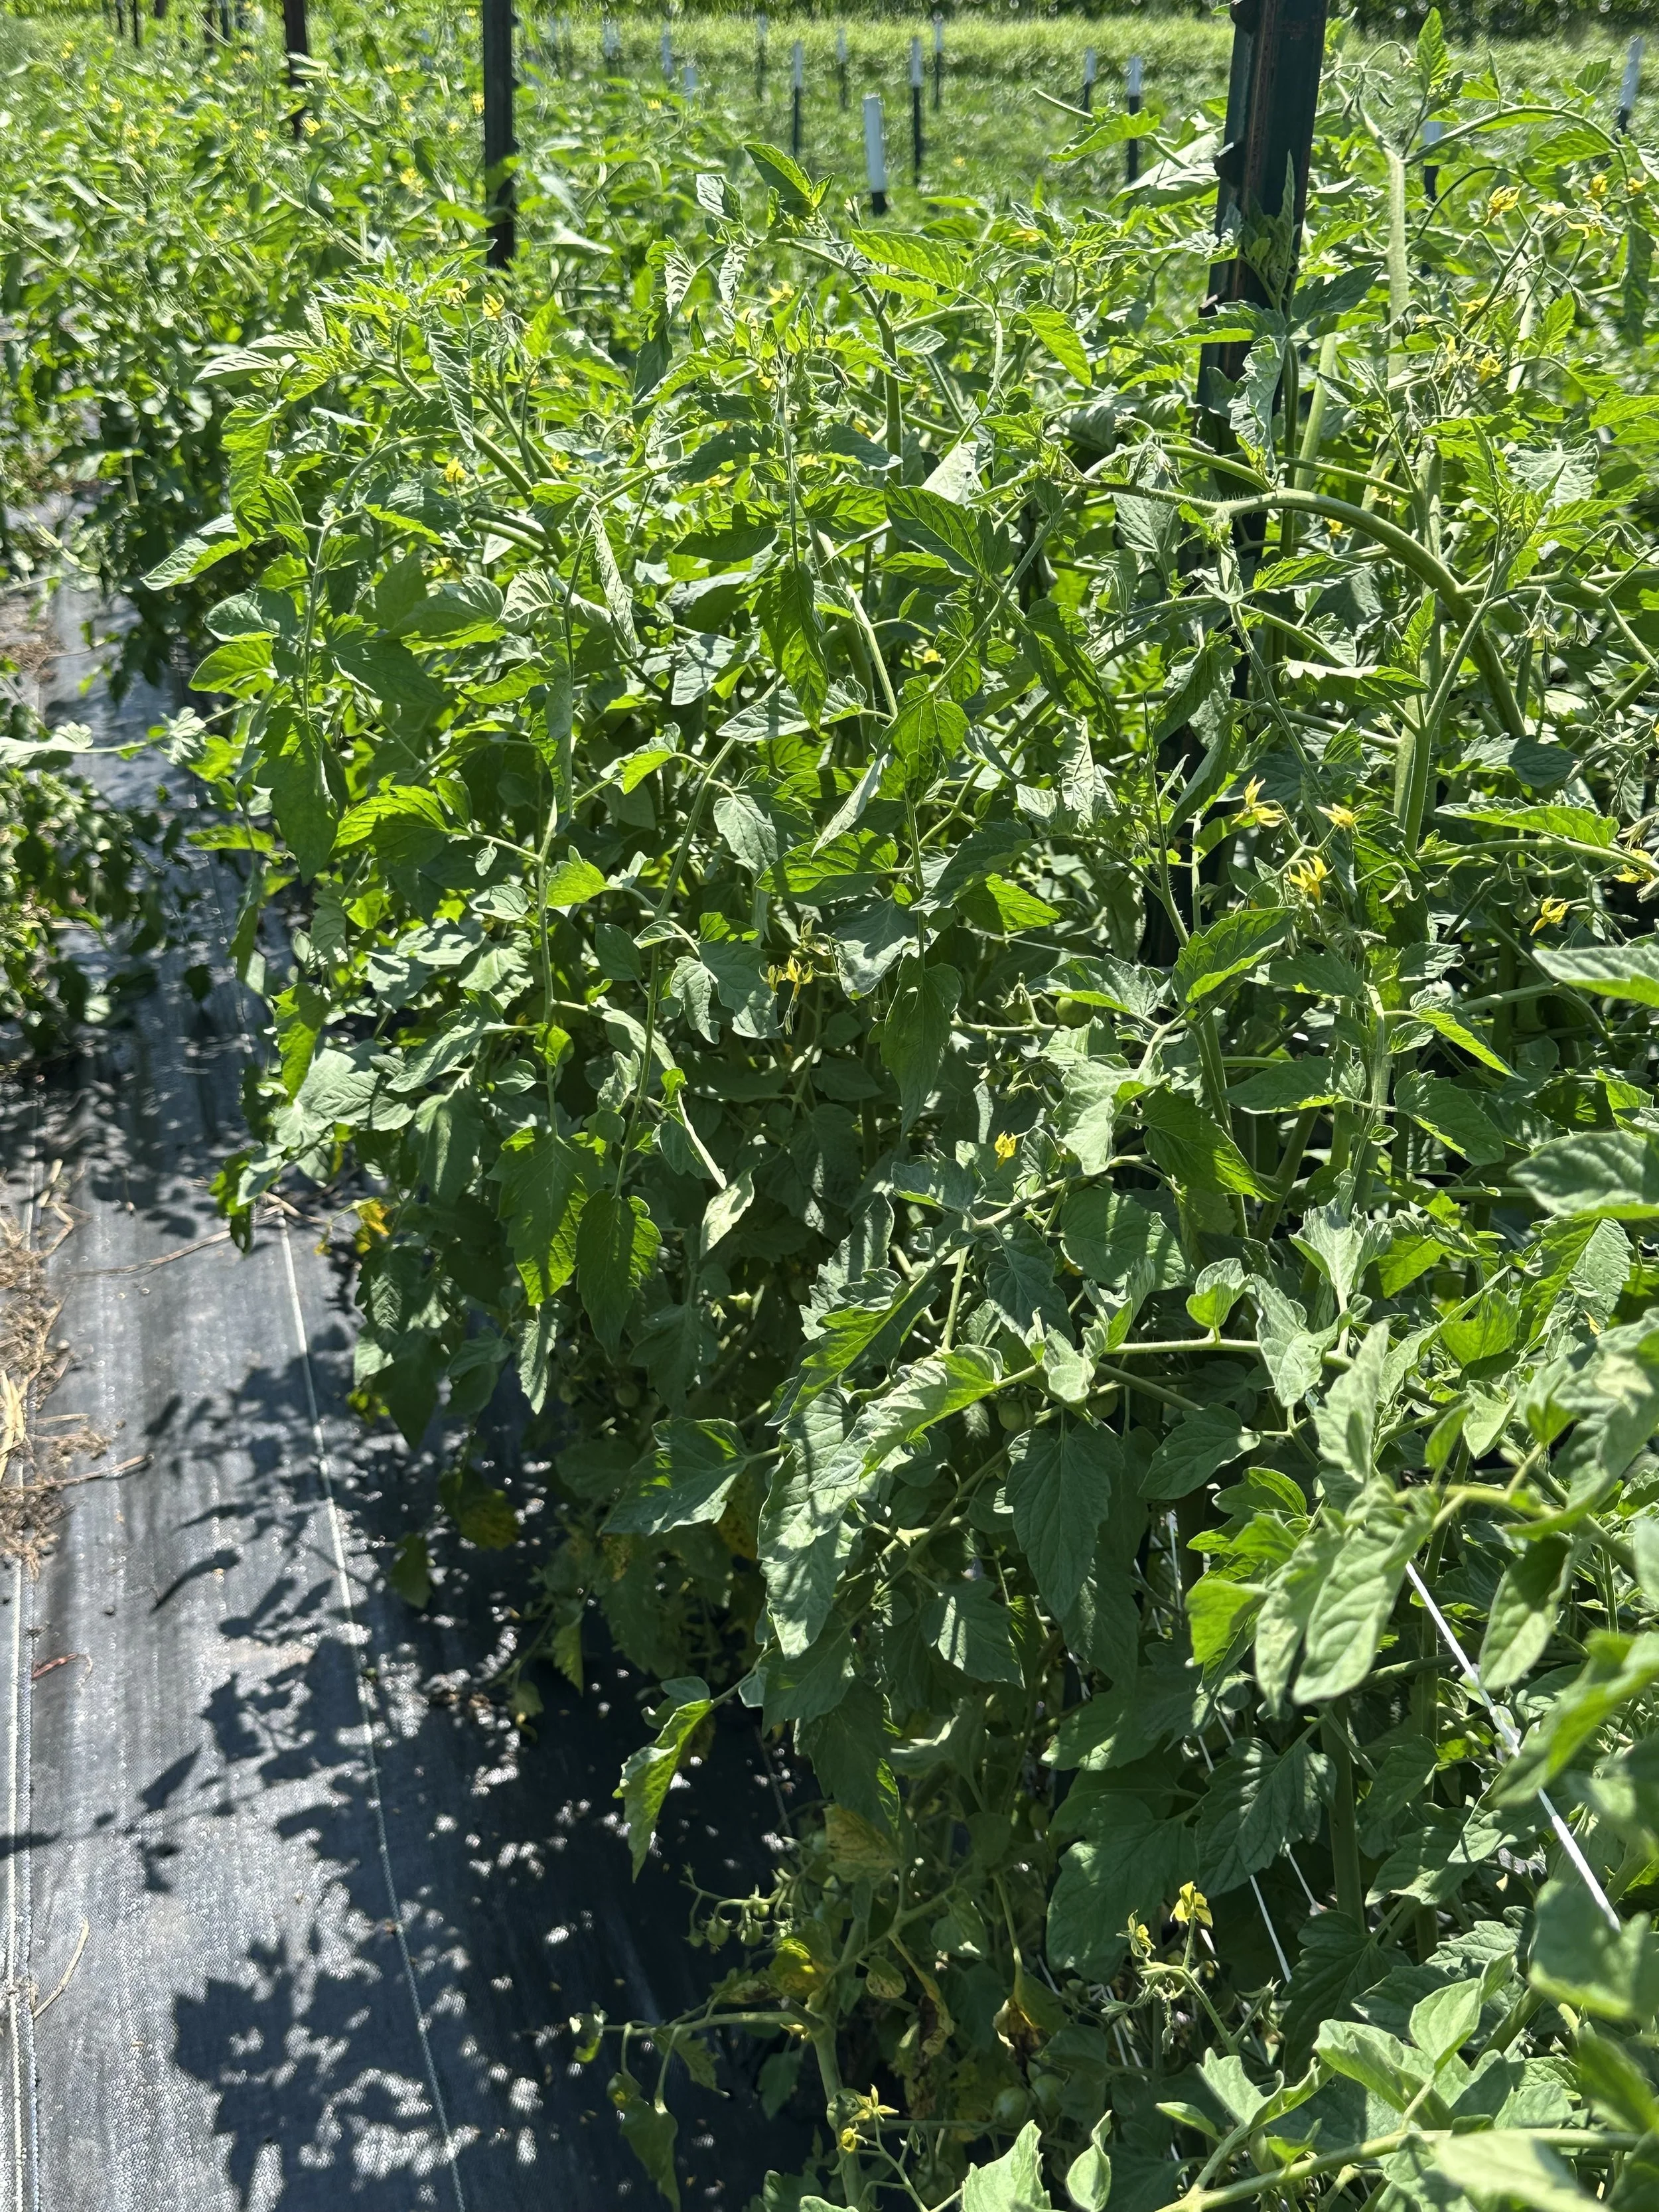
When you grow hundreds of tomato plants you need a plan to manage them. There are numerous ways to manage tomatoes using cages, wires, cattle panels, doing nothing at all, and many more I’ve never dreamed of. For us, we wanted a system that was not labor intensive or equipment intensive, could scale easily and could be taught easily. We also wanted a system that would help keep good airflow to reduce disease pressure. Basket weaving (also called Florida weaving) is our management method of choice. Here’s how it works.
Basket weaving is a system that uses t-posts and twine to “weave” around the tomato plants to create a support system as the tomatoes grow. T-posts are pounded in early in the season with 3-4 tomato plants between each post. Then, every 7-10 days after the tomatoes have established we weave twine around the tomato plants and t-posts. The first rounds of weaving are done alternating each side of the tomato plant. Left side on the first one, right side on the second, left side on the third, and so on. We then repeat the pattern on the opposite side of each tomato. Once the tomatoes get big and bushy we just weave around the t-posts and skip alternating around the individual plants. We do this until we reach the top of the t-posts then the tomatoes are on their own!
Why go through all of that work you might ask. The main reason is to provide ample airflow for the tomatoes to reduce disease pressure. Other benefits include easier harvesting, keeping fruit off the ground, more space for walking/harvest totes, and easier to spot fruit.

Our field tomatoes!
Close up the the white twine we use to support our tomatoes.
Note the room for air movement left and the white twine right.
Effective Cultivation
One of the biggest game changers on the farm was when we purchased our Tilmor PowerOx walk-behind cultivation tractor. Not only did it allow us to cover more ground more quickly and with less effort than a wheel hoe but it also opened the door to various kinds of mechanical cultivation. Together, this allowed us to get a much better handle on weeds allowing us to grow more crops and lowered the chances we’d loose a crop to weed pressure.
Below are a couple photos that illustrate the impact. The first photo shows some recently planted corn with tons of weeds - mostly purslane. The second photo is after making a cultivation pass with the PowerOx. You can see uprooted weeds, soil disturbed both in the row and between the row and a marked reduction in weeds. And that is the key. The goal isn’t 100% eradication but to reduce the weed population by 80-90%. Then, we can quickly come through and hand weed to clean up the rest.
It’s possible for mechanical cultivation to truly eradicate all weeds but it requires perfect conditions, perfect tool calibration and perfect timing.
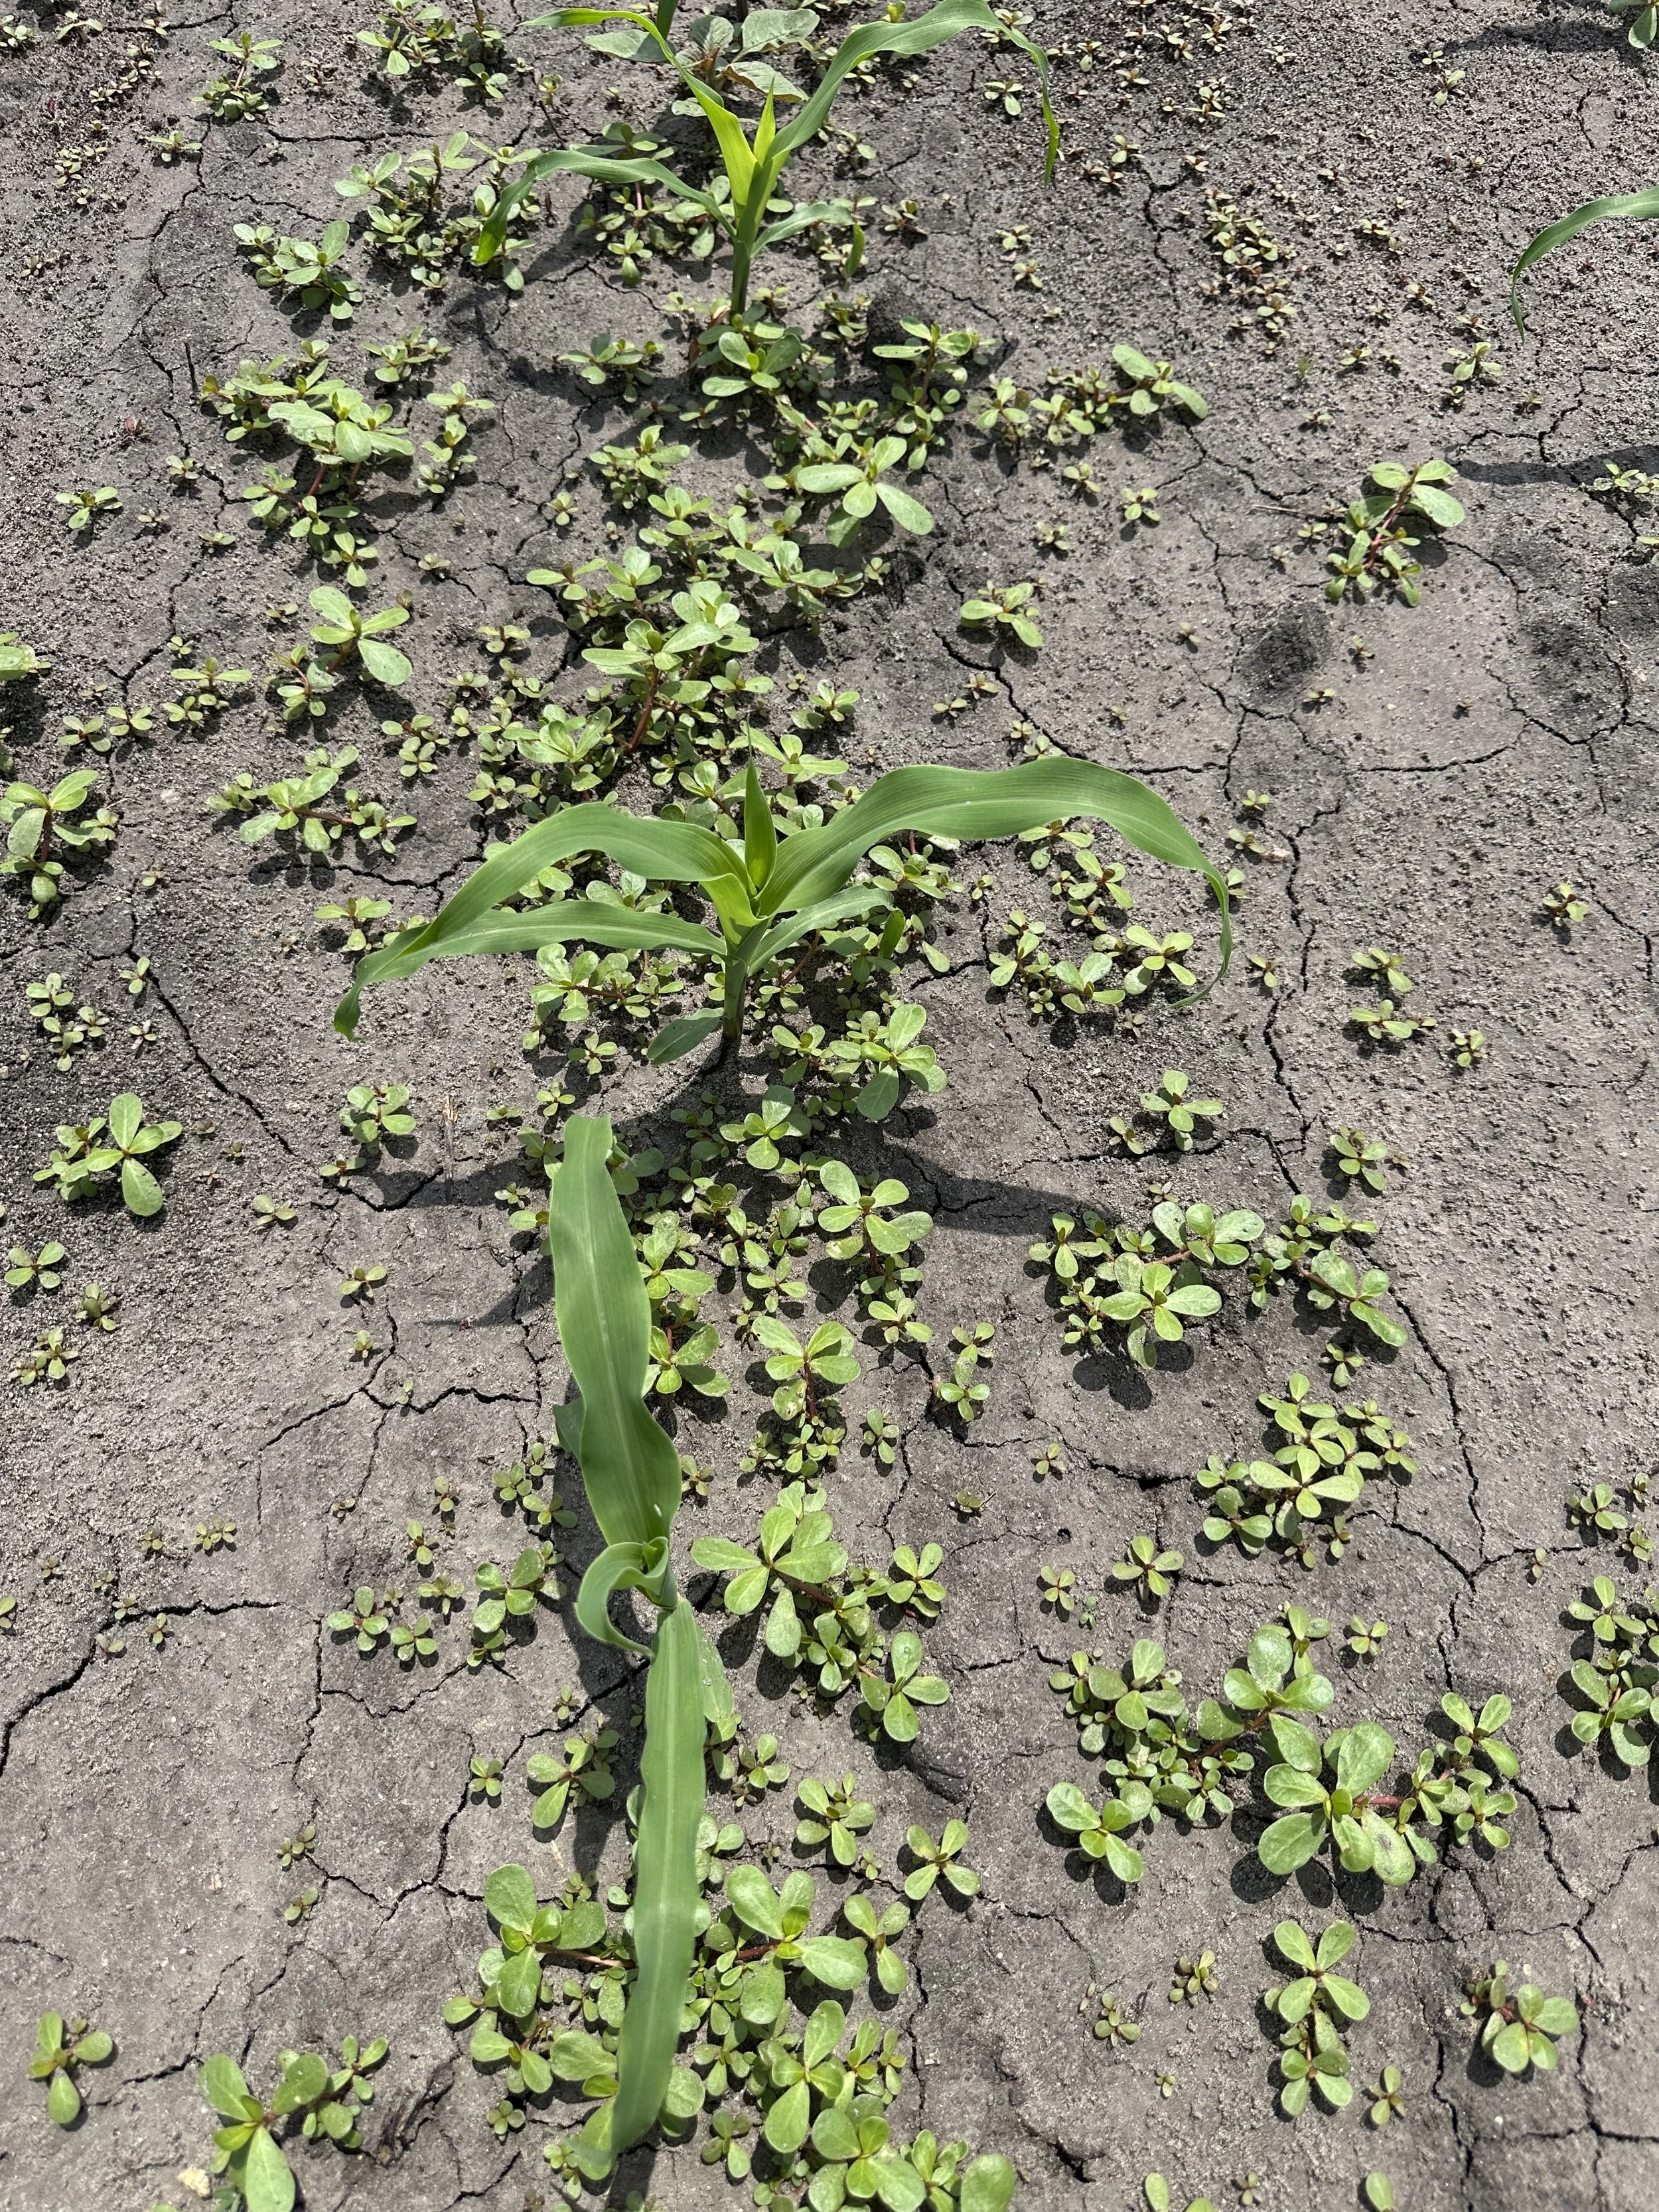
Before
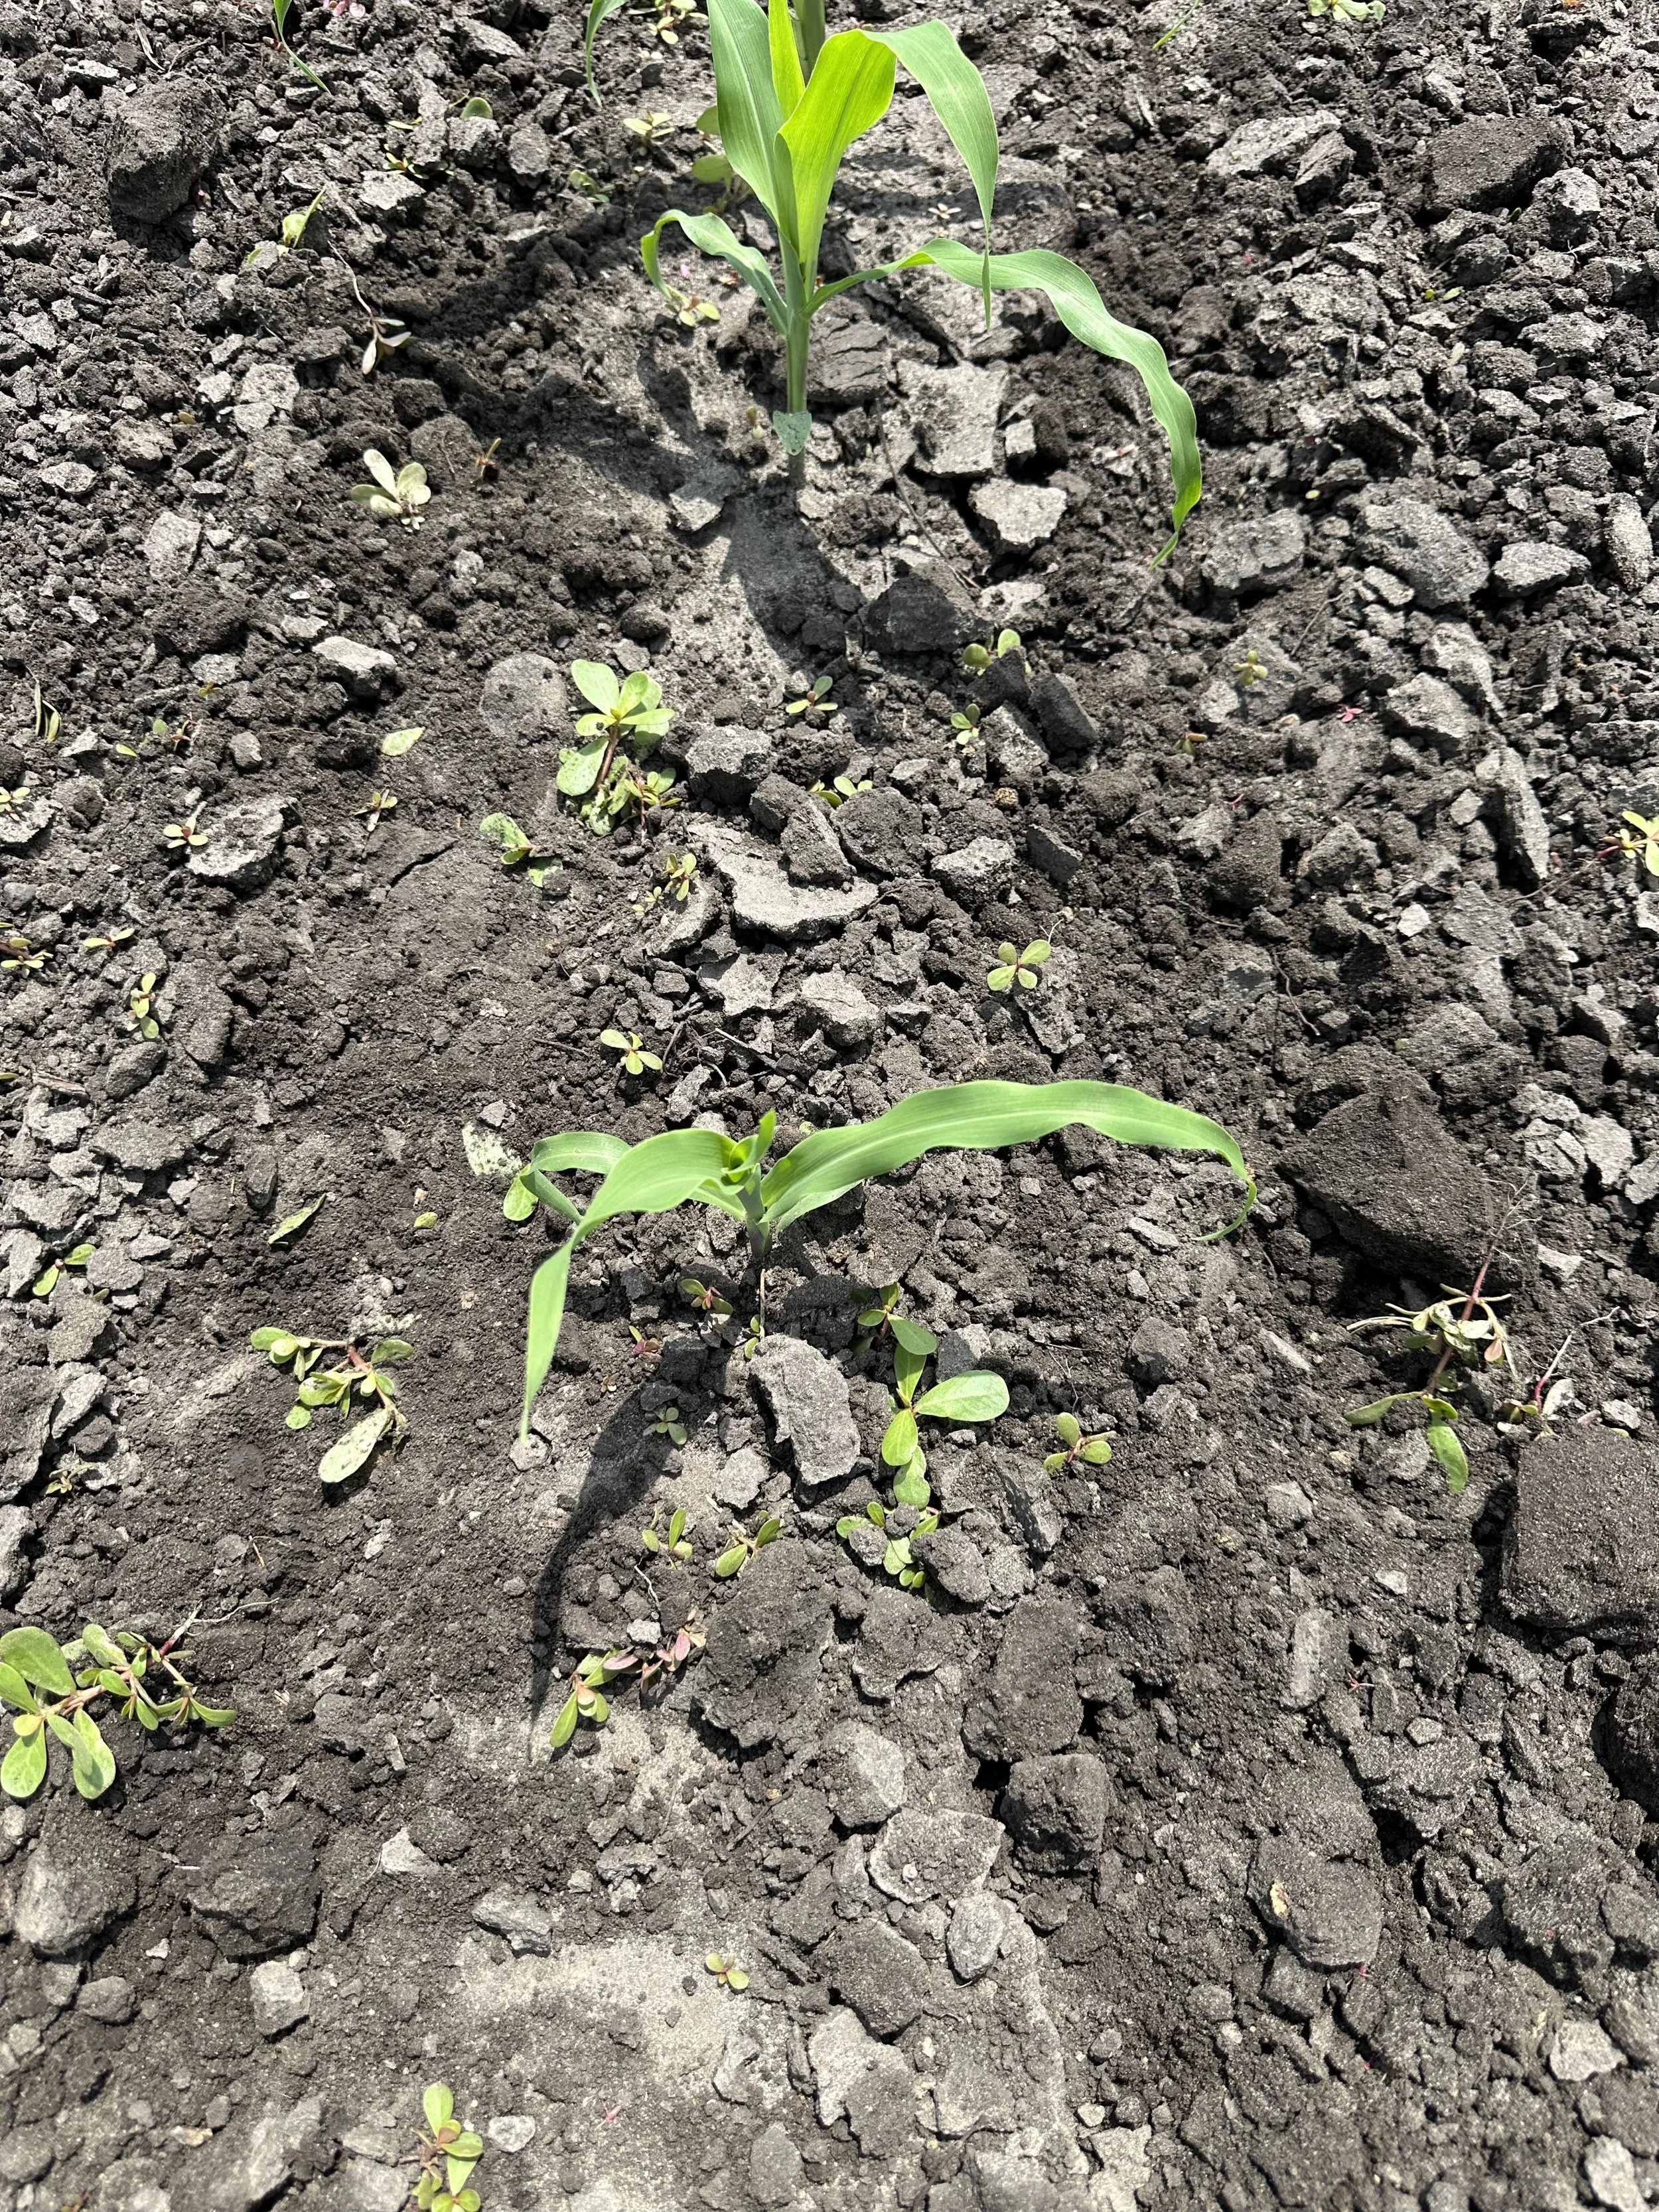
After!
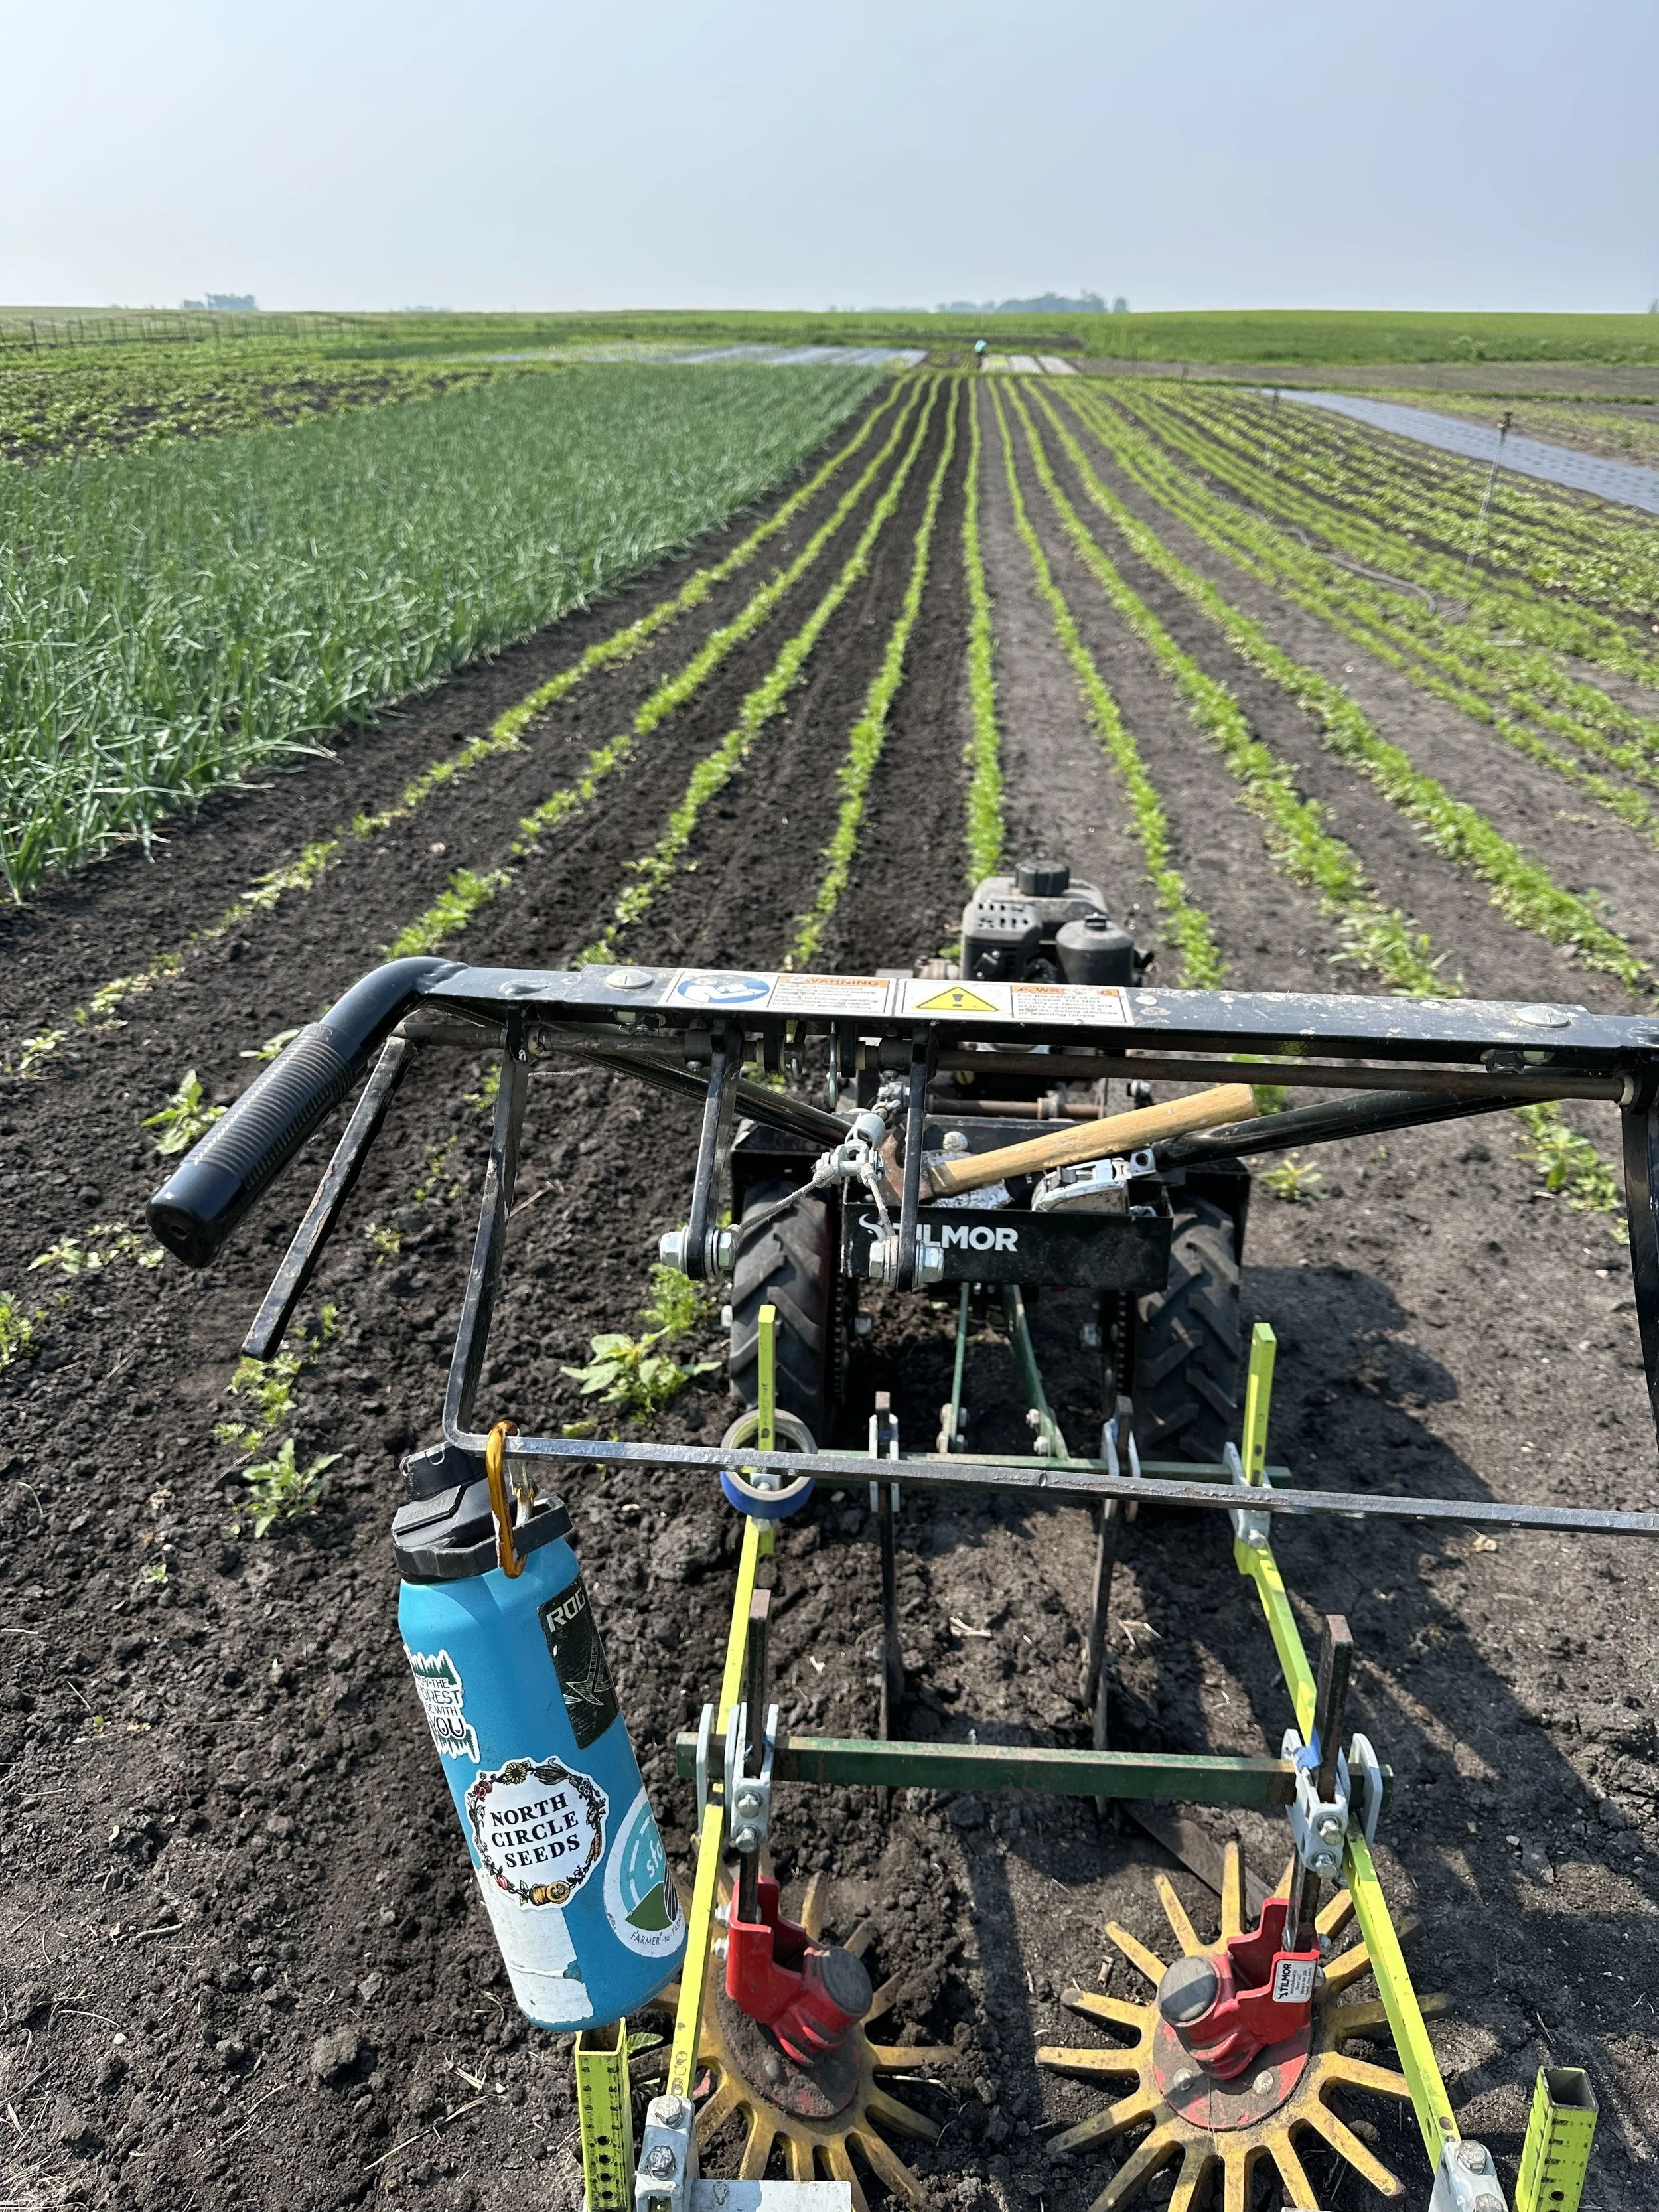
The PowerOx
Farmer Dan’s Vacation Prep
The week leading up to any vacation from the farm is an extra busy one. Not only do we have the usual harvesting, washing, packing, transplanting, weeding, crop care but I’m also anticipating everything that could get done a week early and trying to get that done too. It’s a lot and I thought it’d be interesting to go over my preparation steps in this weeks blog post.
A side note: my vacation to the boundary waters wilderness was excellent. Beautiful scenery, good weather, good company (the fishing was bad though!). Anyway, onto the vacation prep:
Weeds. This is the big one. A week is a long time for a weed to grow so I did everything I could to kill the weeds before I left. This meant a cultivation pass of the entire farm on Friday, flame weeding newly planted but not yet emerged carrots & beets, and tilling extremely weedy areas and harvested crop areas. The results were great: I’ve never left the farm looking so clean. We do have weeds but it wasn’t too bad.
Planting. As luck would have it there was only one item on my planting schedule to be planted last week. I decided to delay it a week.
Staff Notes & Notes for Lara. I chuckled at myself as I ended up typing up four pages of notes for Lara and my staff. These notes are the things inside my head that I just do every week. Monitoring the weather, monitoring the tunnels, payroll & HR things, crops that are coming into season, transplant list and where to transplant & so much more.
Emails. I had several emails that I wrote in advance and scheduled to send while I was away.
Now that I’m back I am so glad I worked extra hard to stay ahead of the weeds. We got around 3-4” of rain while I was gone and the weather and ground was not fit for weeding at all last week. Lara and my staff did great keeping things humming along last week and we didn’t have any major problems.

The farm before I left on vacation.
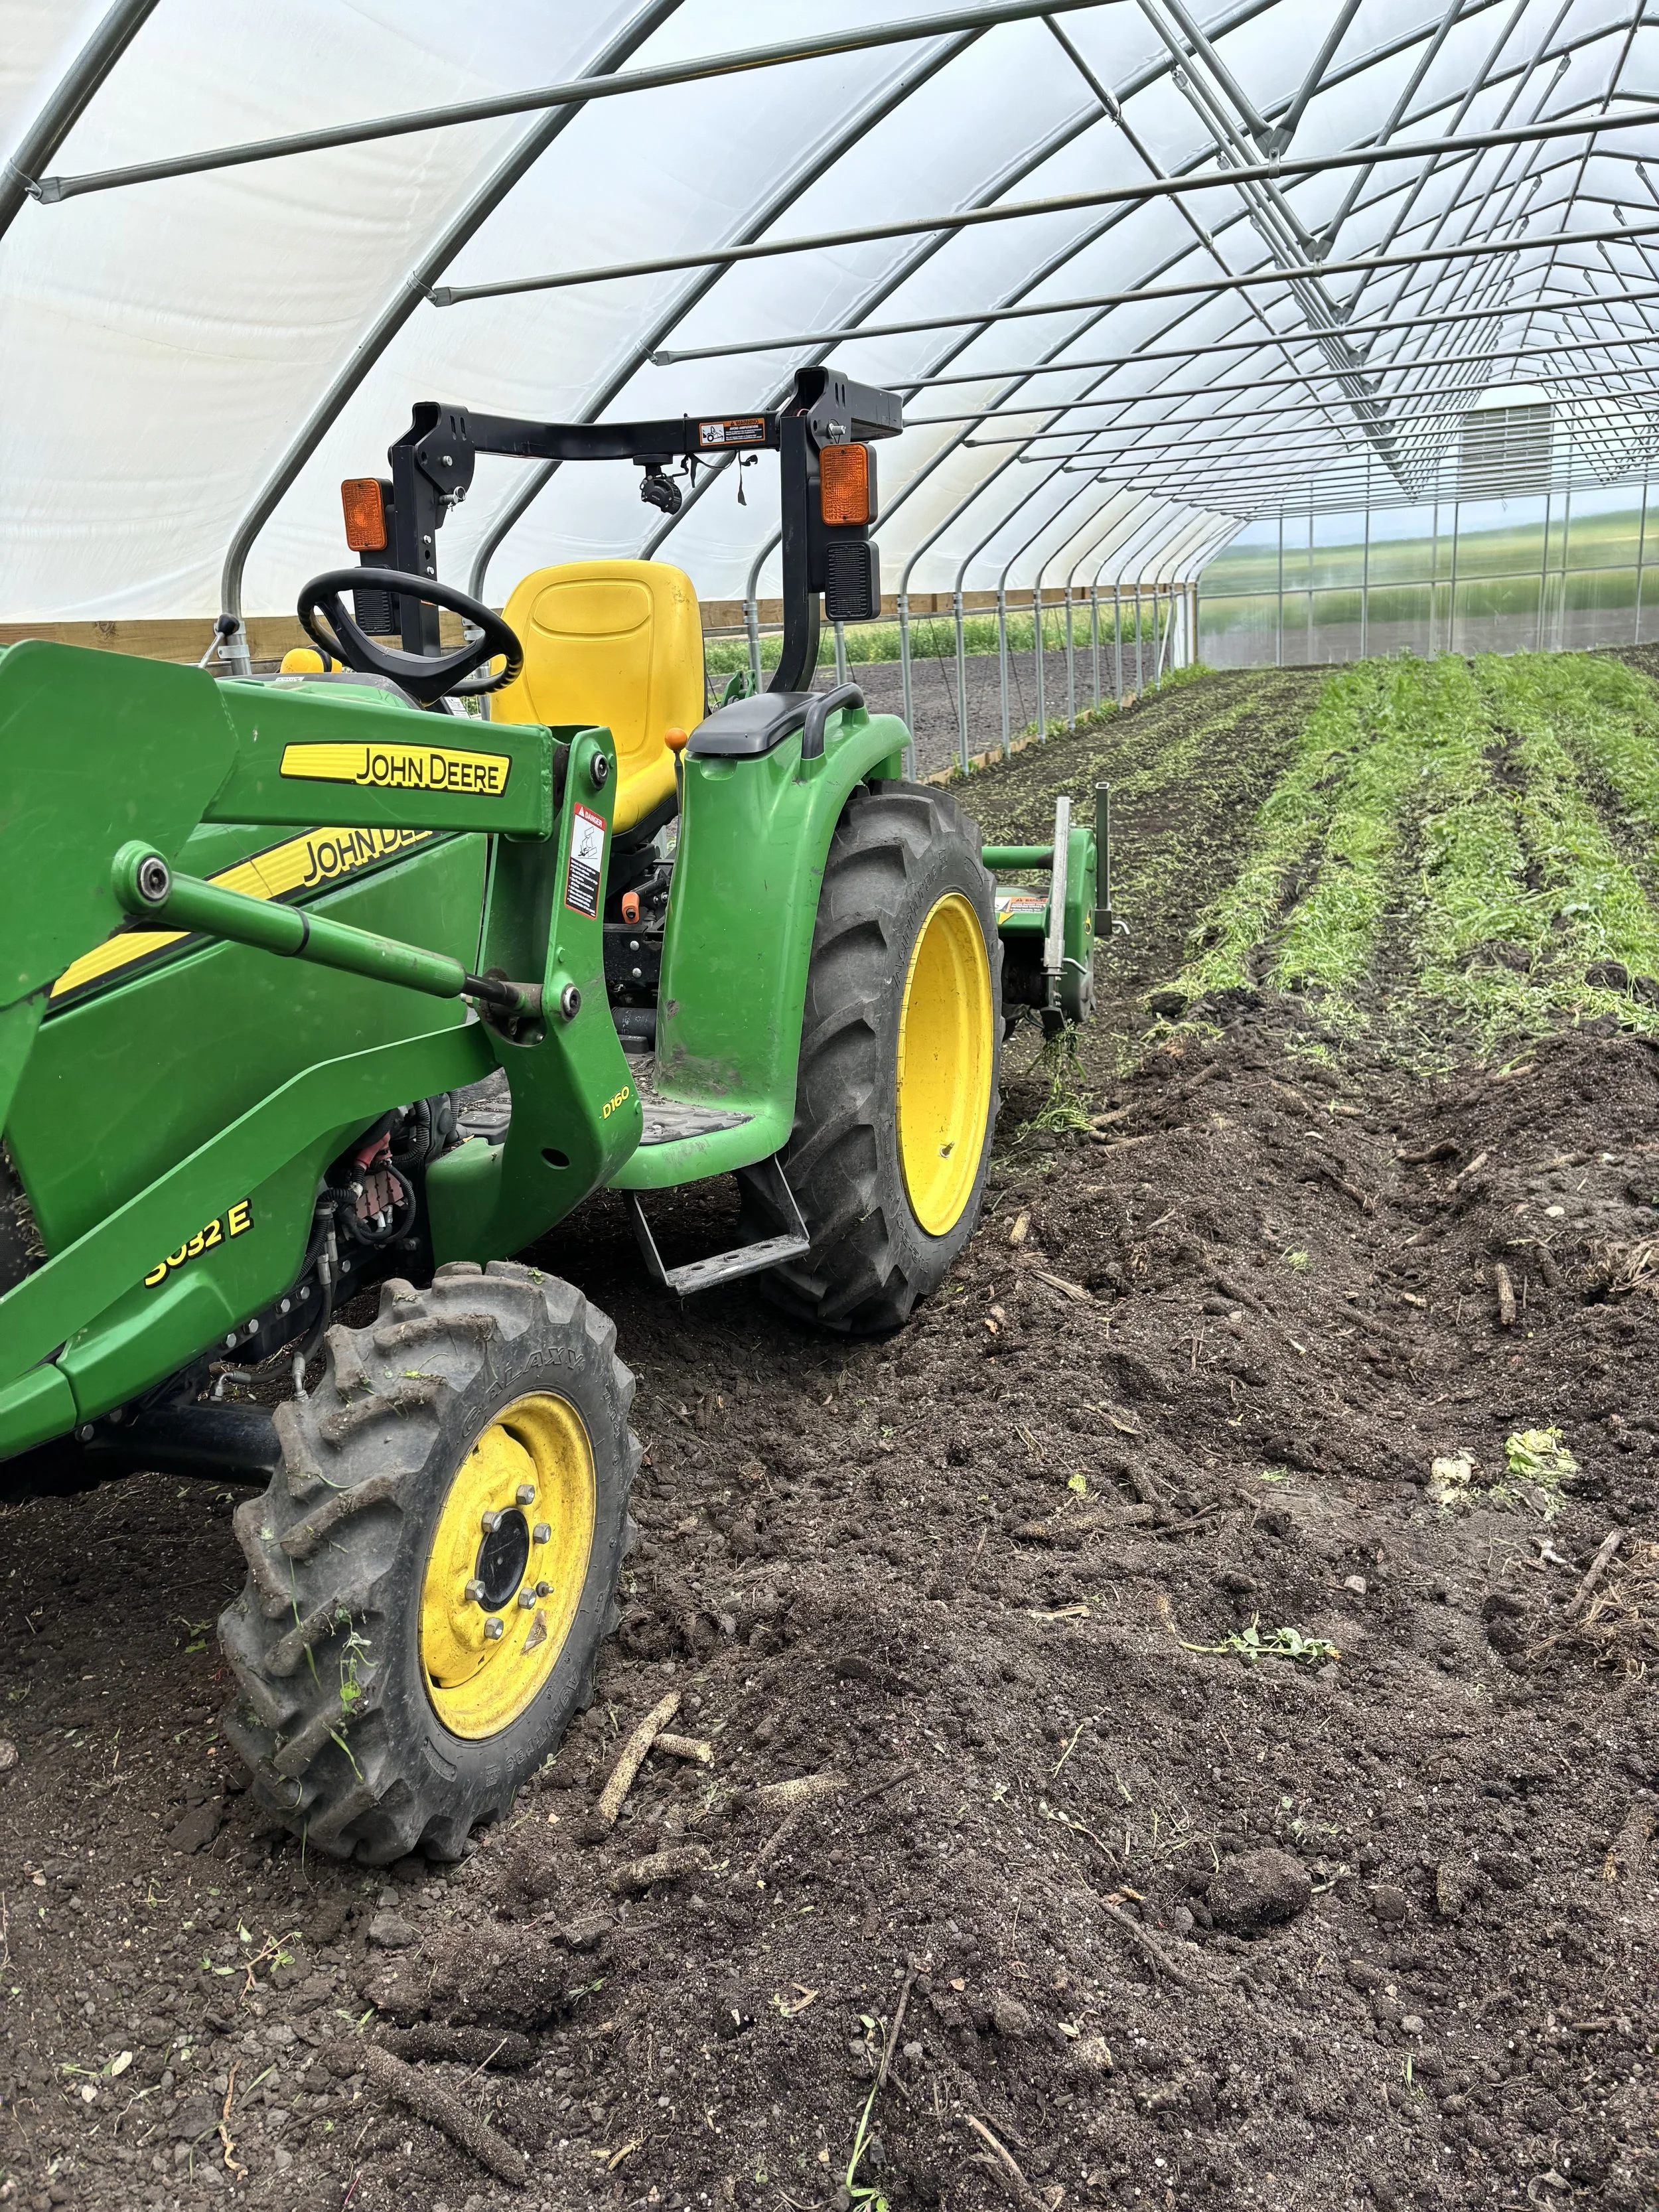
Preparing The Winter Tunnel
It was an exciting day on the farm yesterday as we began preparing the beds inside our new winter tunnel for its first crops. These initial steps are critical to ensuring we get reliable harvests year after year. Today’s blog post will go over some of the preparation steps we’ve taken and some of the supplies and tools we need to complete the tunnel.
Preparing the beds within the tunnel for crops is the most important step and there were several factors contributing to how we approached this initial setup. First, we knew on one end of the tunnel that the soil was extremely compacted from tractor and gator traffic before the tunnel was constructed. We used a subsoiler and applied a very generous layer of compost on top to both break up compaction and add in some very high organic matter that will help loosen compaction over time.
Our spring cover crop didn’t come in as well as we would have liked and we had a lot of weeds poking through. We decided to use our roto-tiller to terminate the weeds and cover crop. Then we followed that with a bed shaper to make raised beds within the tunnel. We’ll leave the weeds lay for a a few days and then we may either till and reshape the beds or flameweed depending on our observations.
Once the beds are prepped we need some tunnel infrastructure to keep things alive. Of the highest importance is water: it doesn’t rain inside the tunnels! We will have both overhead and drip irrigation in our new tunnel. Depending on the time of year and crop that’s grown we use different irrigation techniques for the best plant health. We’ll also need power to our tunnel. Not only does it have a blower for the 2 layers of plastic but it has automatic, thermostatically controlled louvers and will have a thermostat, heater and blower for winter crops. We’re securing quotes for electrical connections in the tunnel so if you’re an electrician let us know!
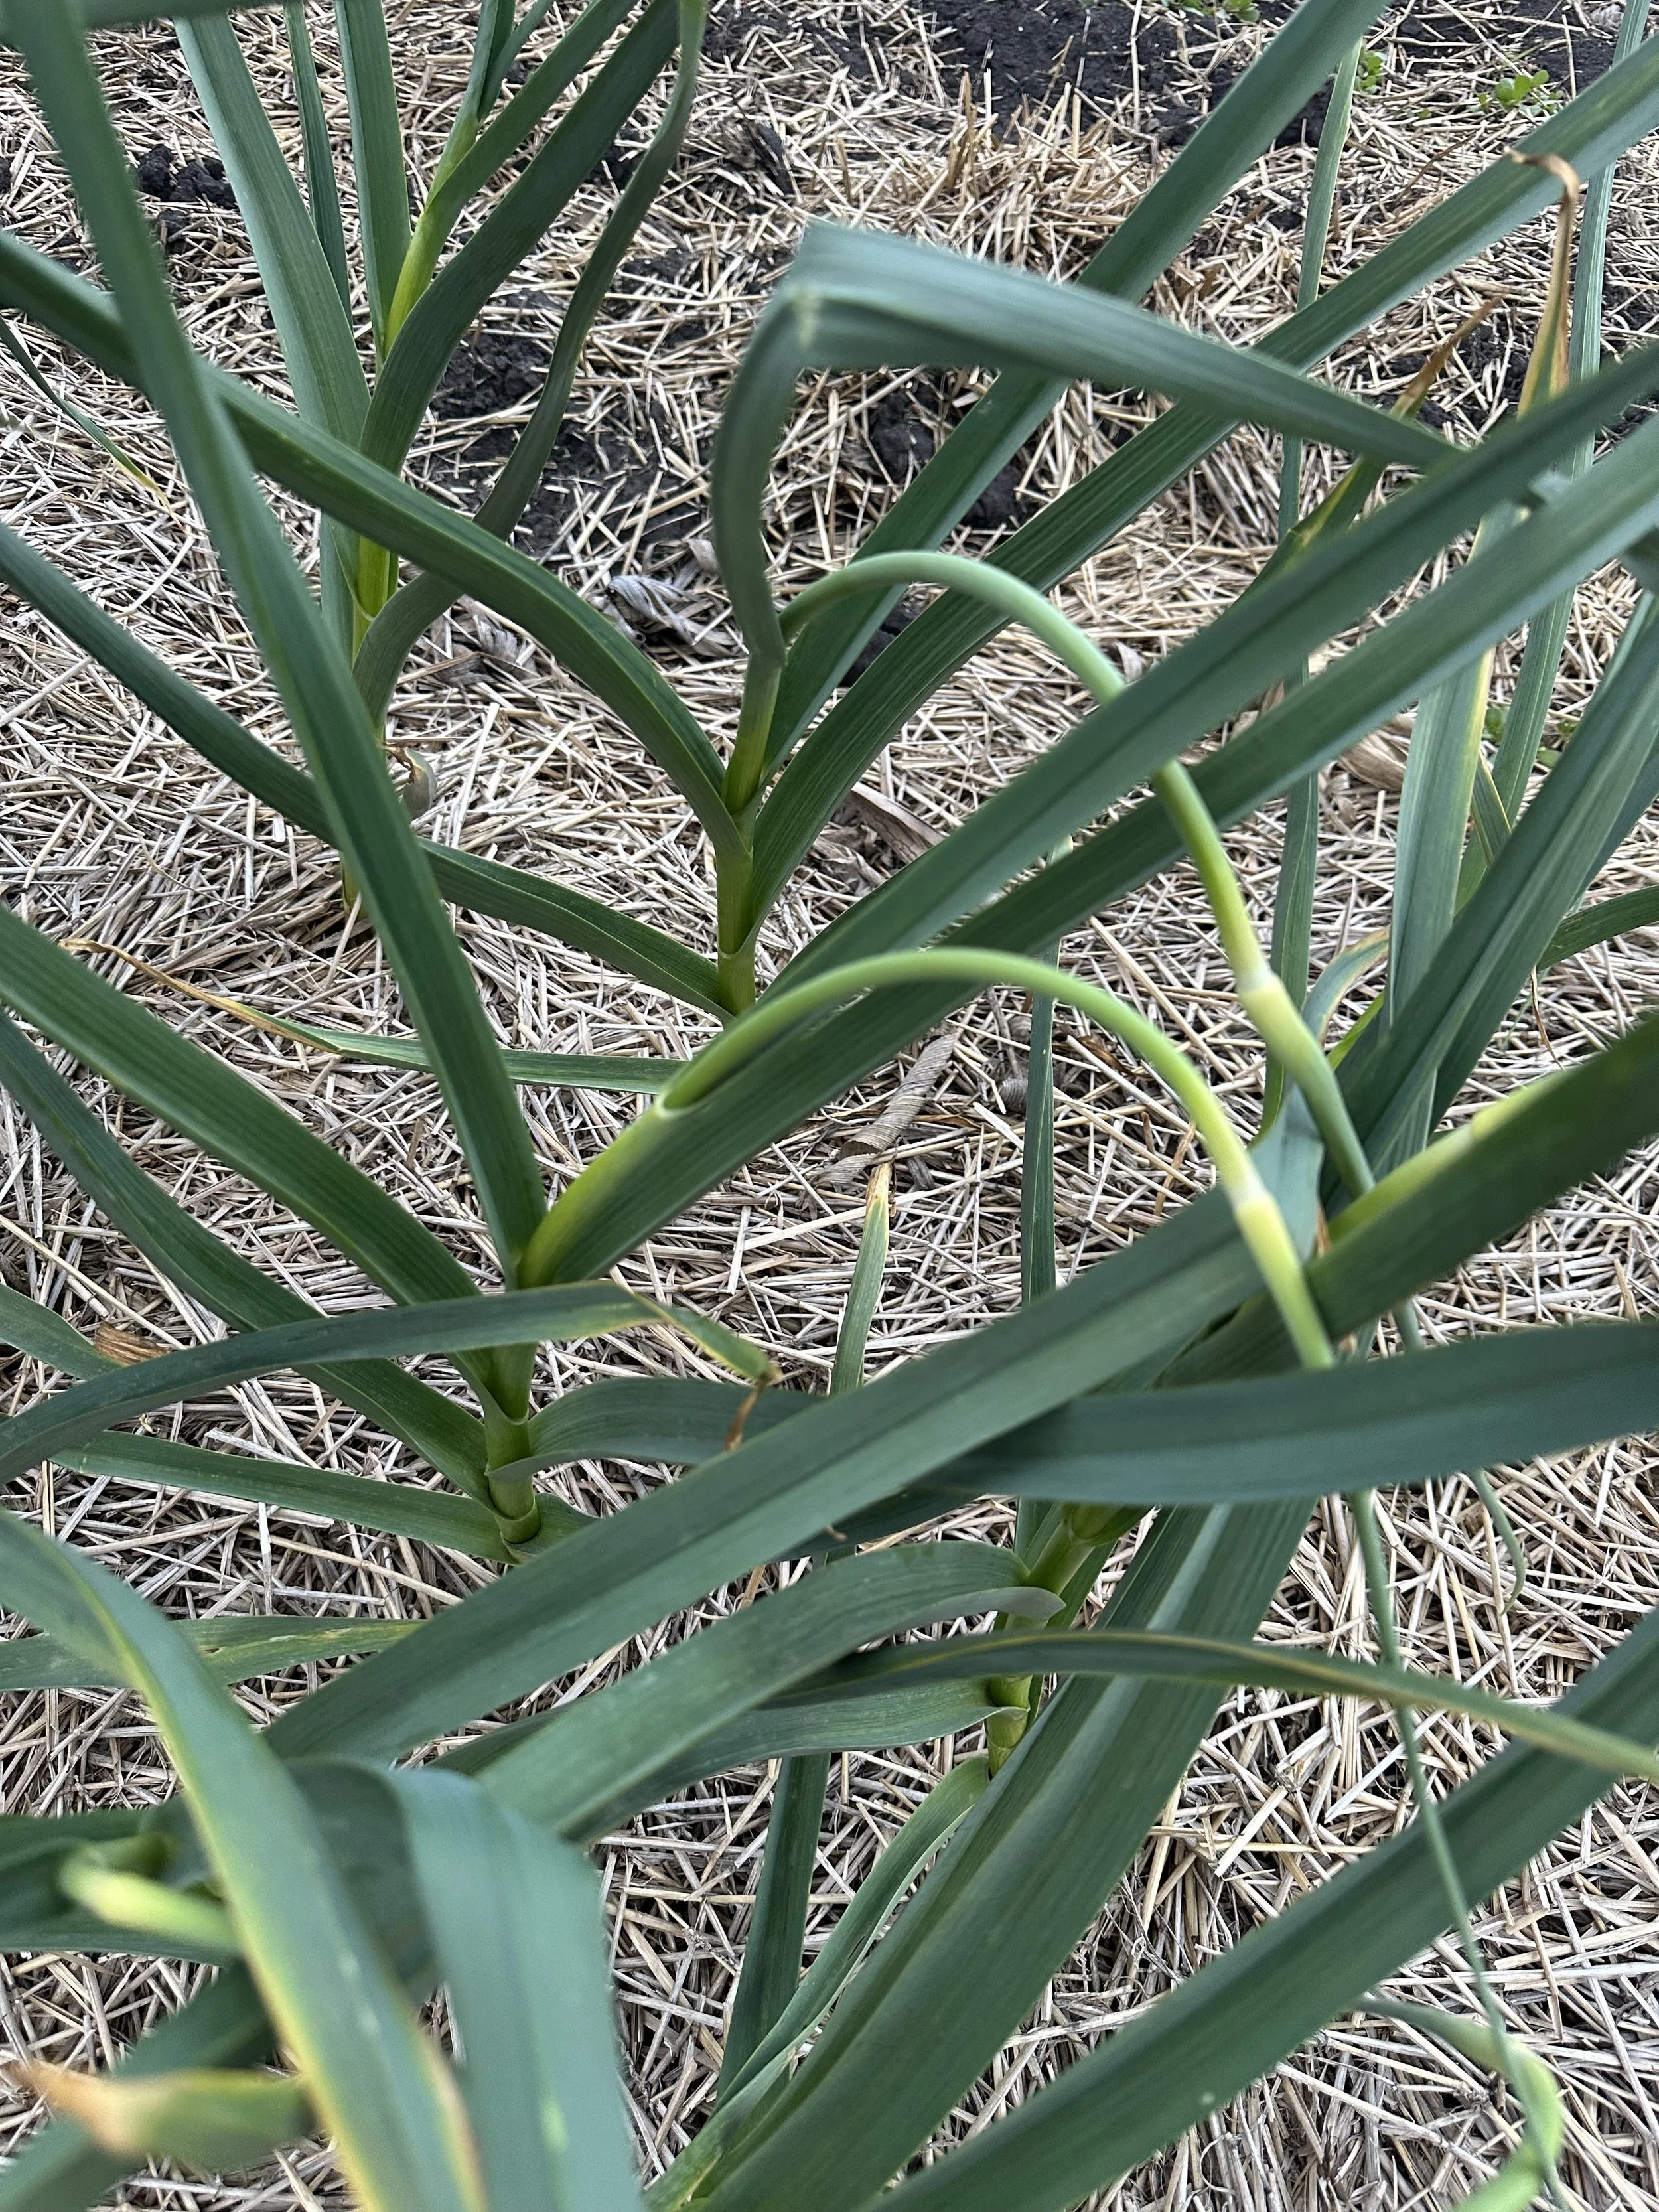
Garlic Scapes: A Hidden Treasure of Market Farms
What is a garlic scape? A garlic scape is the flower stem of the garlic plant. They typically are in season in the second half of June and only for a couple weeks. Each garlic plant only produces one scape so the supply is limited, the shelf life is short (compared to garlic), and since they’re bunched you need several plants worth of scapes to make a bunch.
The flavor profile of garlic scapes is mild to medium garlic flavor raw and very mild to nearly sweet when cooked or grilled. They have a cooked texture similar to asparagus though they are quite different in flavor.
Two of our favorite things to do with garlic scapes here at the Zimmerli household are to toss them in olive oil grill them until they’re slightly tender 3-5 minutes. We serve these as a vegetable side dish. Another favorite is garlic scape pesto. This is great as a pizza base or in pastas amongst many other uses. Below are the ingredients & instructions.
Look for garlic scapes on our farm store, in CSA shares and on our market stand in the next few weeks and stock up while you can!
Ingredients
2 bunches garlic scapes
1/2 cup basil leaves
1/4 cup sunflower seeds
1/2 cup olive oil
1/4 cup Parmesan
1 lemon, juiced
Instructions
Roughly chop scapes and then pulse in food processor for 30 seconds.
Add sunflower seeds and pulse for additional 30 seconds. Scrape down sides of bowl.
Add olive oil and process on high for 15 seconds.
Add Parmesan cheese and pulse until combined.
Add basil and lemon juice and process to desired consistency.
Salt to taste.
Why Cover Crops Are Important: 2026 Revision
Farming in a sustainable and earth friendly manner is one of our primary farming values on our farm. We seek to not only maintain but improve the land we farm on over time. In the grand scheme of things, the time we spend farming this land is pretty small and we want the next generation of farmers to be able to succeed. Not only that but we also want to protect the soil, air and water so that our farming footprint stays confined to the acres we farm. One of the key ways we work towards this goal is by planting cover crops. Today we’ll go over why cover crops are important and what cover crops we plant on our farm.
First, we should define what a cover crop is. For us, a cover crop is a crop that we plant whose primary purpose is to improve our land. Further, a cover crop is not planted with intent to harvest and sell a product.
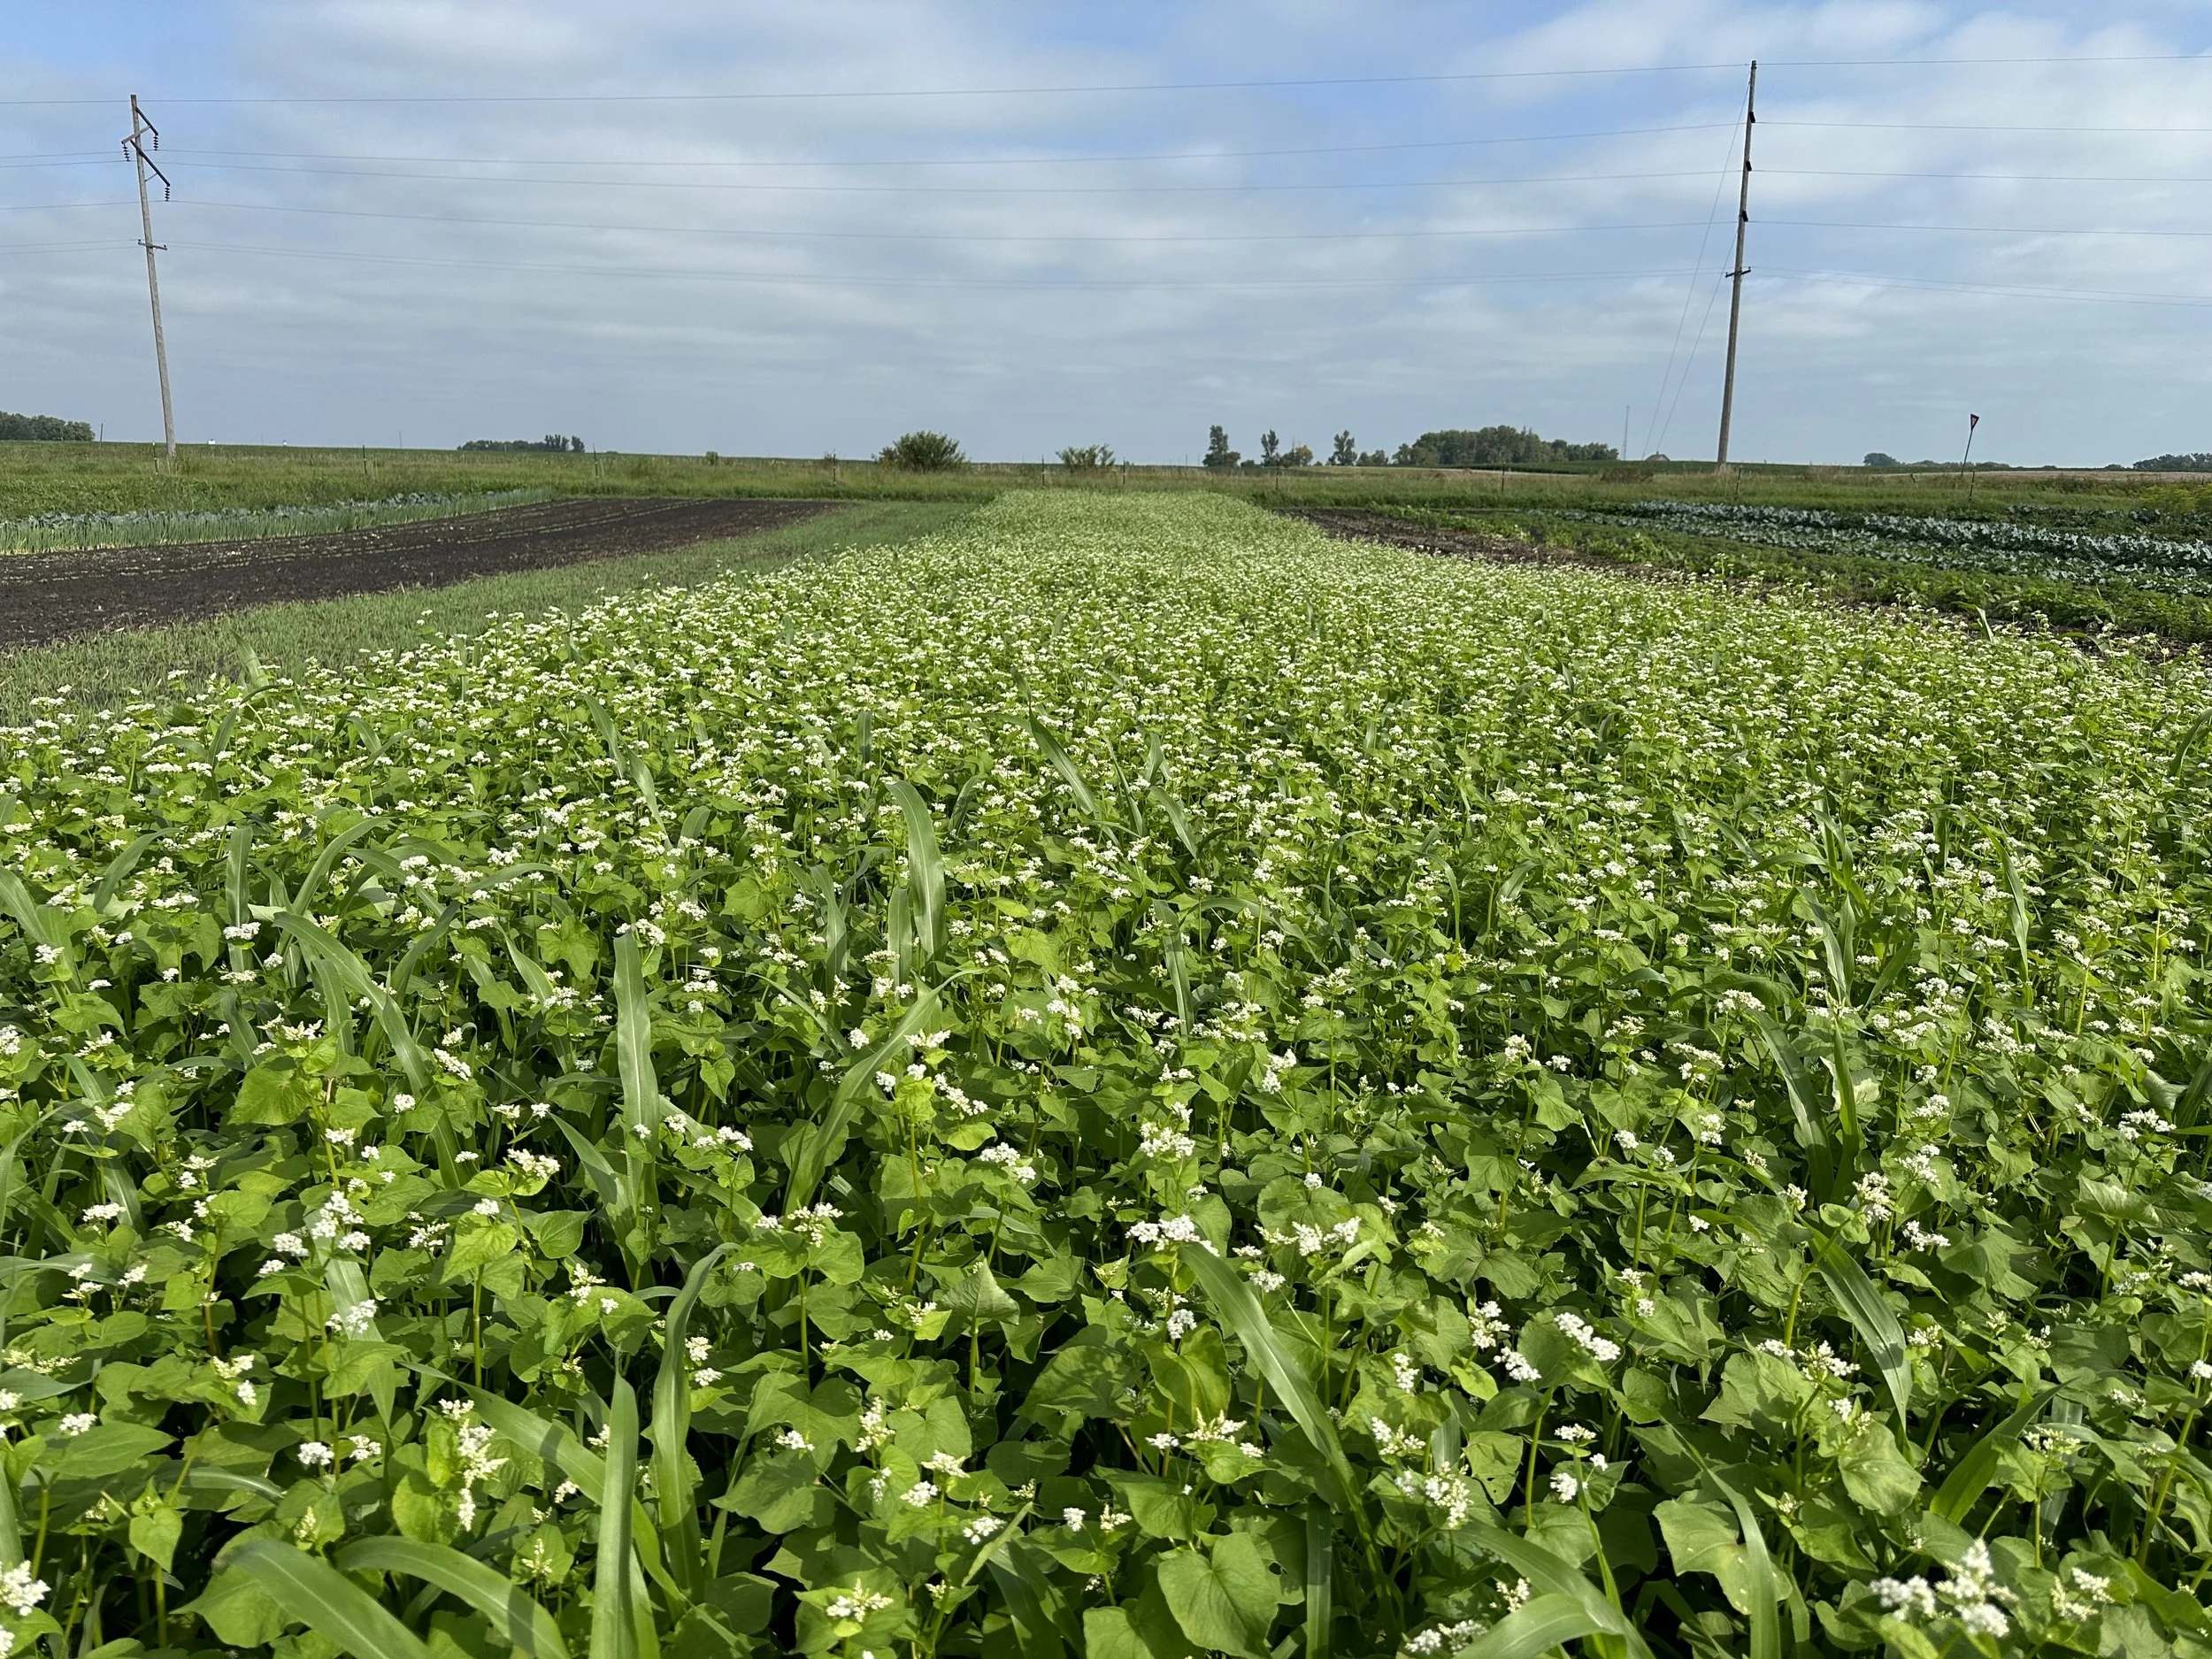
Our summer cover crop mix. The plants with white flowers are buckwheat. The long slender leaves that resemble corn are millet.
Cover crops serve a variety of purposes on our farms and many farms in general. Their benefits include reducing soil erosion, suppressing weed growth, providing habitat for beneficial insects, and improving soil health. Our primary goals for our cover crop mixes are to suppress weed growth and improve soil health. That’s not to say the other benefits are not important - they are. It’s just that when we look at which cover crops to plant we are seeking to achieve those goals primarily and the other benefits secondarily.
We have two mixes of cover crops that we use on our farm to achieve the goals of improving soil health and suppressing weeds. In summer we plant a summer mix of cover crops. That is, crops that grow well in the heat of the summer. This mix includes species like buckwheat, soy beans, sun hemp, sun flowers, millet & more. In the fall we plant a mix of peas, oats & phacelia. These crops grow better in the cooler temperatures of fall and can grow later into the season than our summer mix. Our winter mix is capable of withstanding frosts.
To suppress weeds we seed our cover crops pretty densely and lightly incorporate the cover crop seeds into the soil. With a little rain the cover crop comes to life creating a thick mat of vegetation that crowds out weeds. In our experience, we’ve observed that the areas where we plant cover crops are generally much easier to weed the following season.
Cover crops improve soil health in a few primary ways. First, some cover crops like peas can pull nitrogen (a primary plant nutrient) out of the air and store it in the soil for future crops to use. Cover crops in general also contribute to soil organic matter which microorganisms in the soil feed on. These micro organisms then metabolize the cover crops and leave behind nutrients future crops can use.
Many of our cover crops also achieve our secondary goals of reducing soil erosion and providing beneficial insect habitat. Because we’re planting pretty densely and minimizing fallow ground by using cover crops we are reducing soil erosion. Additionally, buckwheat - one of our primary summer cover crops - flowers quickly and the bees love it. Buckwheat provides habitat and forage for the bees!
Cover crops are an important part of sustainability on our farm. We’re always looking for new species and new mixes of cover crops to help improve our soil and improve our farm!

Addie (about 2yrs old) and I sitting in our oats & peas cover crop mix!
Bugs: Friends or Foes?
When we see a new bug on the farm the first question I ask is “Is this bug a friend or a foe?” As I was pruning tomatoes yesterday I saw these little red bugs/eggs pictured below. A bug I haven’t seen before. To determine if this was the beginning of a problem or something else I used Google’s image search and found that these are predatory stink bug nymphs.
Typically, stink bugs are a pest but in this case this type of stink bug is beneficial. They will eat other bugs.
Can we take a moment to just consider how crazy it is that I can snap a photo as detailed as below, upload it to Google and have an answer back in seconds? My phone camera picked up details my eyes could barely make out like the spines around the tops of the brown eggs. The nymphs are about 1mm in diameter - so tiny! Crazy and amazing. I’m not the biggest fan of big tech but this was one very useful image search!
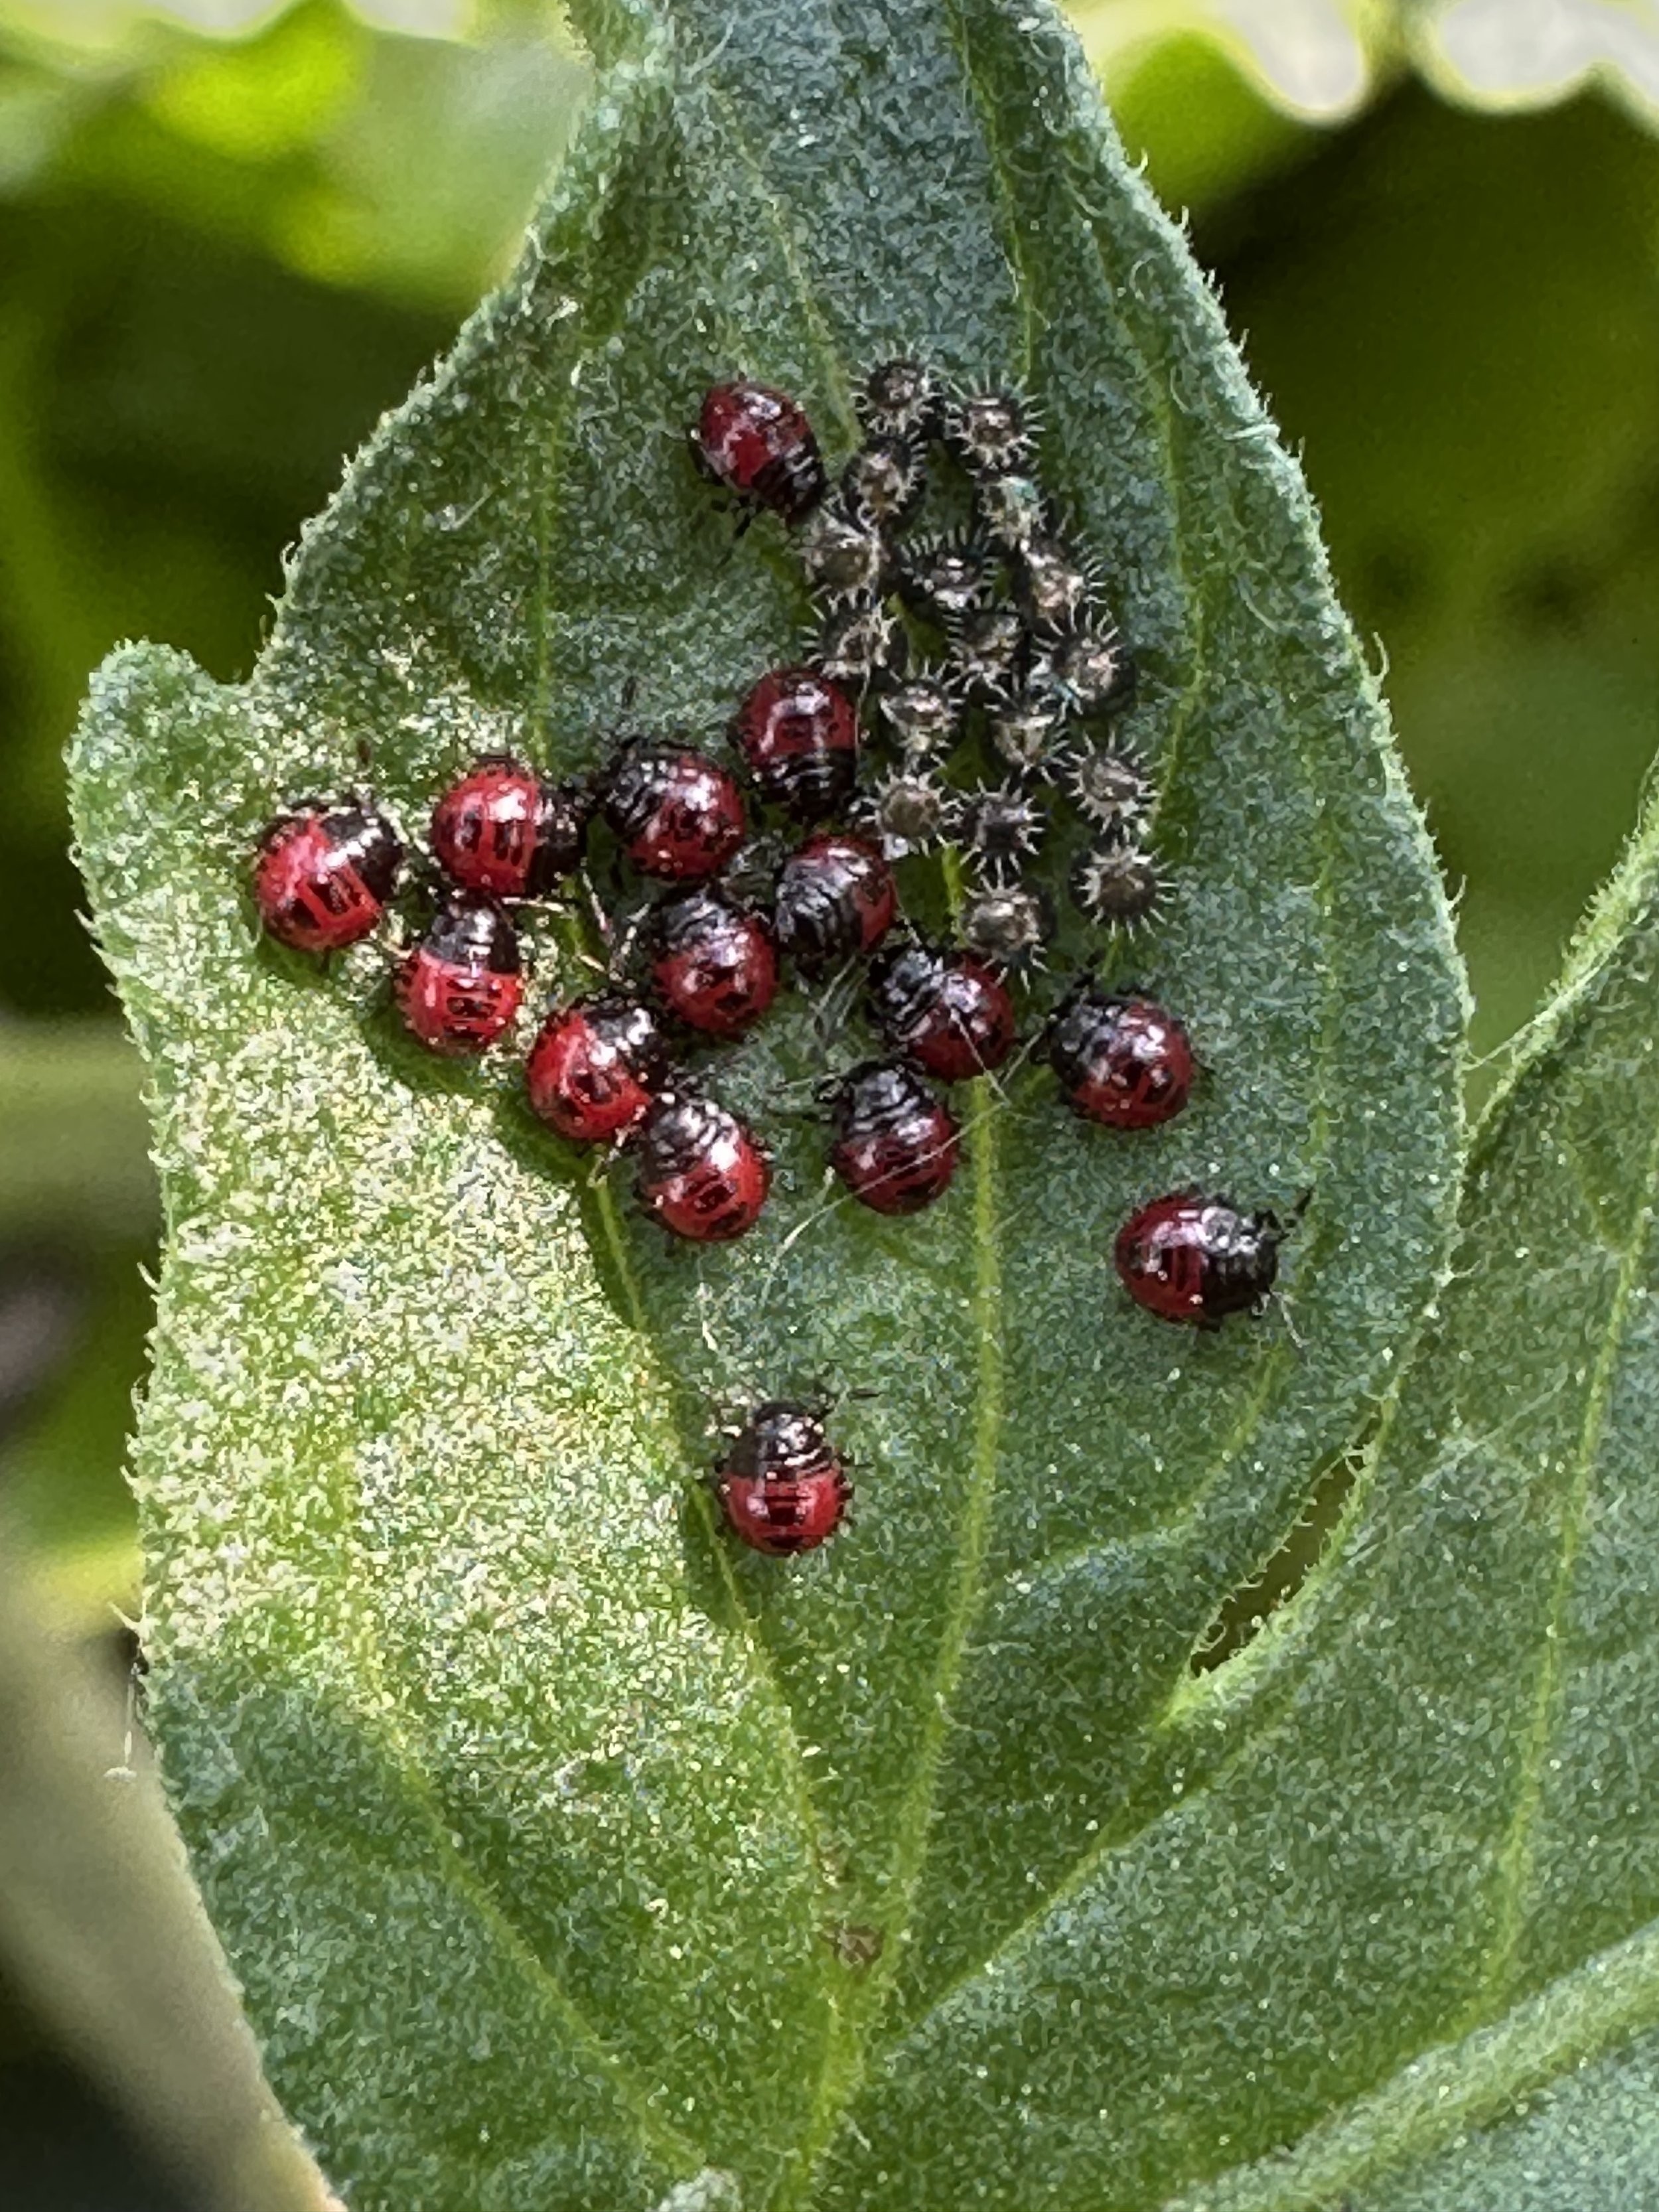
Predatory stink bug nymphs/eggs on a tomato leaf.
Weed Control 101 2026 Version
Weed control is something every farmer has to deal with. On our farm, we don’t spray chemicals on our crops or use pre emergent herbicides to control weeds which means we have to work really hard to control weeds on the farm. It doesn’t take long for weeds to get out of control and choke out the crops you’re trying to grow. Here’s how we do it.
Flameweeding
We use our flame weeder to burn small weeds just as they’re emerging from the soil and before our crops emerge. Because many weeds will germinate and sprout before our crops come out of the soil we can give our crops a head start by burning the weeds off. It’s been an effective tool for us especially in carrots and cilantro which have relatively long germination periods.

Our flame weeder.
Finger Weeding
No, not your fingers (although we do hand weed too). Finger weeders are discs with polyurethane “fingers” that spin and flick weeds out of the soil when they are young and vulnerable. This tools works particularly well on transplanted crops where the crop is vastly bigger than the weeds. This tool is highly adjustable and customizable for the varying crop stages we use it in. While the adjustments do take time, it’s very satisfying when it works perfectly!

Finger weeders in yellow. Notice how the fingers penetrate into the soil in the row.
Tine Weeding
Tine weeding is a type of blind cultivation - that is, cultivation that is “blind” to the crop rows - that uses many small wires that vibrate in the soil and help to uproot very small weeds.
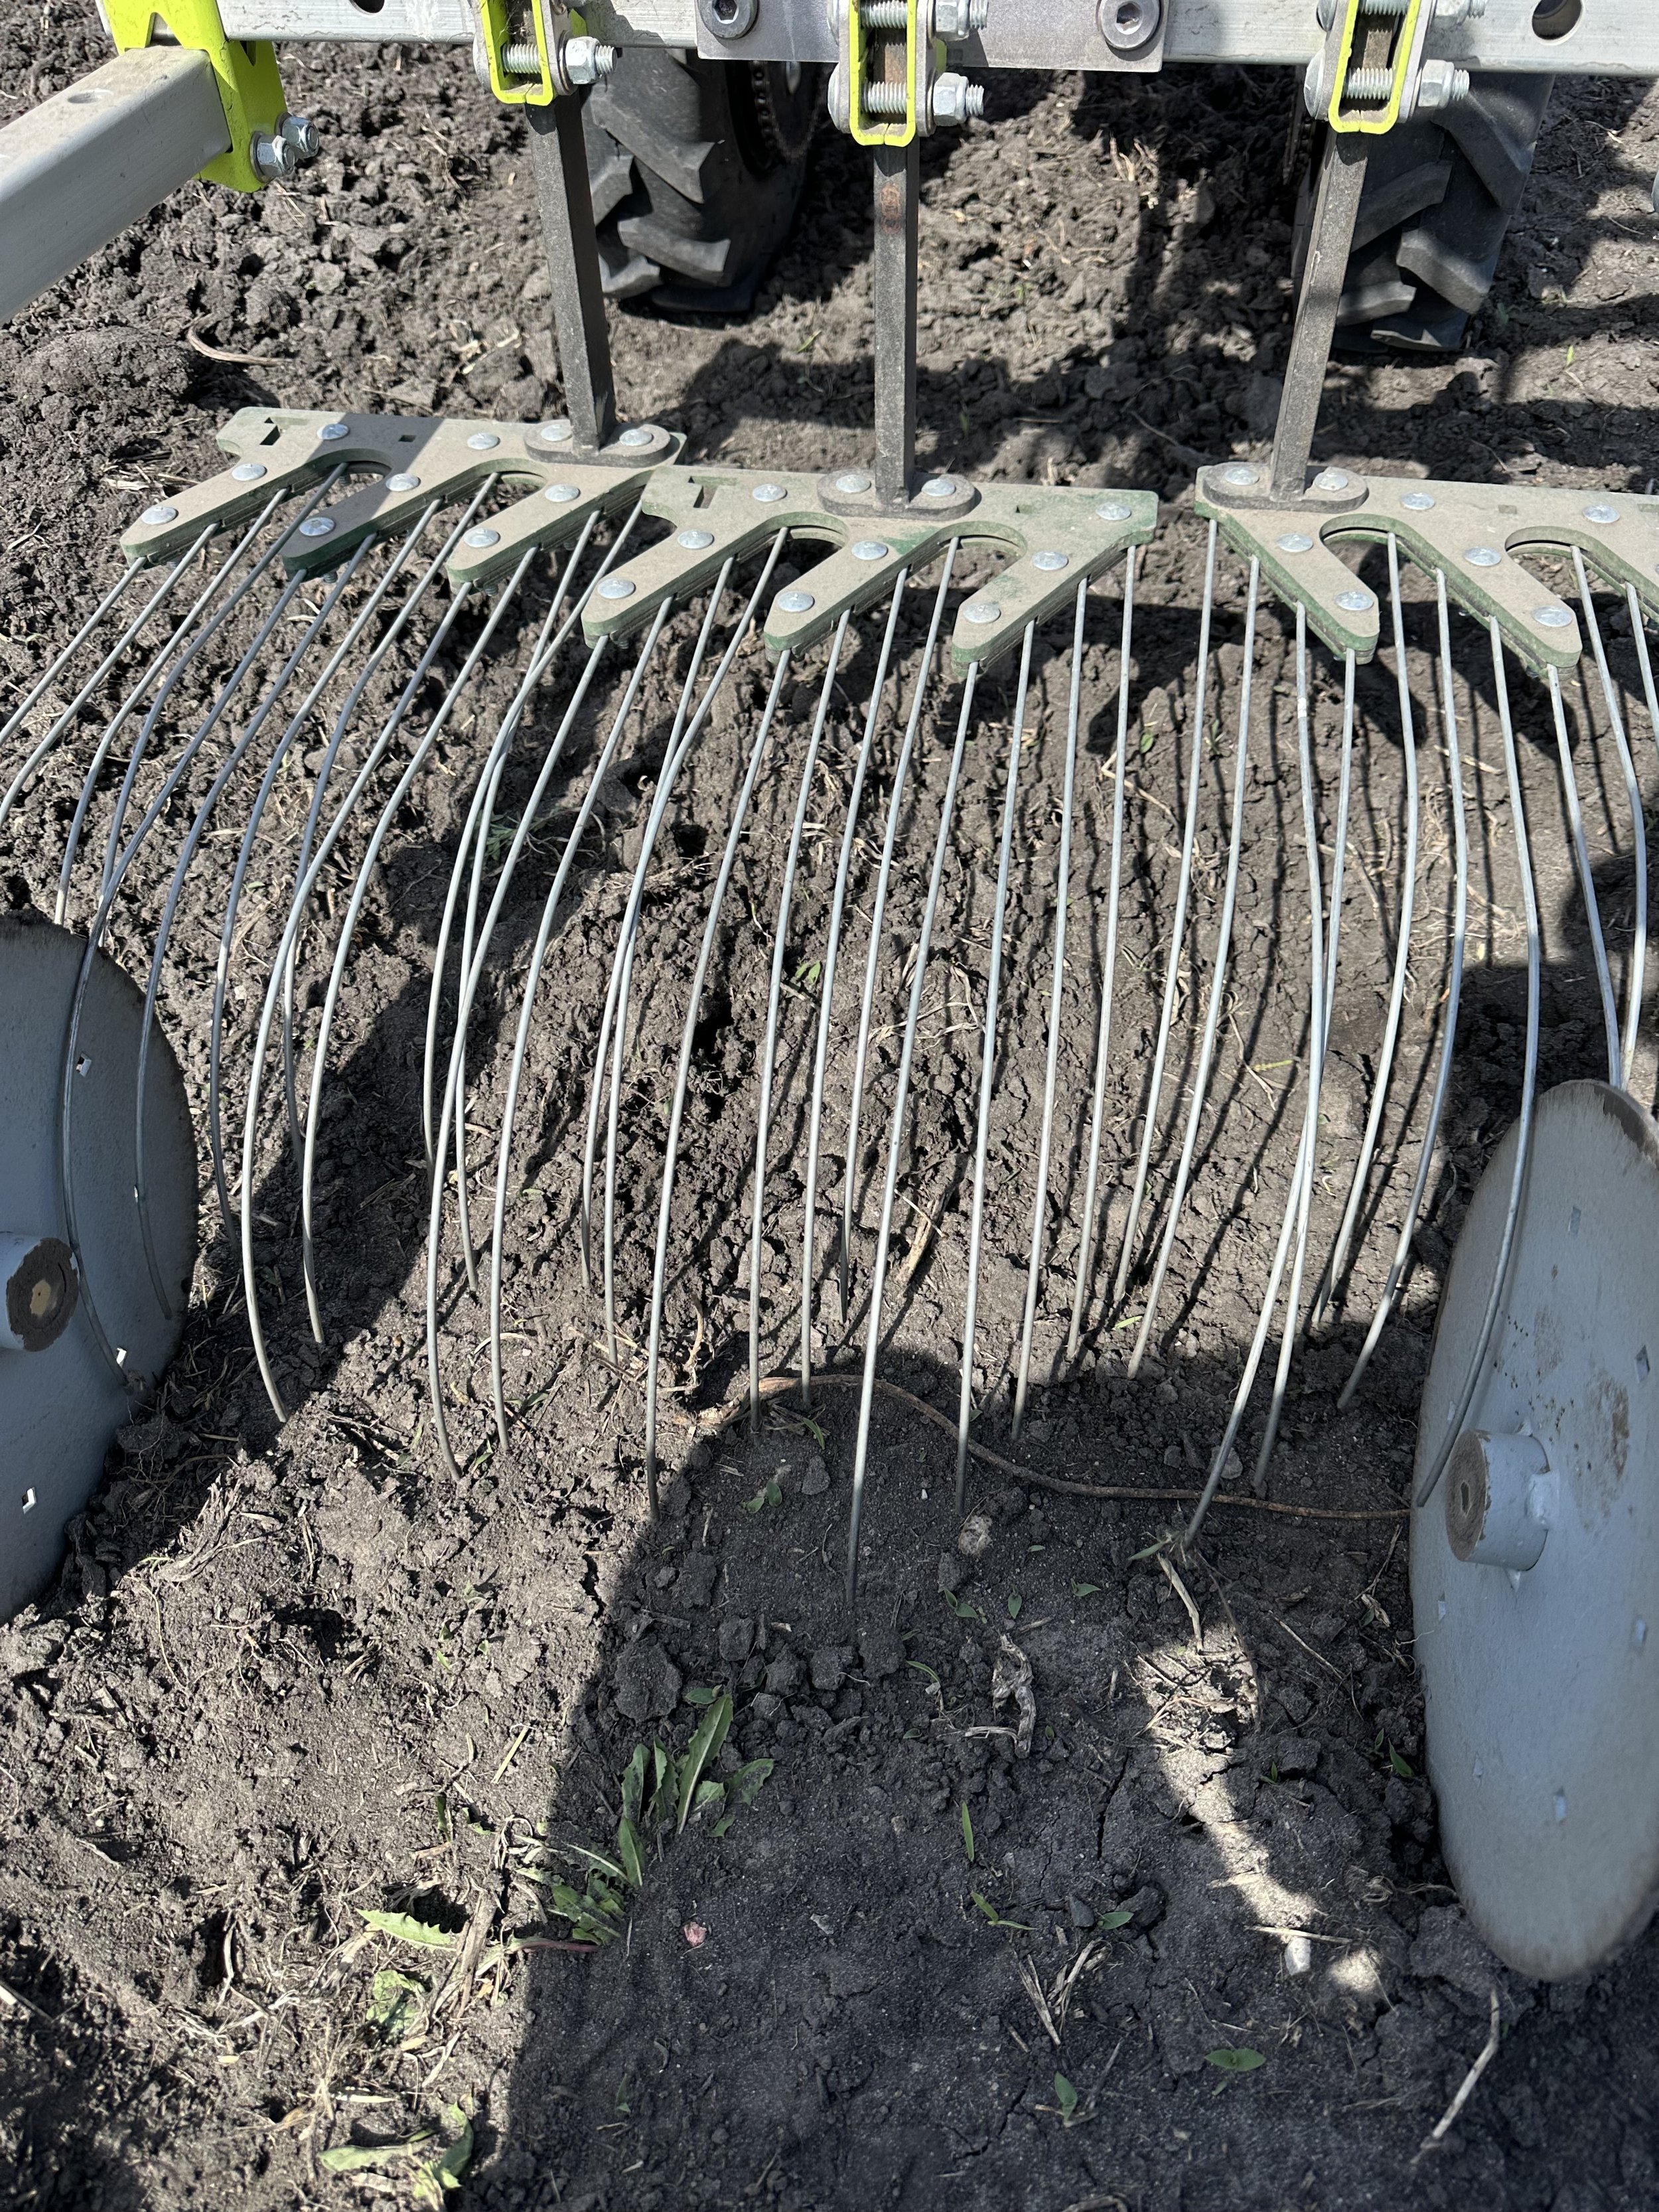
Closeup of the tine weeder.
Hand Weeding
Hand weeding is the most expensive and slowest weeding on the farm. All of the tools above help us reduce the hand weeding we have to do. We won’t completely eliminate hand weeding but in many cases we can reduce the time we spend hand weeding by 70% to 90% by using the tools above at the right time.
Finally, we take all of these tools together and apply a couple principles to them and we arrive at our weed control methodology.
Cultivate after every rain/irrigation session.
If you can see the weeds, it’s already too late to be most effective.
Stack cultivation tools as much as possible. Stacking tools means you use more than one method on each crop as often as possible.
Never let a weed go to seed.
Plant cover crops in fallow ground.