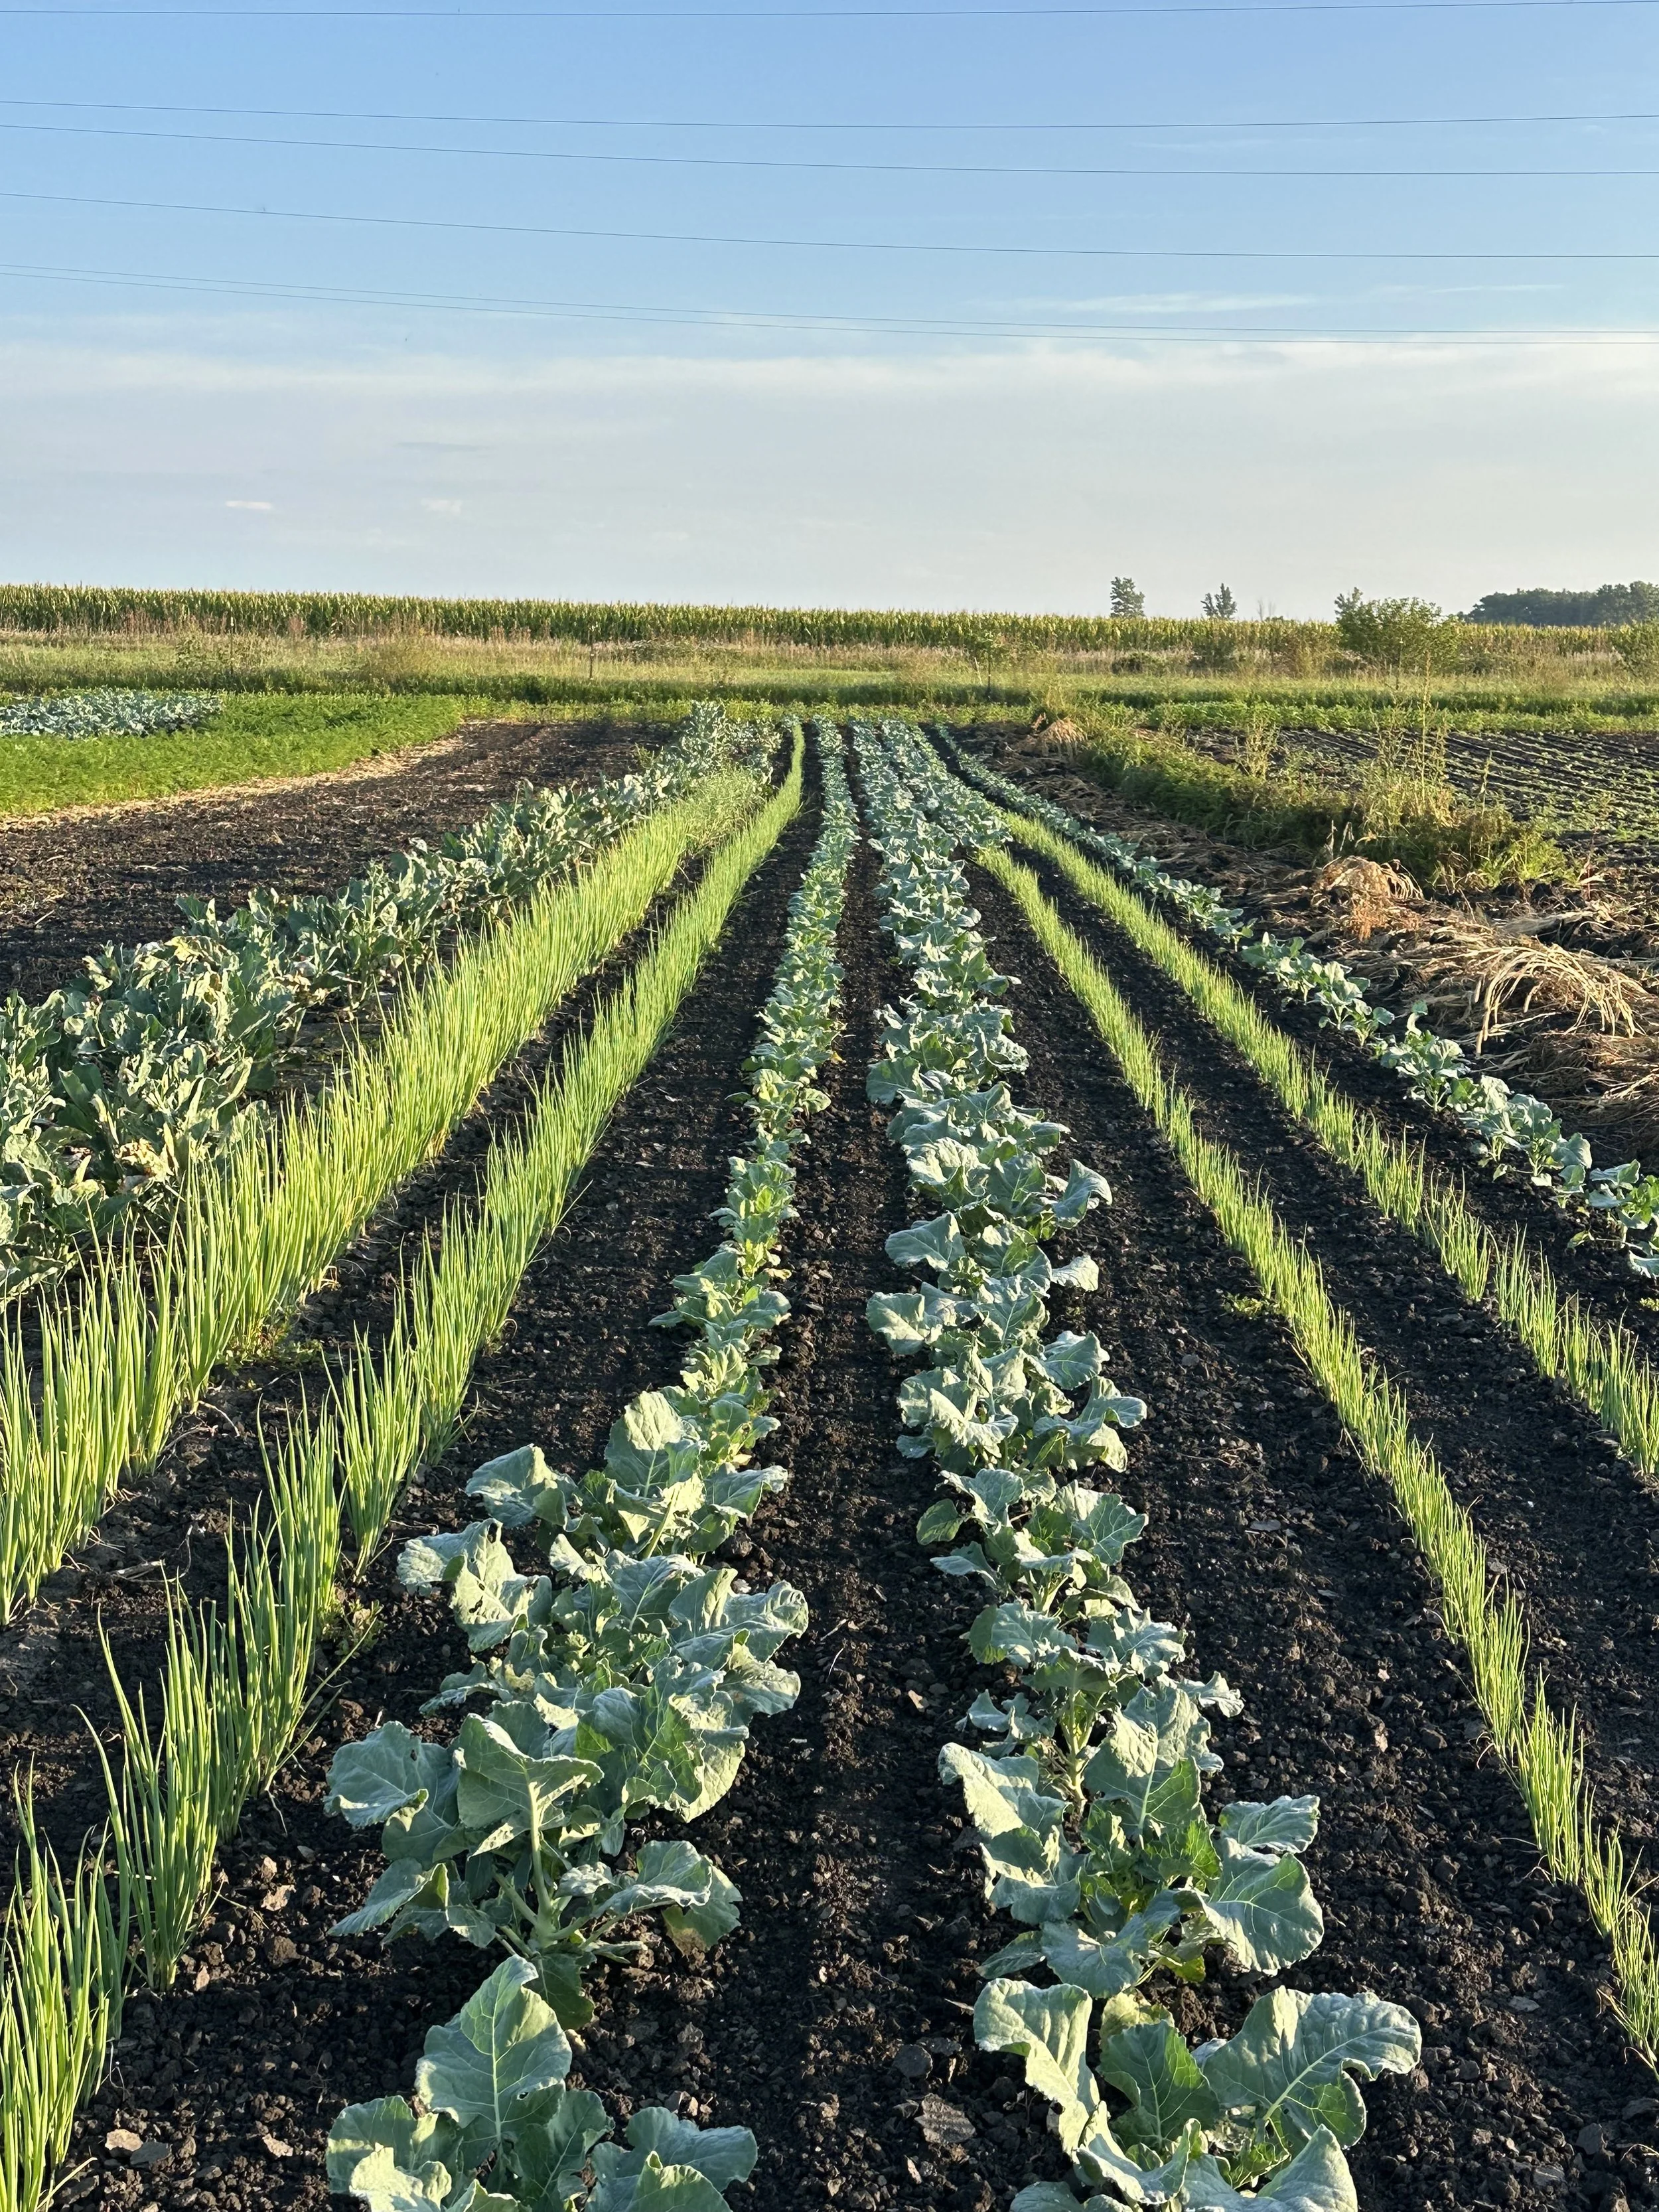
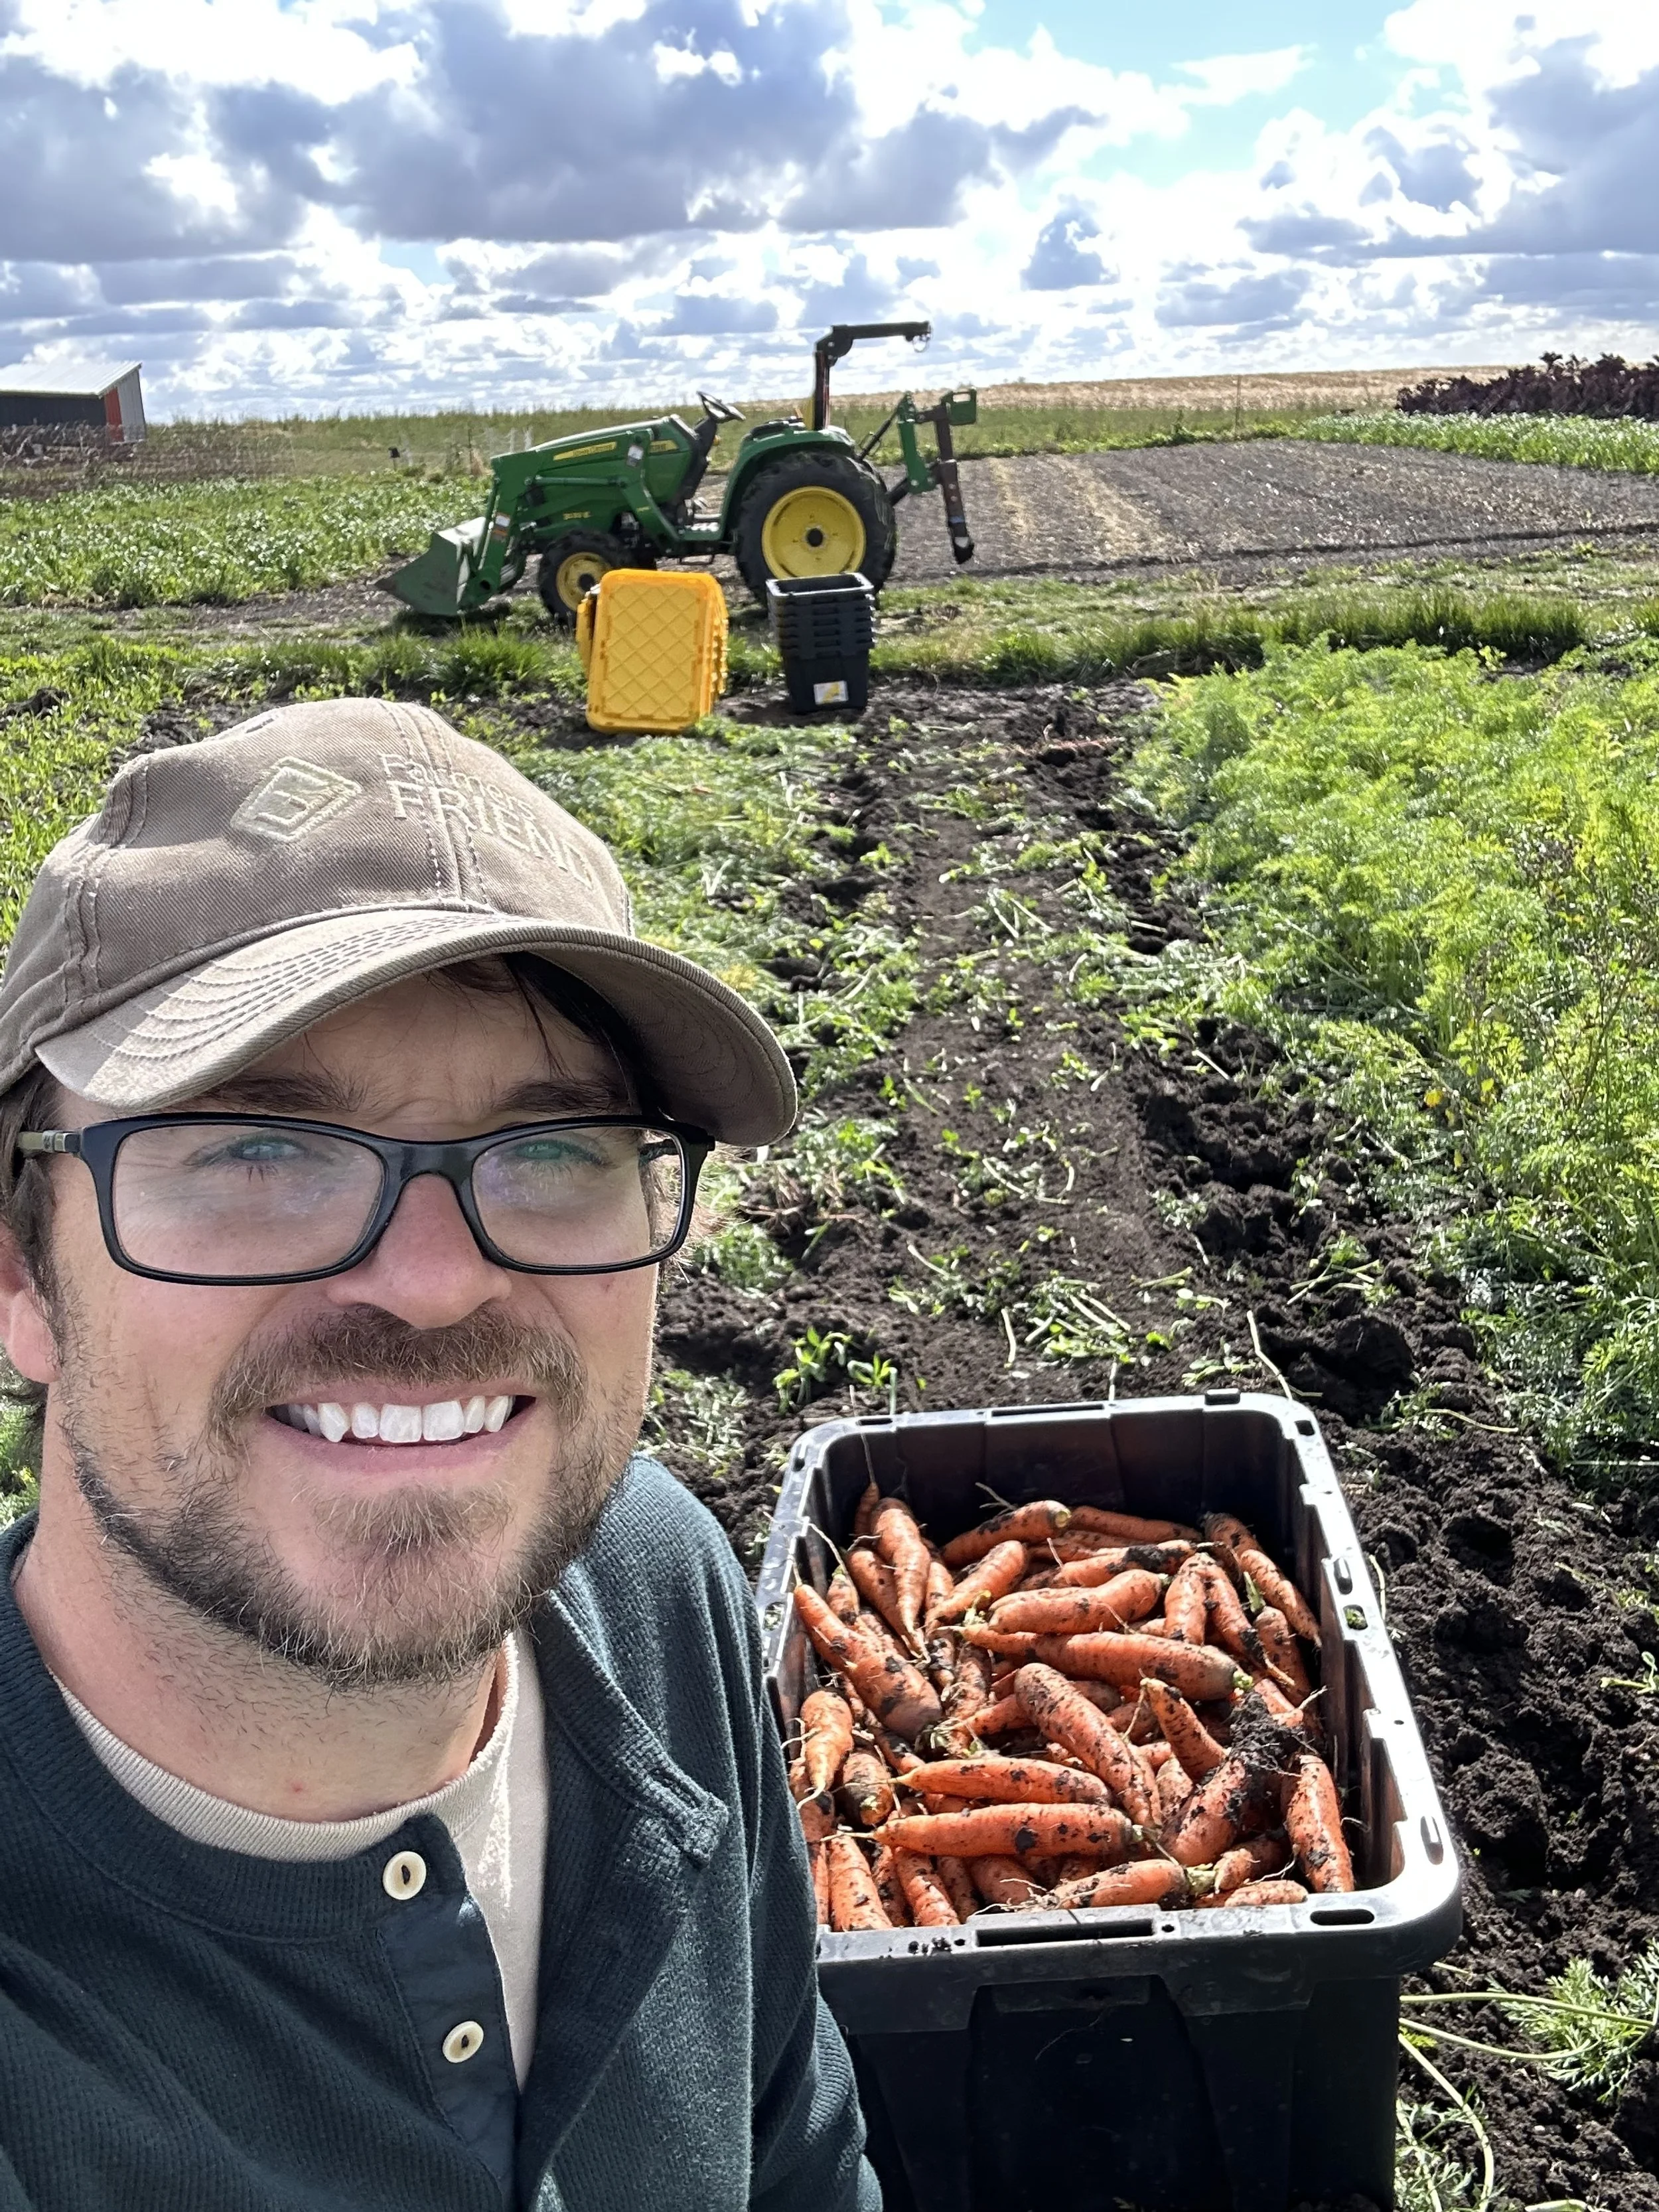
How We Dig Carrots
Carrots are one of our most important crops on our farm and something we’re known for. Each year we grow literally thousands of pounds of carrots for our CSA members, online store, farmers market & whole sale partners. When you’re digging that many carrots every season you need a better, faster and easier way to dig carrots than a simple shovel, broadfork or potato fork. We use a tractor attachment called a bed lifter to make digging our carrots much easier.
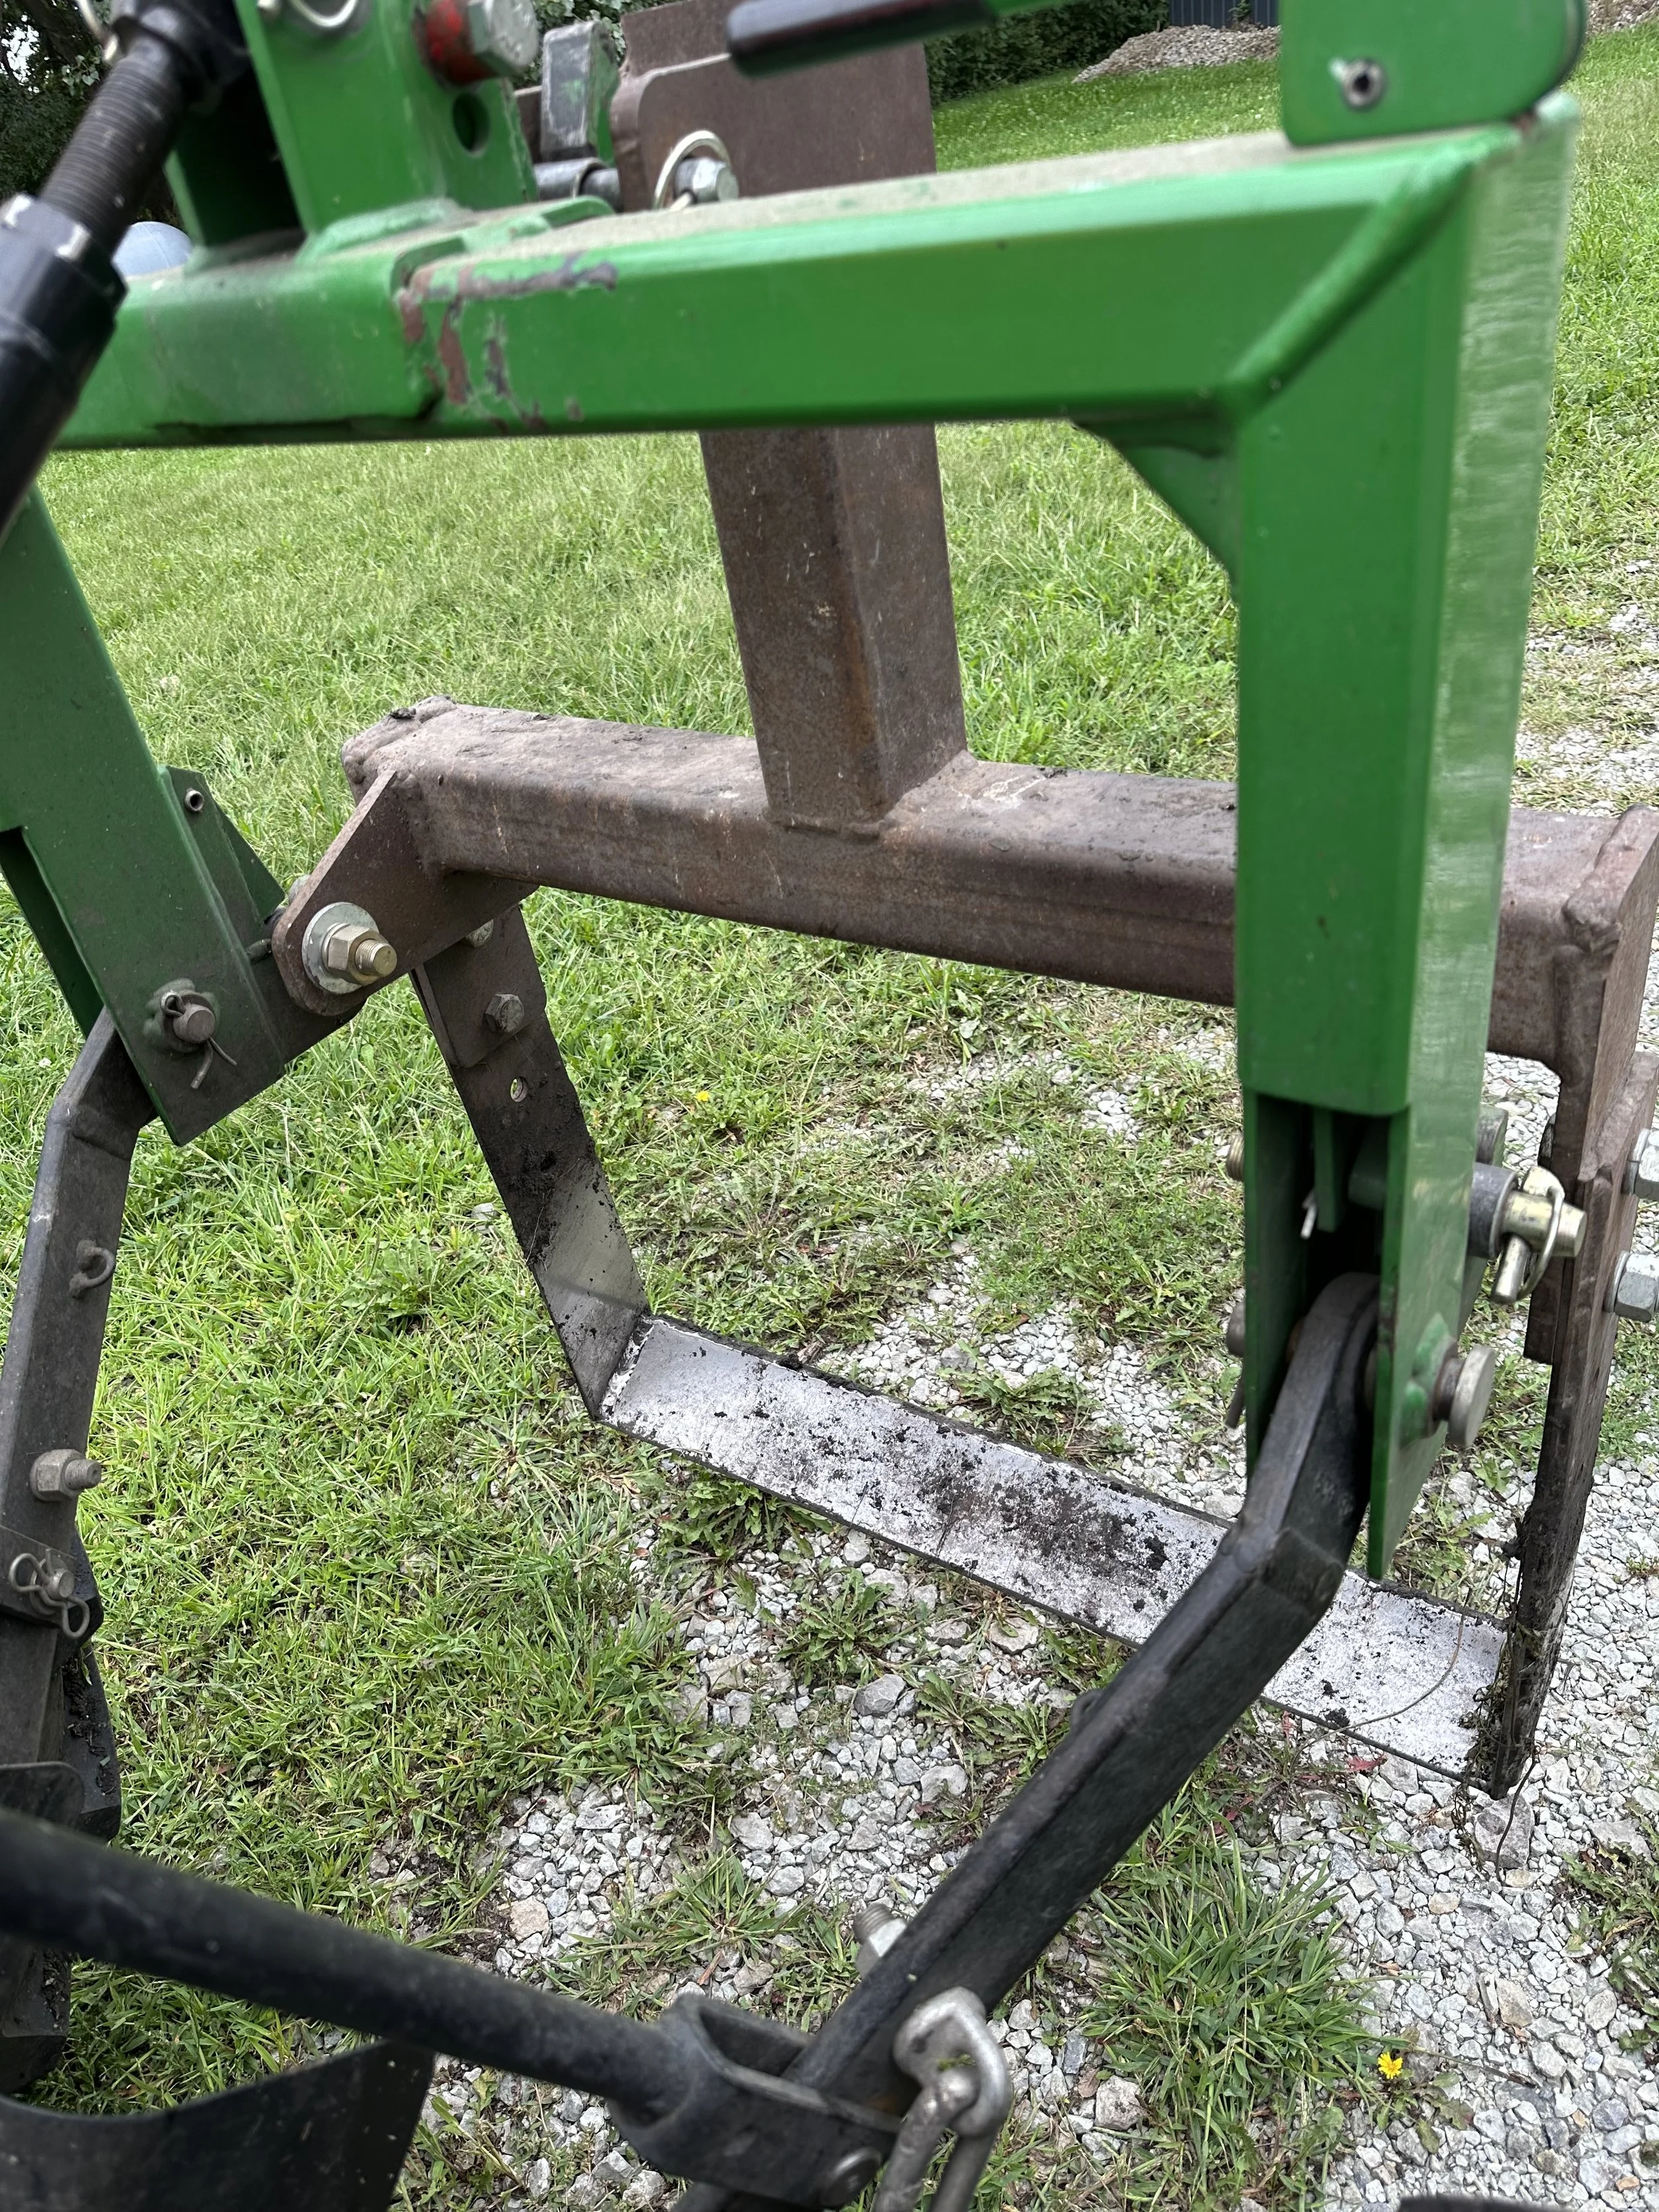
The bed lifter is a simple tool overall. It works by digging underneath the depth of the carrots and loosening the soil. This enables us to easily pull the carrots out by their tops for harvest. It greatly increases the amount of carrots we can dig and it’s a lot easier on our backs as well.
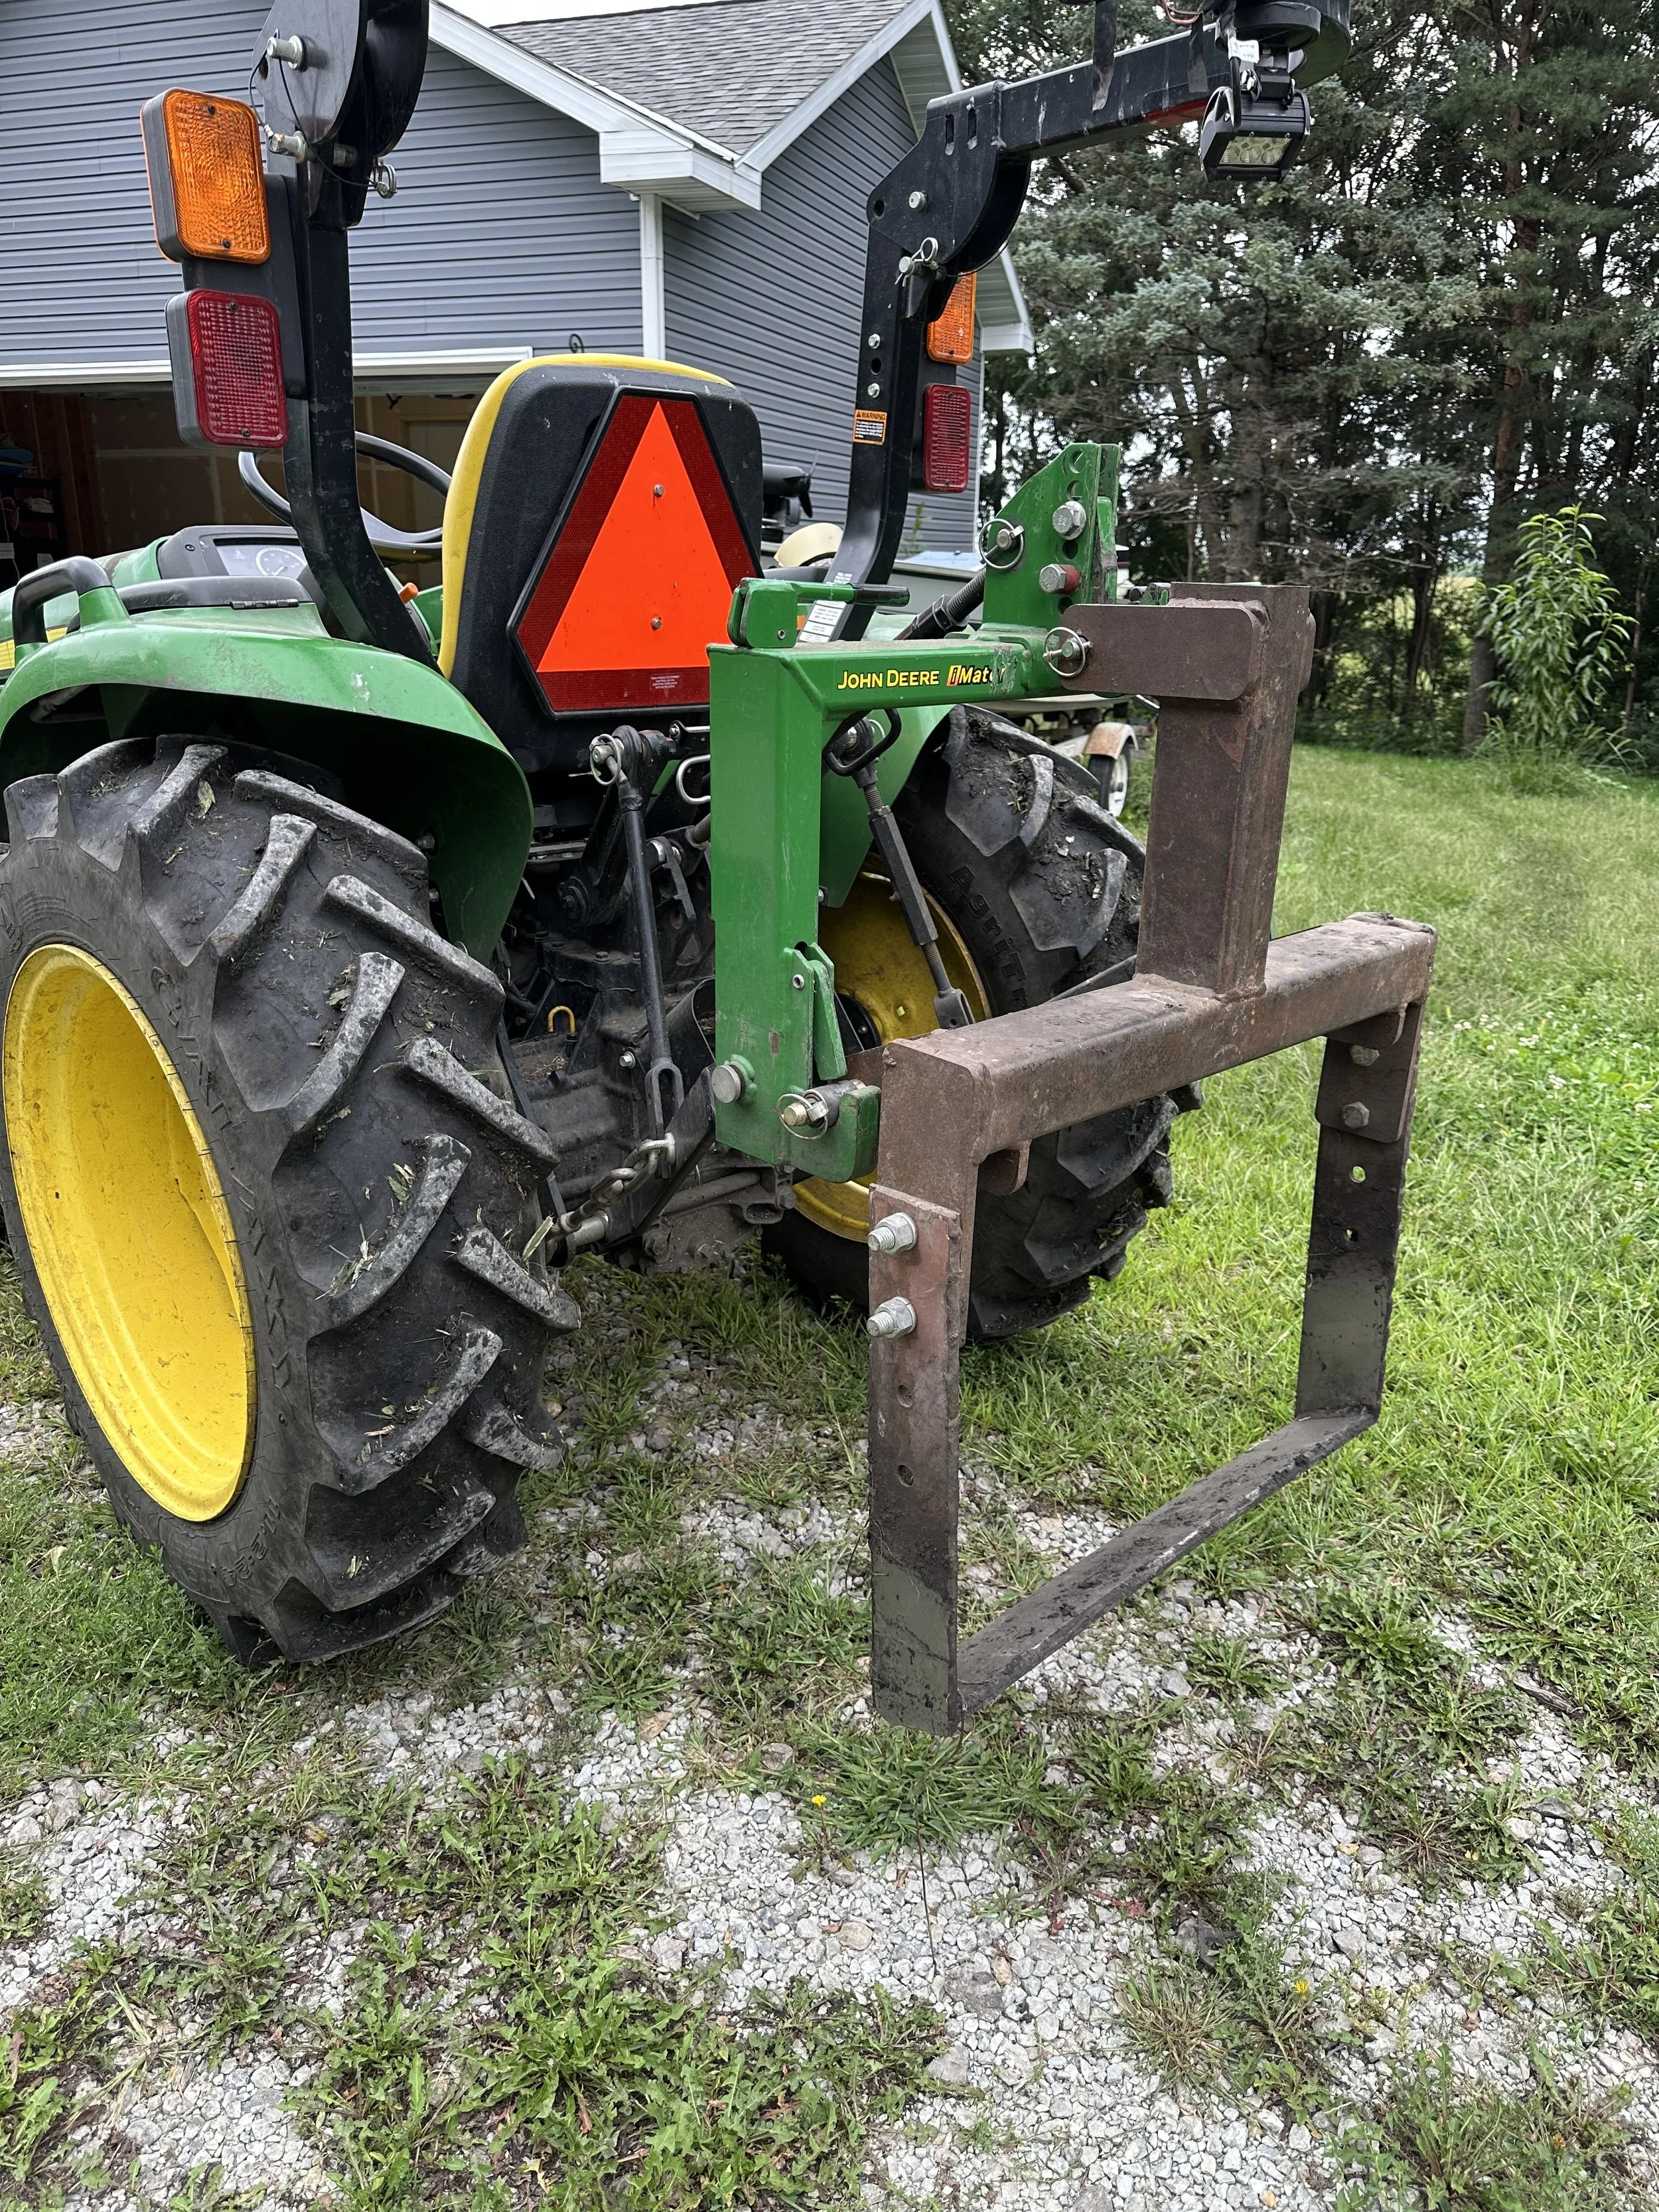
There are a couple tricks to using the bed lifter. It needs to be deep enough that we don’t slice off the bottoms of the carrots but not so deep that the carrot cling to tons of dirt and mud. The angle of the cross bar at the bottom needs to be gentle enough to not break the carrots but steep enough to loosen the soil. And the soil conditions need to be right. If it’s too dry the soil breaks apart in huge clods breaking carrots and not greatly improving the speed. Conversely, if it’s too wet we aren’t able to use the bed lifter because we’d either get the tractor stuck or not have enough traction to pull the bed lifter.
Why Cover Crops Are Important
Farming in a sustainable and earth friendly manner is one of our primary farming values on our farm. We seek to not only maintain but improve the land we farm on over time. In the grand scheme of things, the time we spend farming this land is pretty small and we want the next generation of farmers to be able to succeed. Not only that but we also want to protect the soil, air and water so that our farming footprint stays confined to the acres we farm. One of the key ways we work towards this goal is by planting cover crops. Today we’ll go over why cover crops are important and what cover crops we plant on our farm.
First, we should define what a cover crop is. For us, a cover crop is a crop that we plant whose primary purpose is to improve our land. Further, a cover crop is not planted with intent to harvest and sell a product.
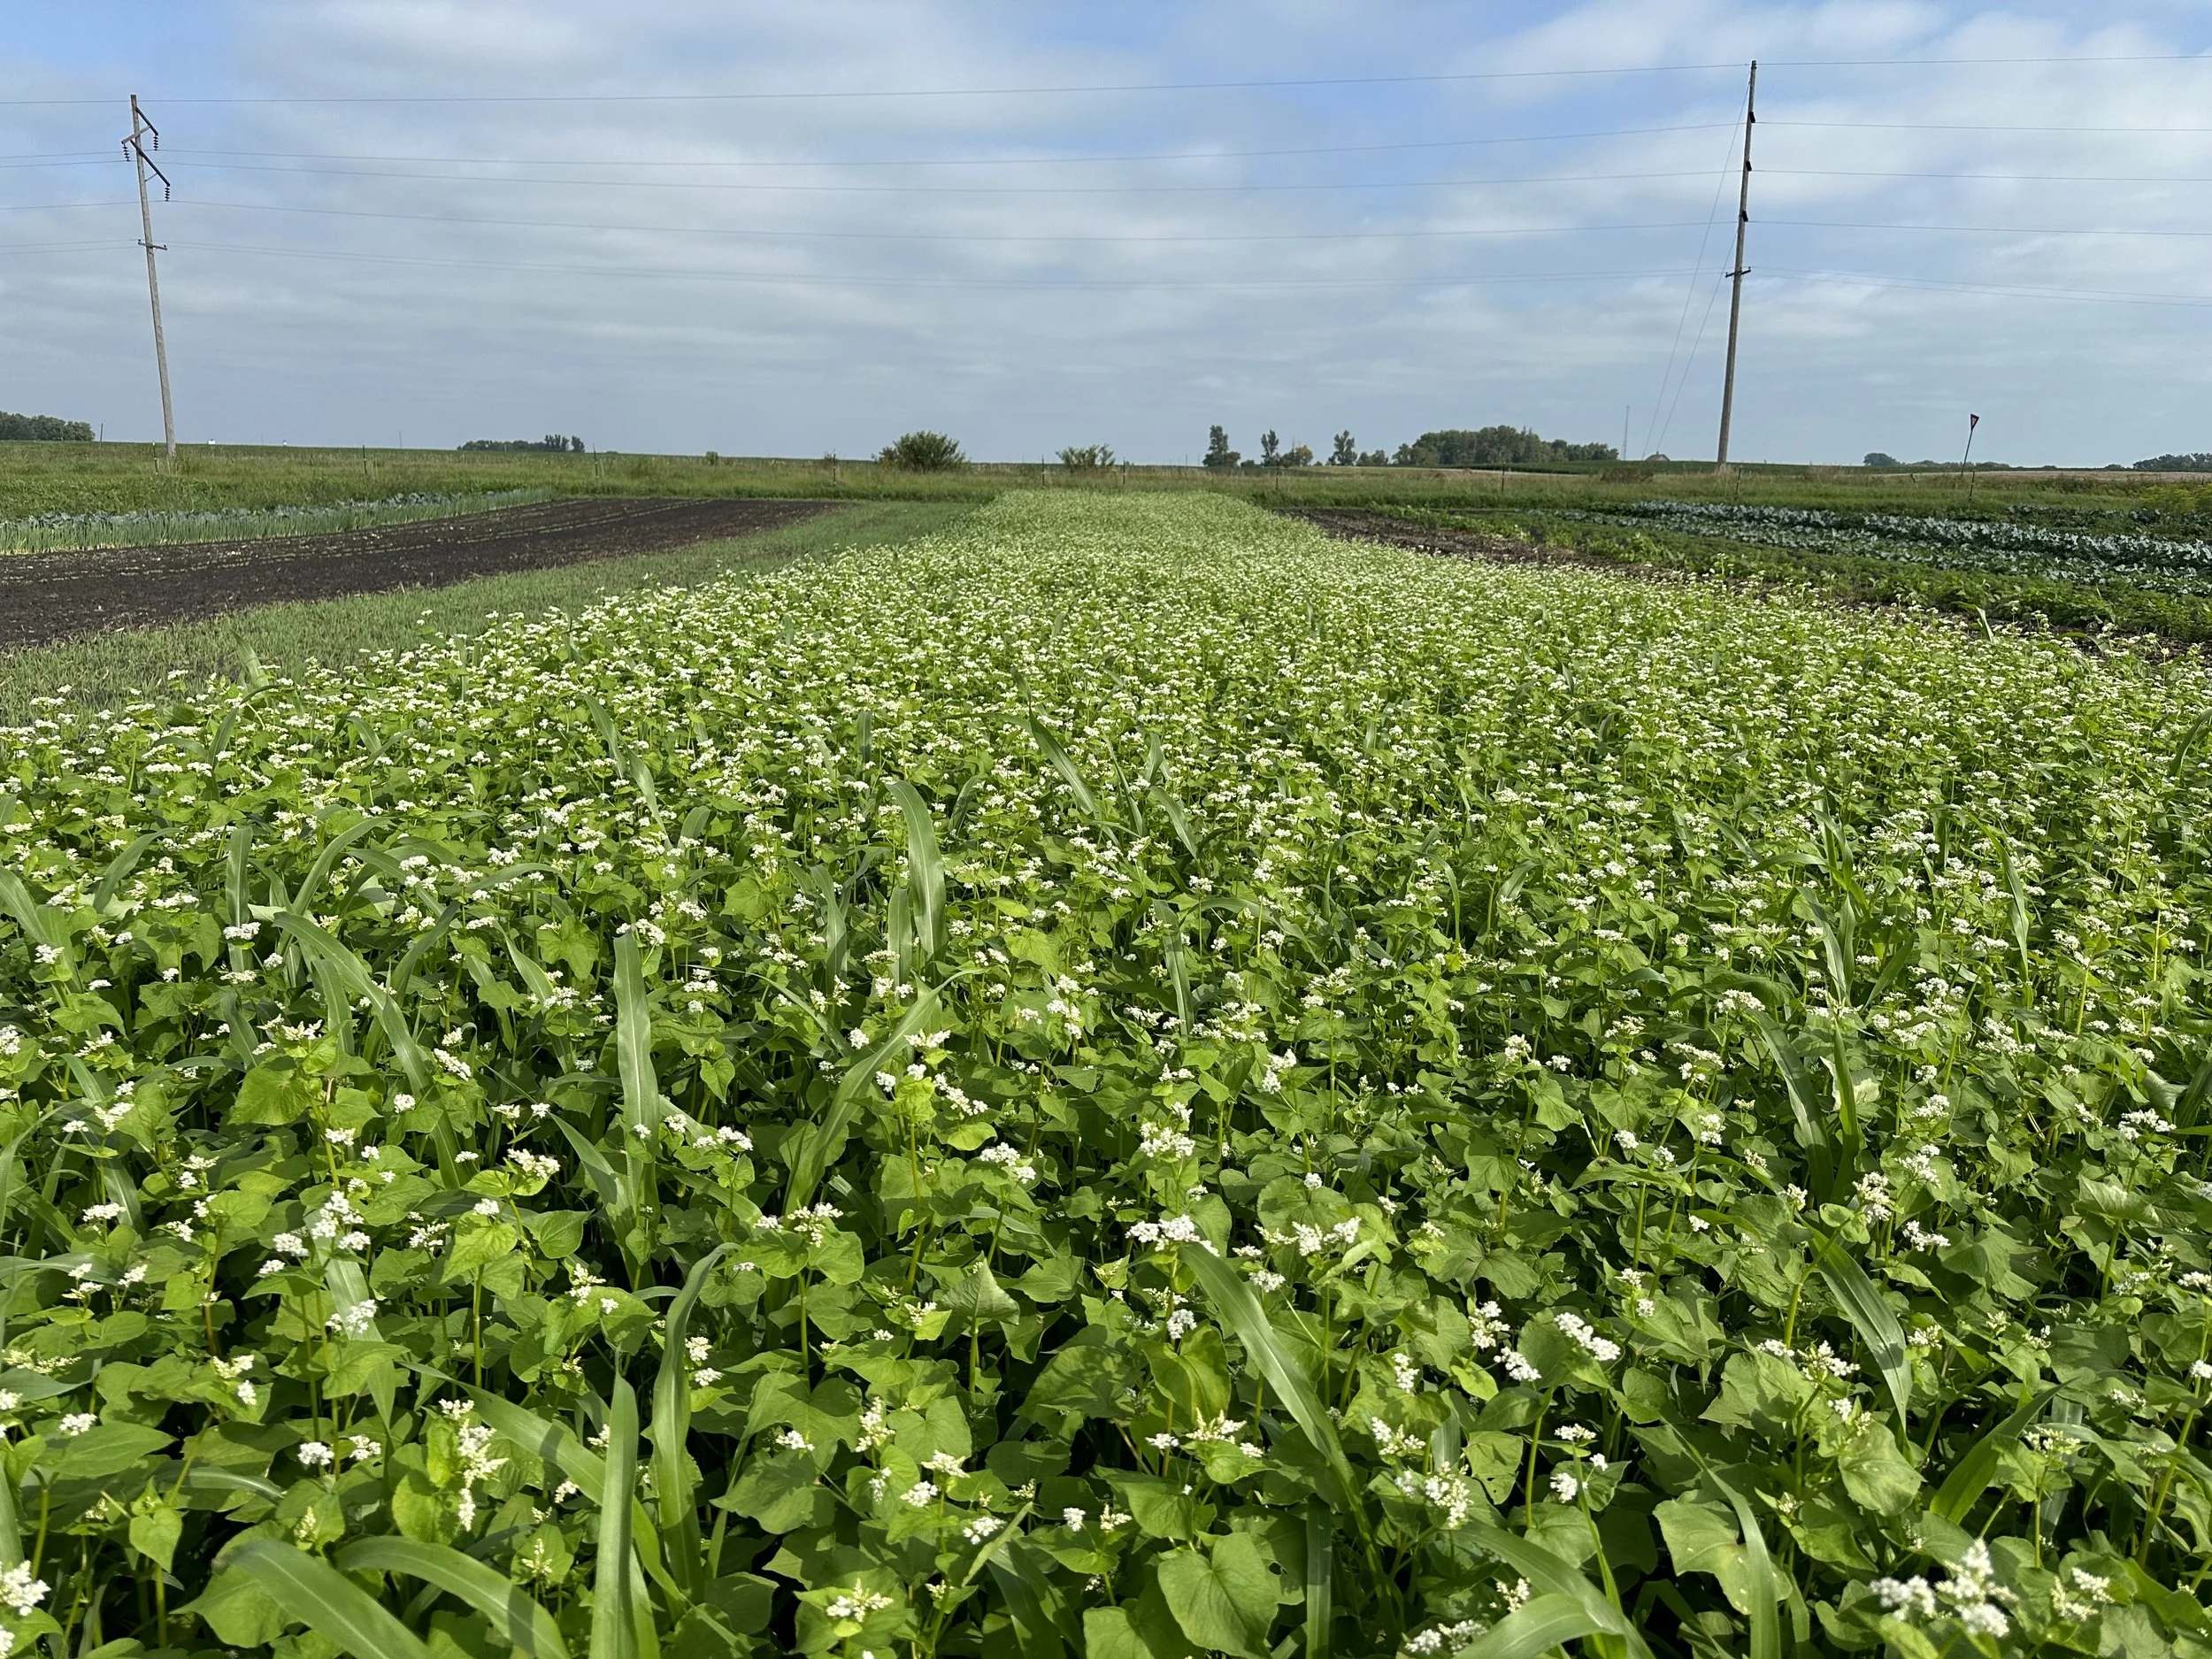
Our summer cover crop mix. The plants with white flowers are buckwheat. The long slender leaves that resemble corn are millet.
Cover crops serve a variety of purposes on our farms and many farms in general. Their benefits include reducing soil erosion, suppressing weed growth, providing habitat for beneficial insects, and improving soil health. Our primary goals for our cover crop mixes are to suppress weed growth and improve soil health. That’s not to say the other benefits are not important - they are. It’s just that when we look at which cover crops to plant we are seeking to achieve those goals primarily and the other benefits secondarily.
We have two mixes of cover crops that we use on our farm to achieve the goals of improving soil health and suppressing weeds. In summer we plant a summer mix of cover crops. That is, crops that grow well in the heat of the summer. This mix includes species like buckwheat, soy beans, sun hemp, sun flowers, millet & more. In the fall we plant a mix of peas, oats & phacelia. These crops grow better in the cooler temperatures of fall and can grow later into the season than our summer mix. Our winter mix is capable of withstanding frosts.
To suppress weeds we seed our cover crops pretty densely and lightly incorporate the cover crop seeds into the soil. With a little rain the cover crop comes to life creating a thick mat of vegetation that crowds out weeds. In our experience, we’ve observed that the areas where we plant cover crops are generally much easier to weed the following season.
Cover crops improve soil health in a few primary ways. First, some cover crops like peas can pull nitrogen (a primary plant nutrient) out of the air and store it in the soil for future crops to use. Cover crops in general also contribute to soil organic matter which microorganisms in the soil feed on. These micro organisms then metabolize the cover crops and leave behind nutrients future crops can use.
Many of our cover crops also achieve our secondary goals of reducing soil erosion and providing beneficial insect habitat. Because we’re planting pretty densely and minimizing fallow ground by using cover crops we are reducing soil erosion. Additionally, buckwheat - one of our primary summer cover crops - flowers quickly and the bees love it. Buckwheat provides habitat and forage for the bees!
Cover crops are an important part of sustainability on our farm. We’re always looking for new species and new mixes of cover crops to help improve our soil and improve our farm!

Addie (about 2yrs old) and I sitting in our oats & peas cover crop mix!
Our New Vacuum Seeder
We made a large new purchase for the farm recently: a new electric vacuum seeder. This purchase is a huge upgrade for us and today we’ll go through exactly what a vacuum seeder is, how it’s different from the seeders we currently use and the crops we plant to use the vacuum seeder on.
What is a vacuum seeder?
A vacuum seeder uses suction with air to hold the seeds to a plate. The plate rotates based on spacing needs and the vacuum is cut when the plate rotates to the position where the seed is supposed to be dropped into it’s furrow. Our particular vacuum seeder has a multitude of different plates with different spacing and hole sizes to accommodate a wide variety of seeds.
Vacuum seeders have much better seed singulation. That is, making sure a single seed is dropped at the designated spacing instead of a multitude of seeds. That’s because the suction of the air holding the seeds against the plate is easier than trying to have a single hole size that fits a the variability that comes with seeds. Not all seeds are the same size even within the exact same crop and variety!
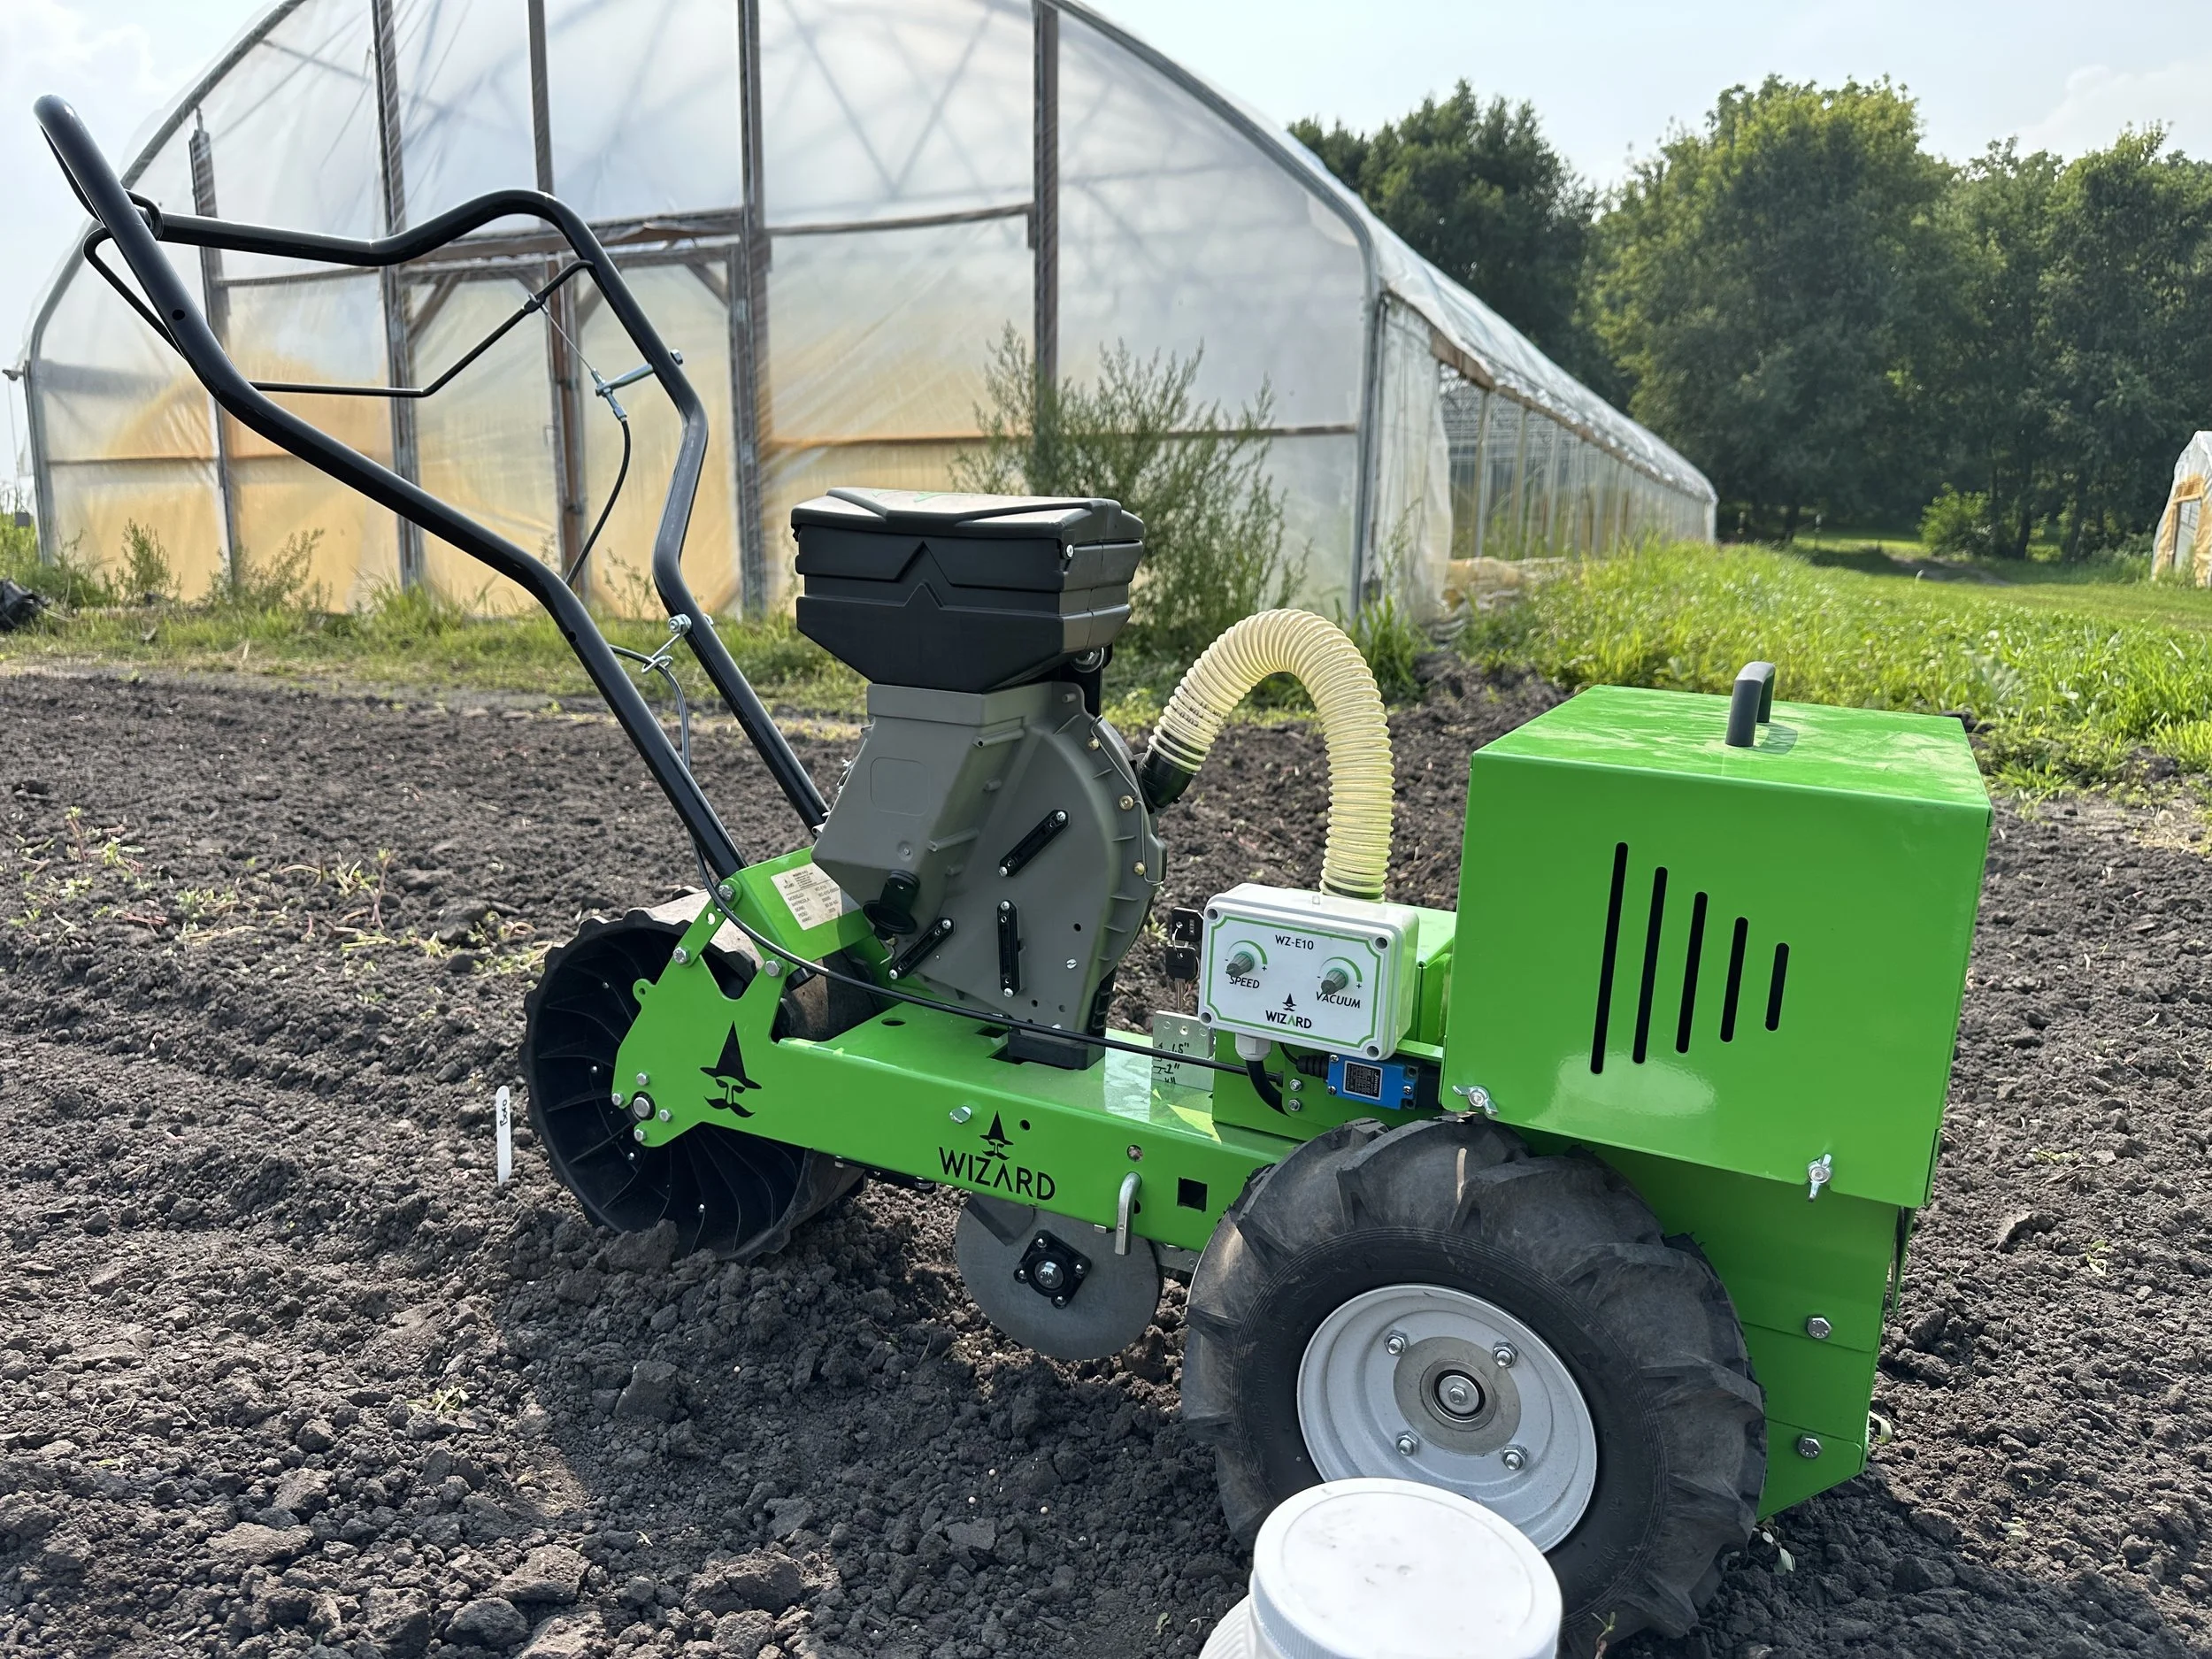
Our new vacuum seeder! First crop seeded with it was beets.
How are other seeder types different?
Our other seeders, the Jang and Hoss seeders both work similarly. Each have a seed plate or seed puck that has holes drilled into it for different seed sizes and spacing. Instead of air suction through vacuum holding the seeds in the plate/puck only gravity allows the seed to fill the hole. Because the holes need to accommodate the variability in seed sizes even within crops you inevitable end up either jamming seeds or dropping more seeds than necessary.
Which crops will we plant with the vacuum seeder?
One of the things we love about the vacuum seeder we bought is that it can be used for a number of different crops. We plan to use it to seed peas, green beans, popcorn, sweet corn, beets, cucumbers, zucchini, summer squash & melons.
In particular I’ve been very frustrated with our Hoss seeder in our popcorn & sweet corn. The Hoss is just not accurate enough to singulate seeds nor does it achieve the desired spacing. We end up with lots of doubles, triples or gaps which is a problem because we’re either spending labor thinning doubles and triples or spending labor weeding gaps where there are no crops. The vacuum seeder will solve these problems for us!
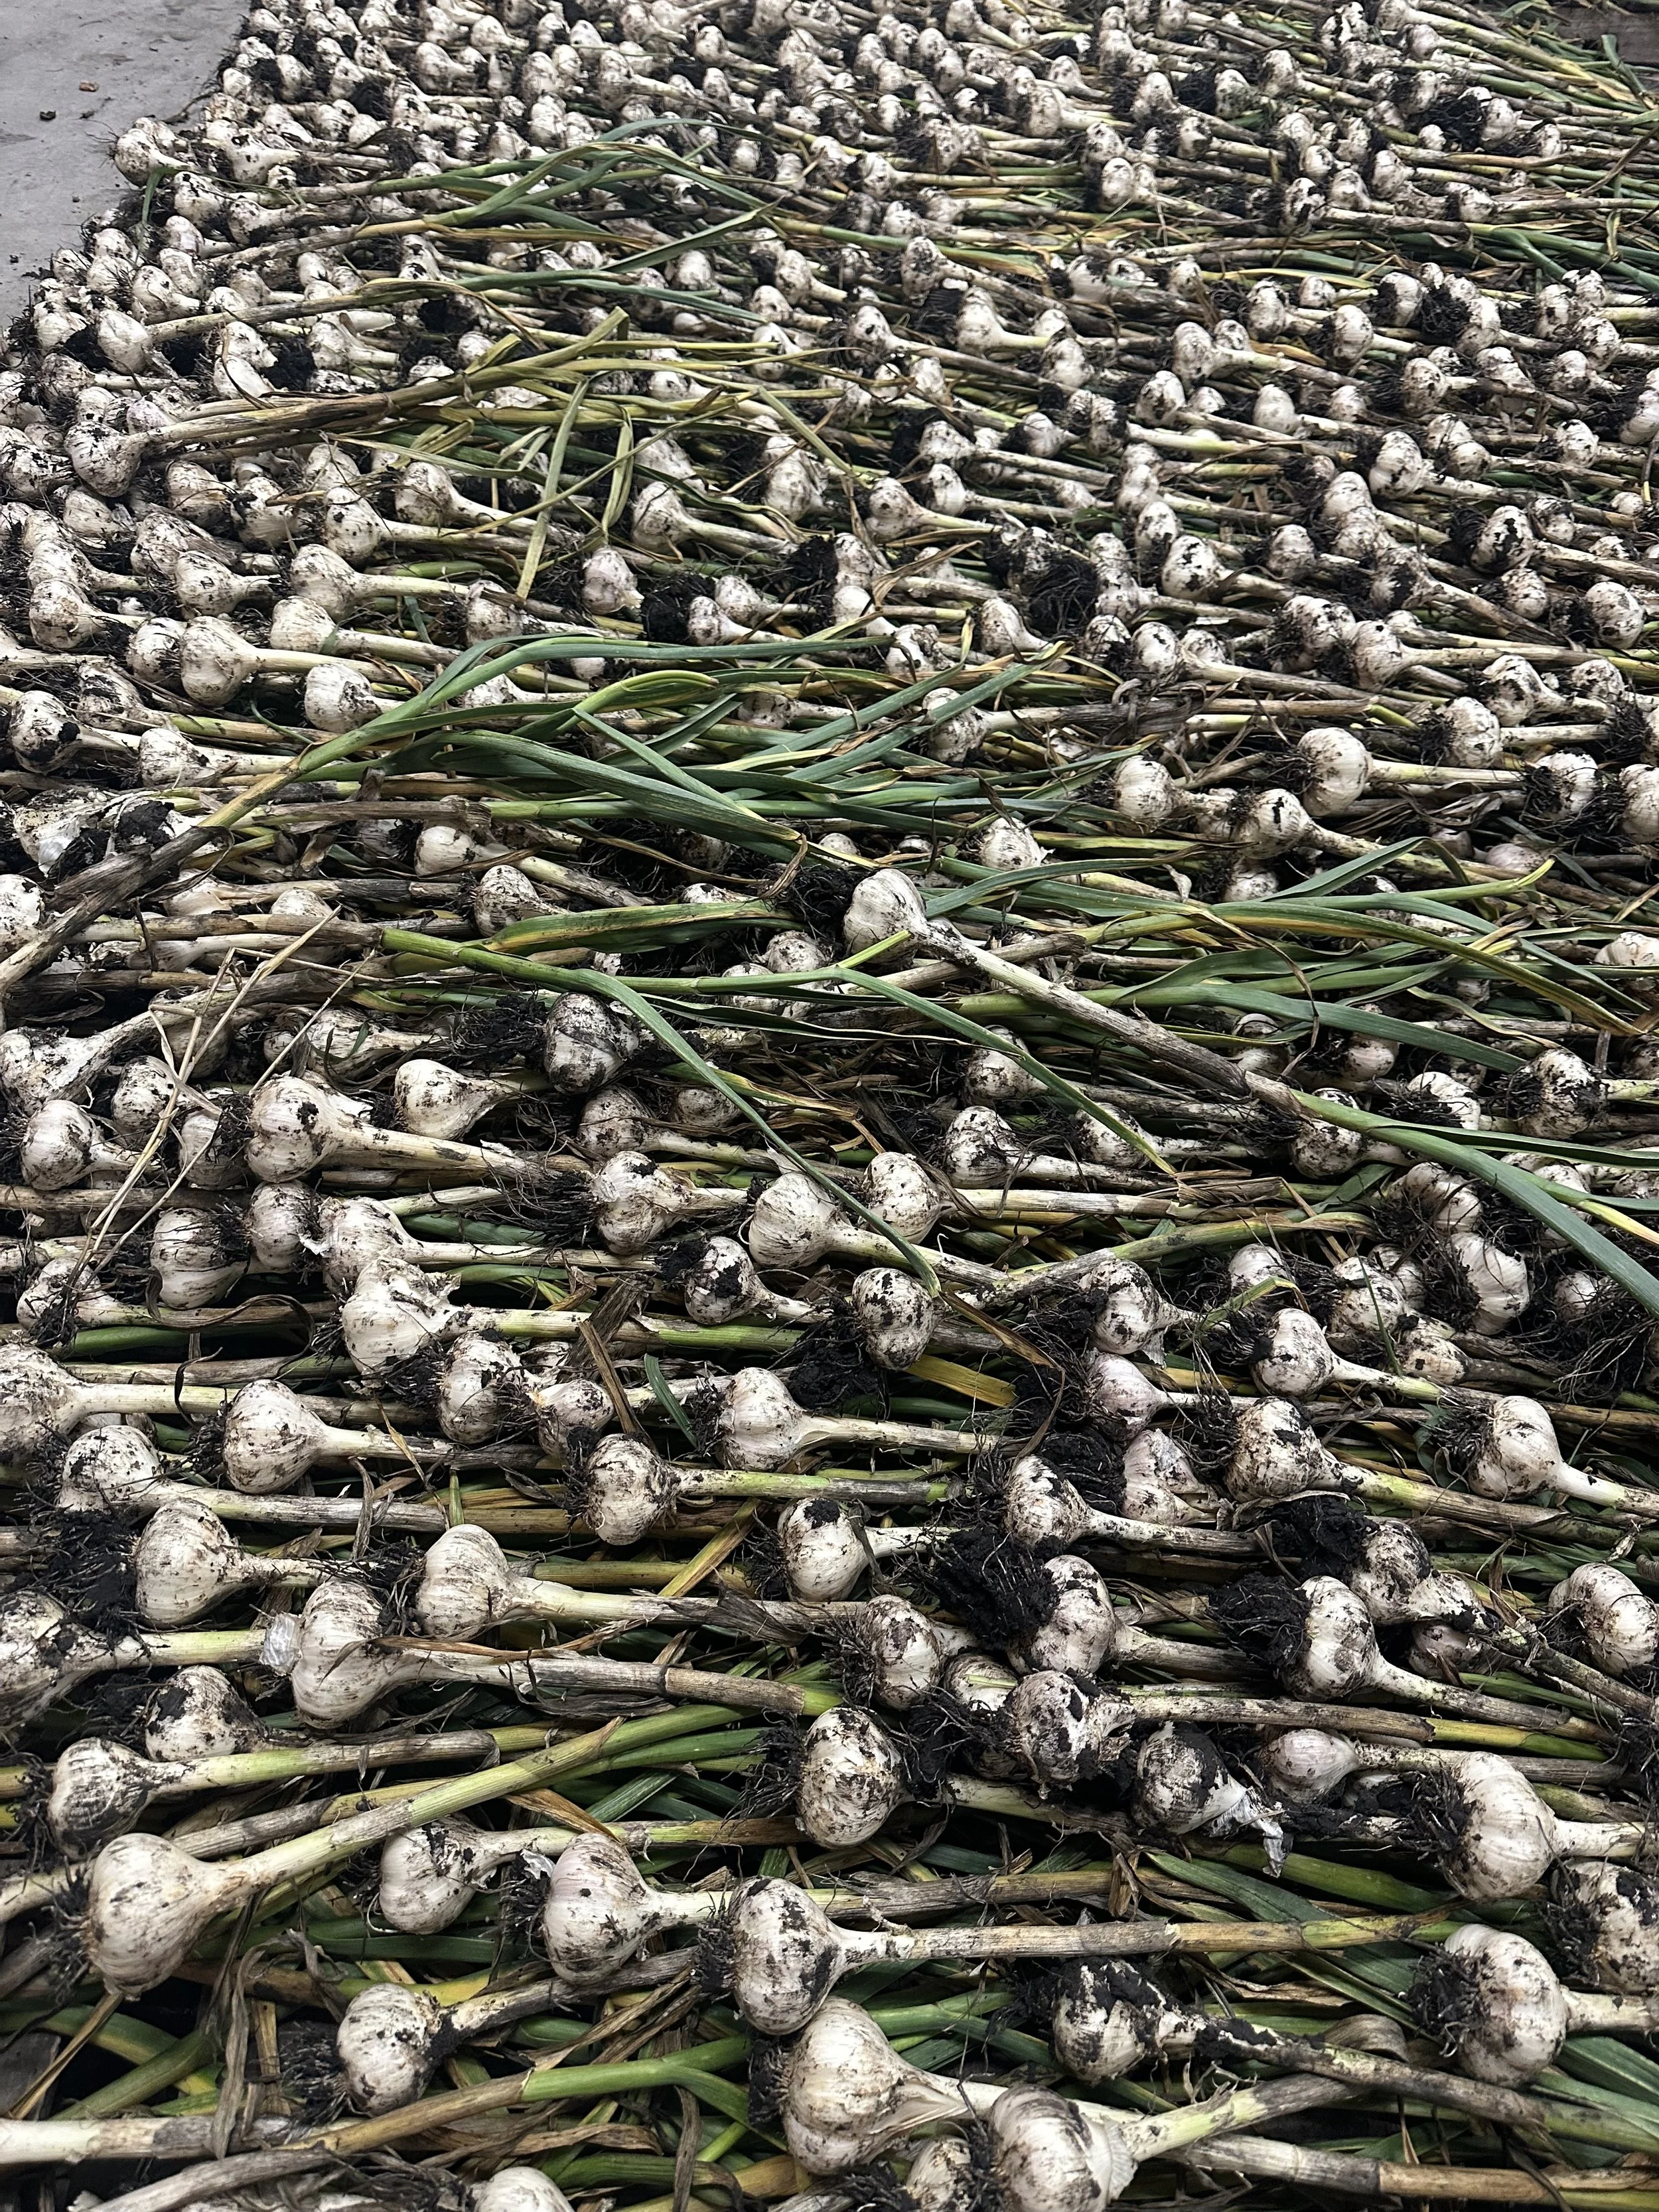
Garlic Harvest 2025
One big project we checked off the list this week was completing our garlic harvest. Not only is it a pretty big job but also it’s somewhat time sensitive. Leave the garlic out in the field too long and the cloves can start to split apart which negatively affects shelf life.

A grimace for the weeds. You can see at least part of a row of garlic over my left shoulder though. :-/
Overall, we’re happy with our garlic harvest this season. It’s not our biggest and best crop ever and our weed management could have been better but what we pulled up looks nice and tastes amazing. When you consider that our seed stock was grown last year in what was some of the worst weather we’ve ever seen and then add to that a pretty wet 2025 the harvest we got is exceptional. Intense rainfall for two seasons and we’re still getting a good harvest. We’re proud of that.
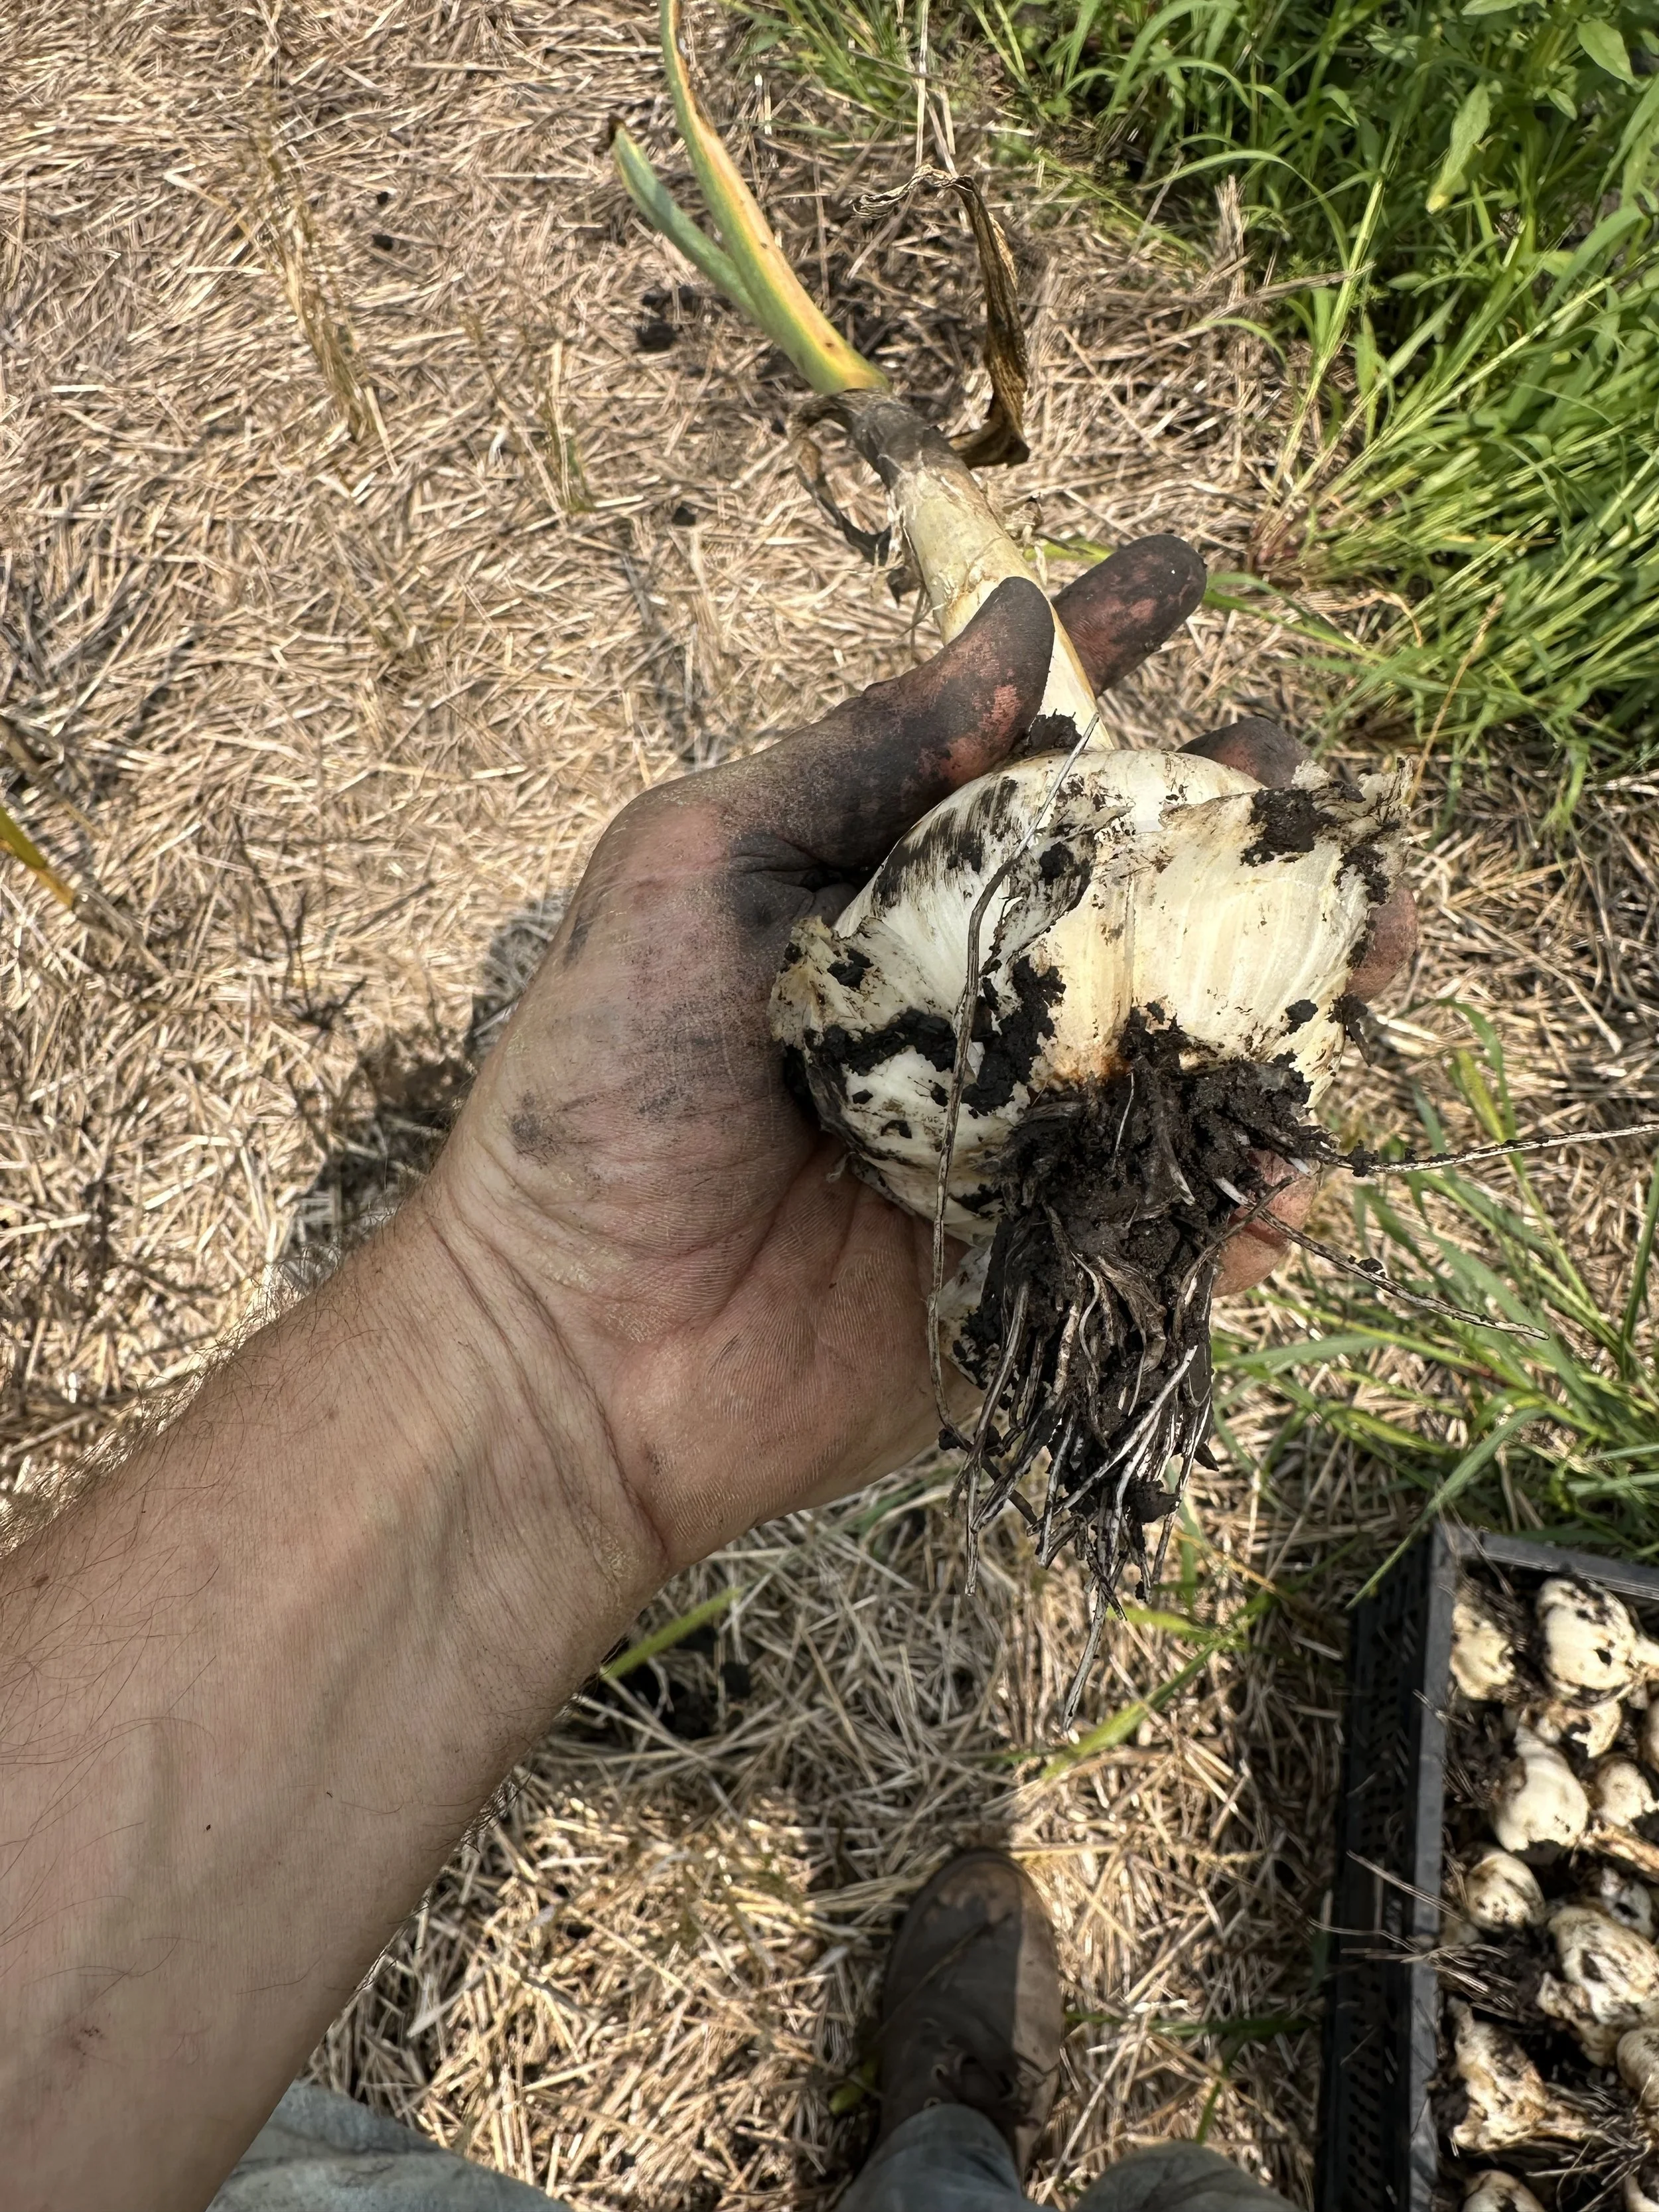
Pretty good sized garlic bulbs but they seem smaller on average than previous years.
In previous years we’ve used a tool pulled by our tractor called a bed lifter dig underneath the garlic and loosen the soil so we can pull the garlic up easily. We use this tool on our carrots too. But this year we had two problems using that tool. First, the weeds got out of control in our garlic patch so we couldn’t see the rows from the tractor seat. The second problem was that our rows were spaced just a little too far apart. We ended up damaging a few garlic bulbs when we attempted to use the bed lifted.
What did we do instead? Luckily the soil was both damp enough and loose enough that we were able to pull up the garlic by hand without too much effort. Don’t get me wrong, it was difficult and harder than using the lifter but it was doable. We had a very small percentage where the stem broke leaving the garlic bulb in the ground. It might seem like this is a big bummer but there’s a really good chance the garlic bulbs left in the ground will regrow next season for early spring “green garlic.”
Now we wait about 2 weeks for the garlic to cure. That is, dry down the out layers that will form a protective seal and greatly improve shelf life of the garlic. Once curing is complete we’ll have plenty of garlic for CSA members, online orders and our farmers market stand!
Garlic set up to cure!
Farm Flooding: It Takes a Village
The wet summer continues.
I read a book this winter called The Stoic Challenge by William B. Irvine. The book, while brief, gives pointers on how to deal with adversity. To boil it down to a central idea The Stoic Challenge challenges readers to take every problem or setback they face and frame it as a challenge by “the stoic gods.” The goal, is to not let setbacks ruin your mood or your day. The way we choose to frame setbacks determines our reality.
I’m glad I read that book because two summers in a row of intense rainfall, difficult farming conditions, and high disease pressure put my basic stoicism skills to the test. I can’t say I’ve dealt with everything this summer perfectly - the way The Stoic Challenge advises - but I think I’m doing better than last season.
One last bit of context before we get to the flooding: I left on a vacation for the Boundary Waters Canoe Area Wilderness (BWCA) last Friday, July 18th. In the BWCA there’s no internet, no cell service, and no way to communicate back home. It’s a perfect way for me to stop fretting about the weather, emails, product inventory and everything else technology related. On Tuesday, July 22nd I got back to civilization and promptly checked my messages, email and the weather. Not good.
On Friday evening I saw a huge spot on the radar right over our farm. I knew it was raining hard but I didn’t know how much. I later found out we got about 3.5” of rain in about 2 hours. Our farm is already overly saturated from the frequent heavy rains this season has brought so that wasn’t welcome news. On top of that, I had just planted our fall storage carrots - one of our most important winter crops. Carrots do not like heavy rainfall just after planting.
Then, on Wednesday evening we got a second round of nearly 4” of rain in about 2 hours. Over 7” of rain in less than one week. Not good. Both rainfalls prompted a community response here on the farm. One of our tunnels flooded and it holds one of our most important summer crops: lettuce. With how saturated everything is we knew that we needed to remove that water as fast as possible.
The lettuce tunnel on Thursday morning. So. Much. Water.
Lara - who did an amazing job while I was away - arranged with our neighbors to borrow a pump on Sunday. Huge thanks to the Millers who not only loaned the pump but also helped get it set up and more. The pump worked beautifully removing all the standing water from the tunnel in just a few hours - likely saving our summer lettuce. Of course, the tunnel flooded again on Wednesday evening so Thursday we did the same thing.
We still don’t know if we saved all of the lettuce yet. Time will tell if our lettuce succumbs to disease before it reaches maturity. We do know we vastly improved our odds.
Here’s hoping for a dry August!
Shallots: A New-To-Us Crop
I’ve been farming professionally for 11 years and gardening my whole life (I’m almost 40) and I’ve never grown shallots. That is, until this year. Most years, we try out a new crop or two and after 11 years and all the things I’ve grown throughout my life the list of things we don’t grow that people ask about is getting small. Shallots were the one thing we still routinely get asked about and so we finally gave them a try this year. Here’s how we tackled this new to us crop.
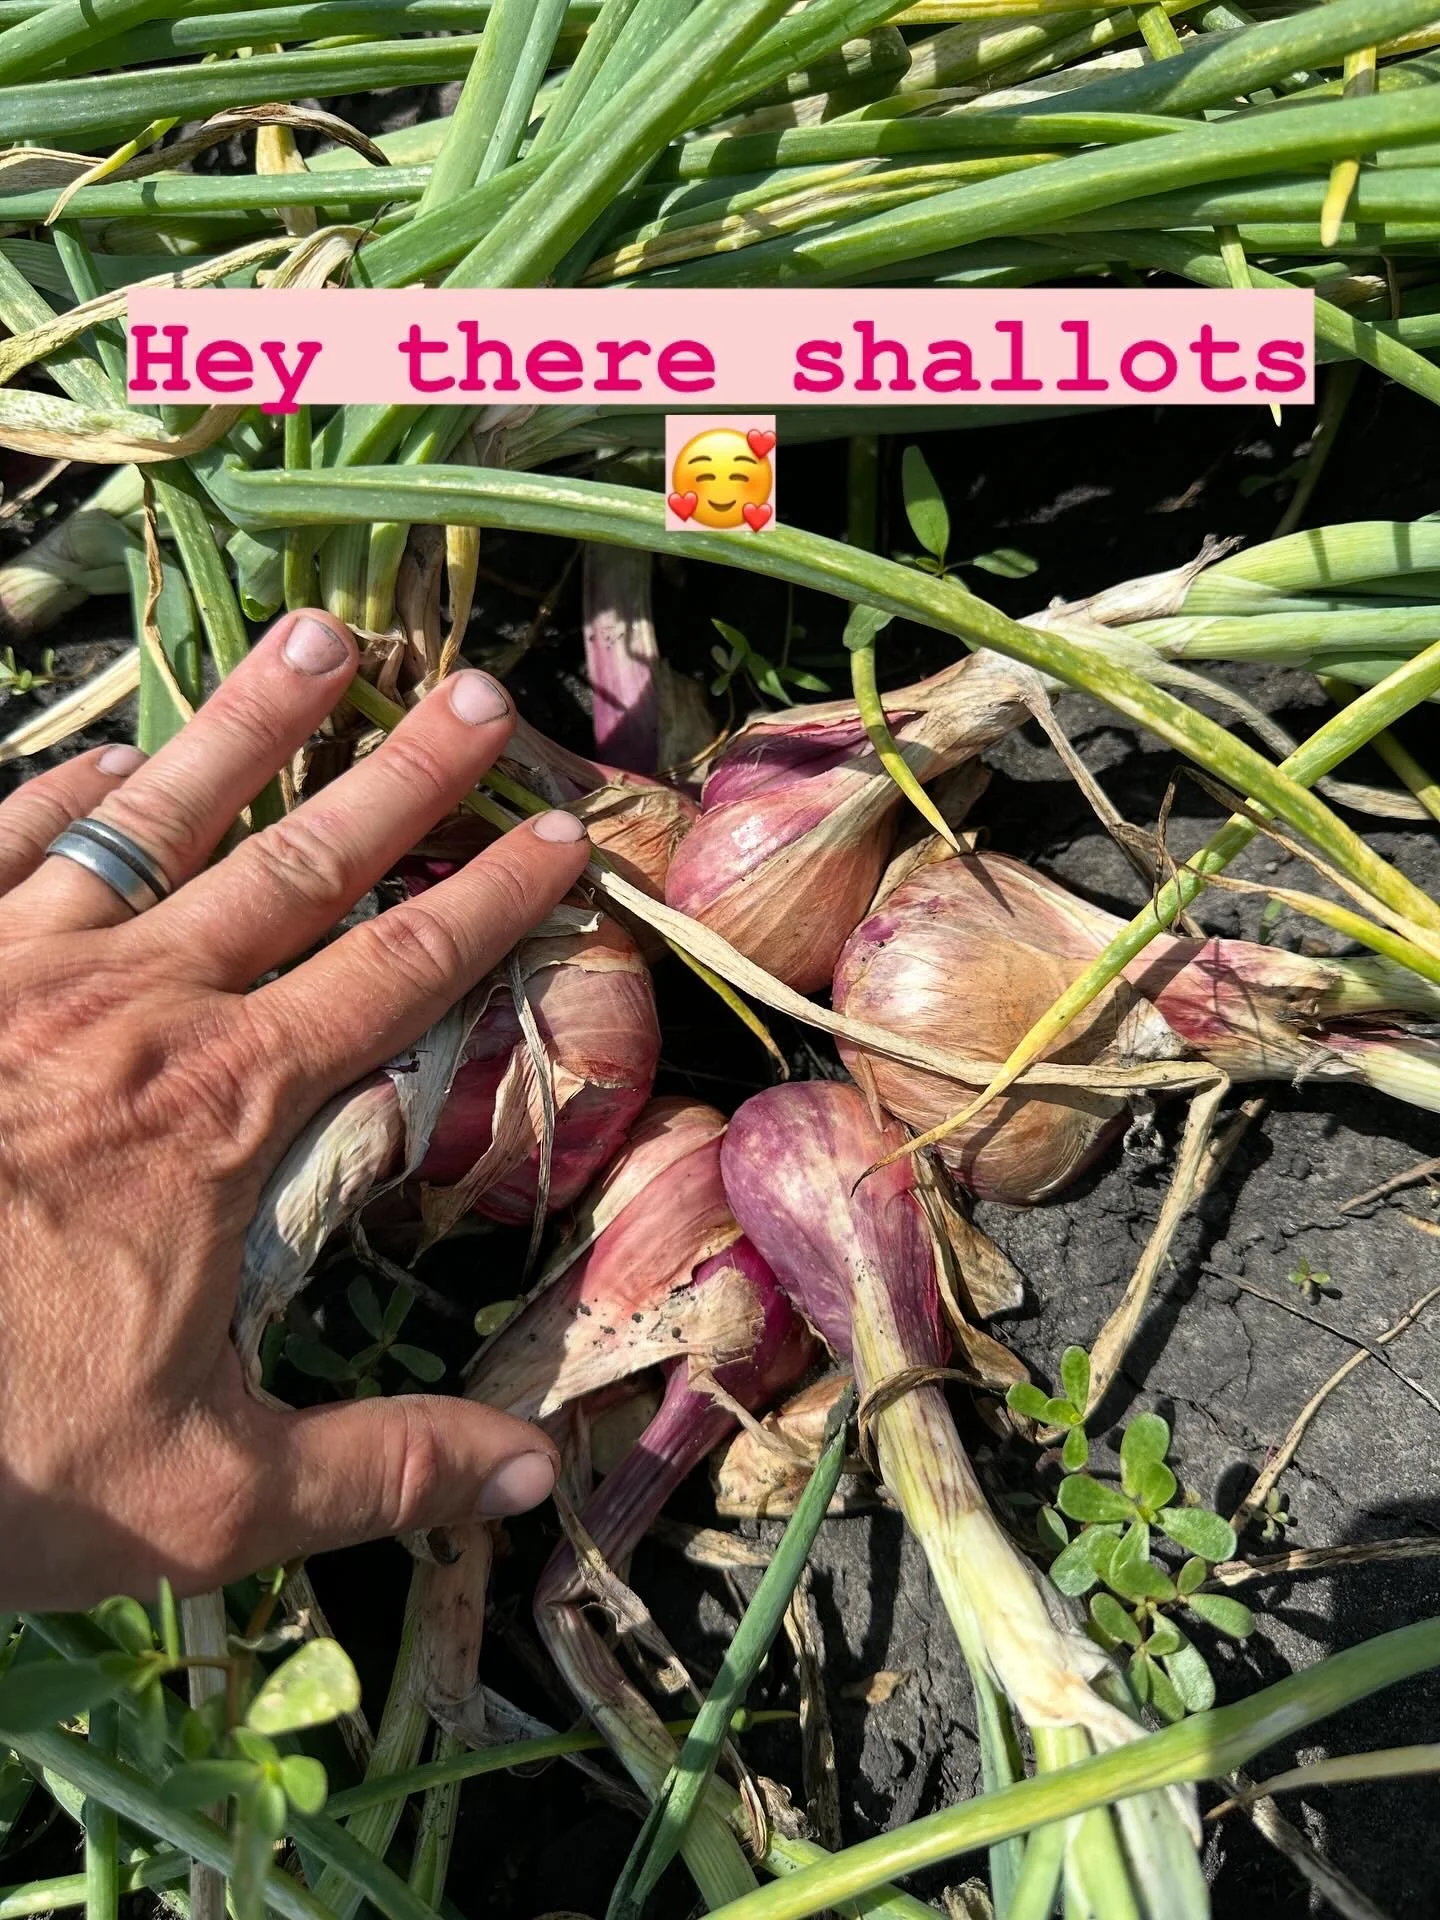
They’re so pretty! Good size on them too.
We ordered shallot sets from the nearby Albert Lea Seed House. Sets is the term used to describe very small bulbs of shallots (or onions) intended to be planted and grown. I saw a lot of conflicting information about whether to grow plants or sets. We chose to grow sets because we didn’t have the greenhouse space and I couldn’t find a supplier that would mail live plants as we do with our onions. I also saw conflicting information about whether to plant in the spring or fall and mulch them like garlic. Since I decided to plant them over the winter my hand was forced there.
We kept up with the weeds as we try to do with all our other crops and almost 3 months later we’re nearing our first shallot harvest. The advice we saw online says to treat them as we do storage onions: when the tops fall over it’s time to harvest and cure them. Curing simply means allowing the outer skin to dry down and form a protective layer allowing for a much longer shelf life.
We’ll plan to harvest these shallots in the next week or so and after around 2 weeks of curing our very first shallot crop will be ready for you!
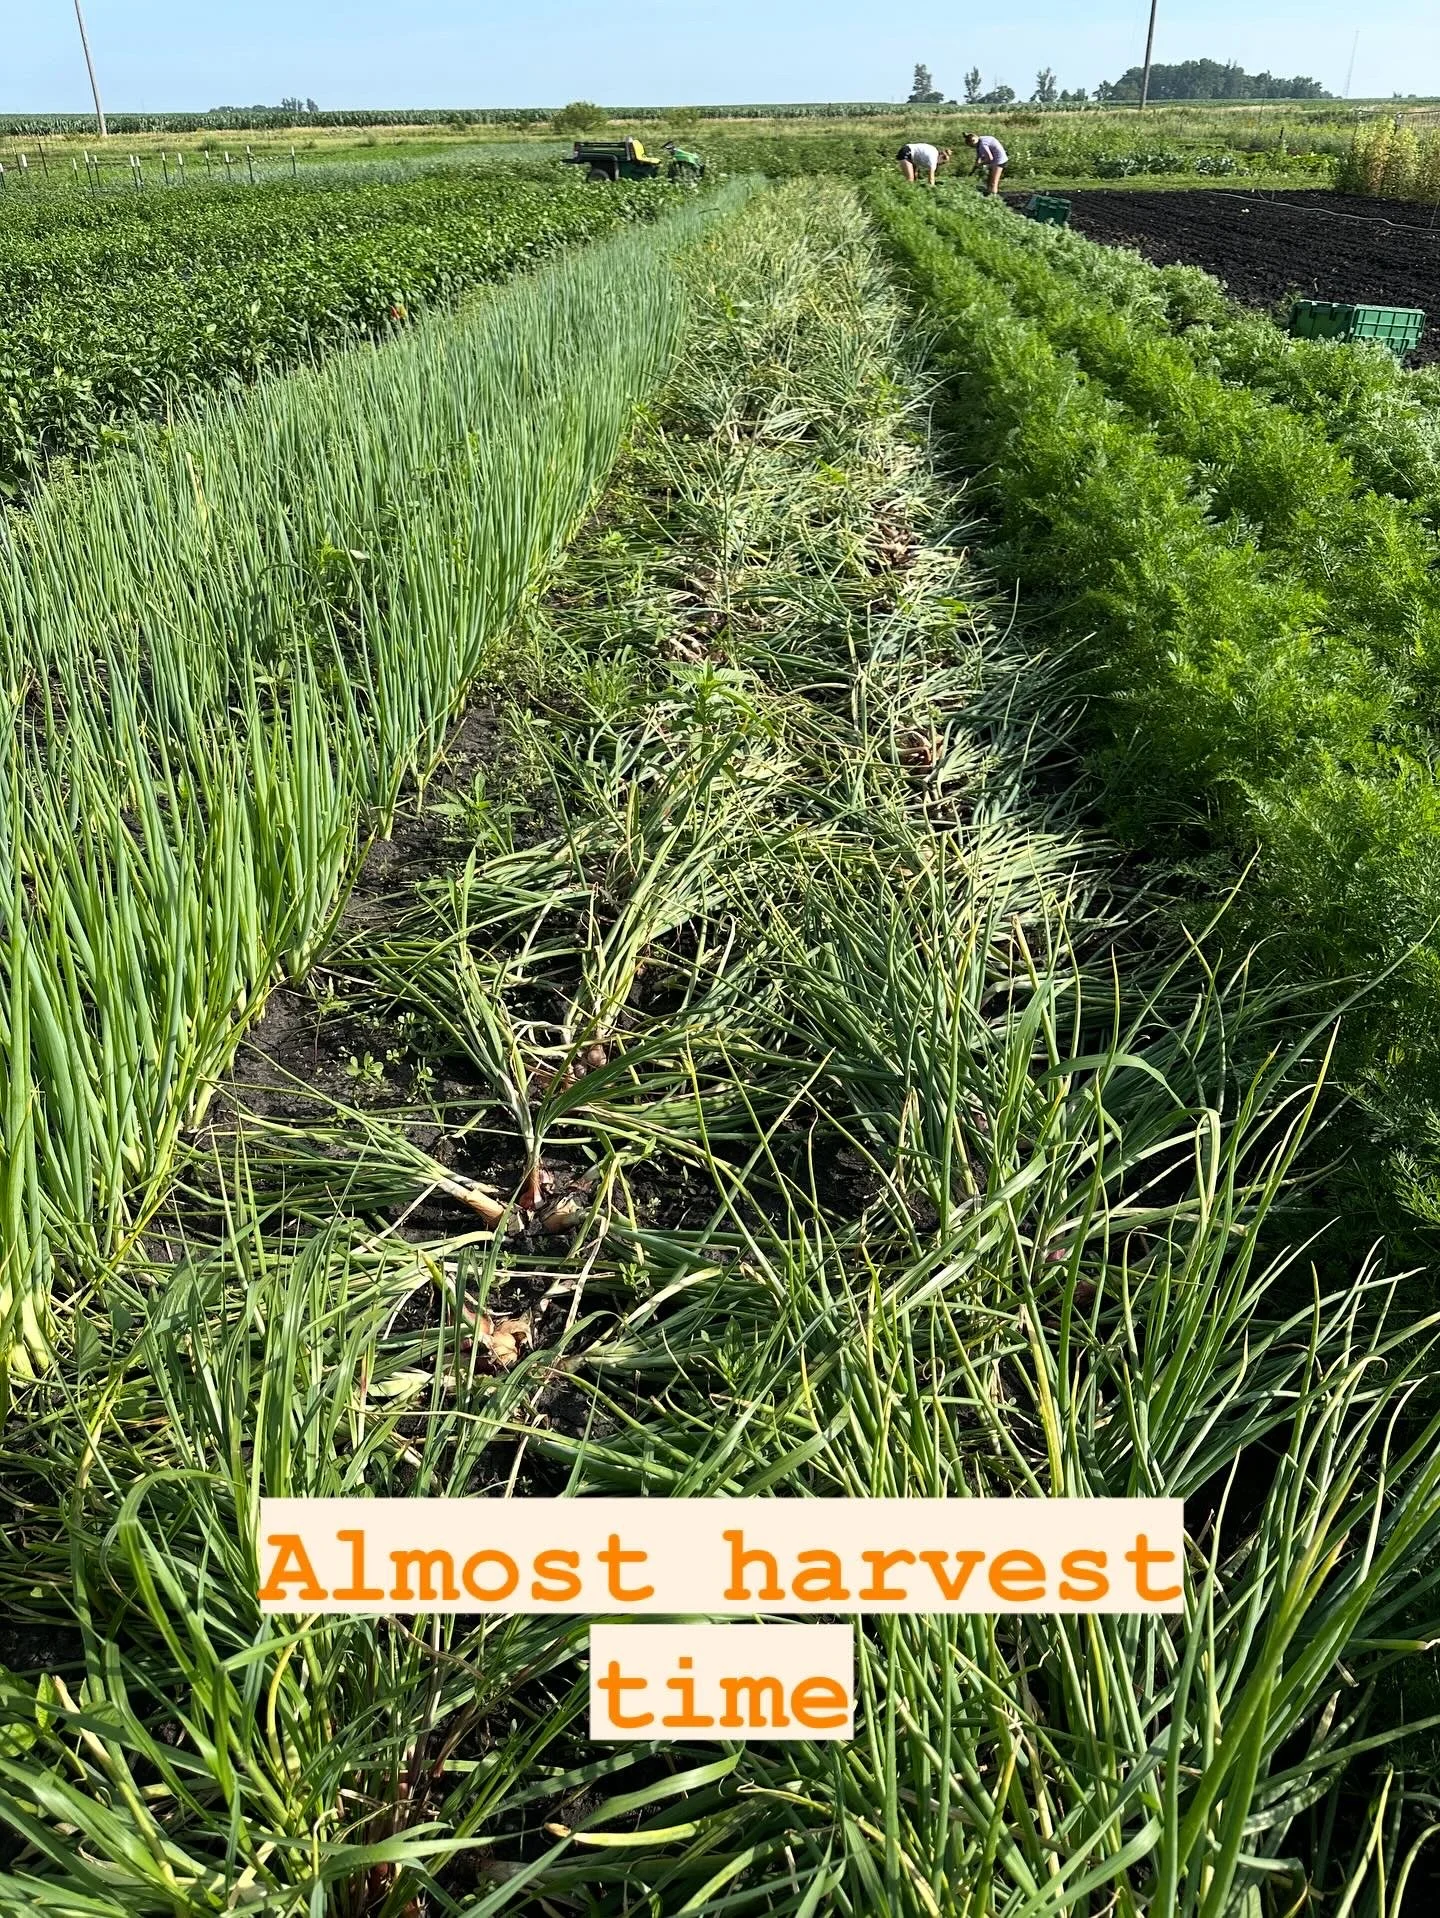
Shallot tops have fallen over - that’s how we know it’s close to harvest time.

What the shallots looked like before the tops fell over.
The Tomato Tunnel
Tomato season is juuuuuust about here! In fact, I picked the very first tomato of the season just yesterday and promptly ate it. Farmers treat :-). This week I wanted to share a few photos of our tomato tunnel and talk about our pruning and trellising strategy both of which are very important to getting a good harvest of delicious, healthy, summery tomatoes.


We prune and trellis our tomatoes for a number of reasons that all help us with our goal of harvesting lots of large tomatoes from healthy plants for the duration of the season. Let’s talk about pruning first. When we prune tomatoes we’re pruning two things: lower leaves and “suckers.” We prune lower leaves from the plant to help improve airflow in our tunnel which helps reduce the risk of disease in our tomato tunnel. We prune suckers to both encourage the plant to produce larger tomatoes and to make the plants more manageable.
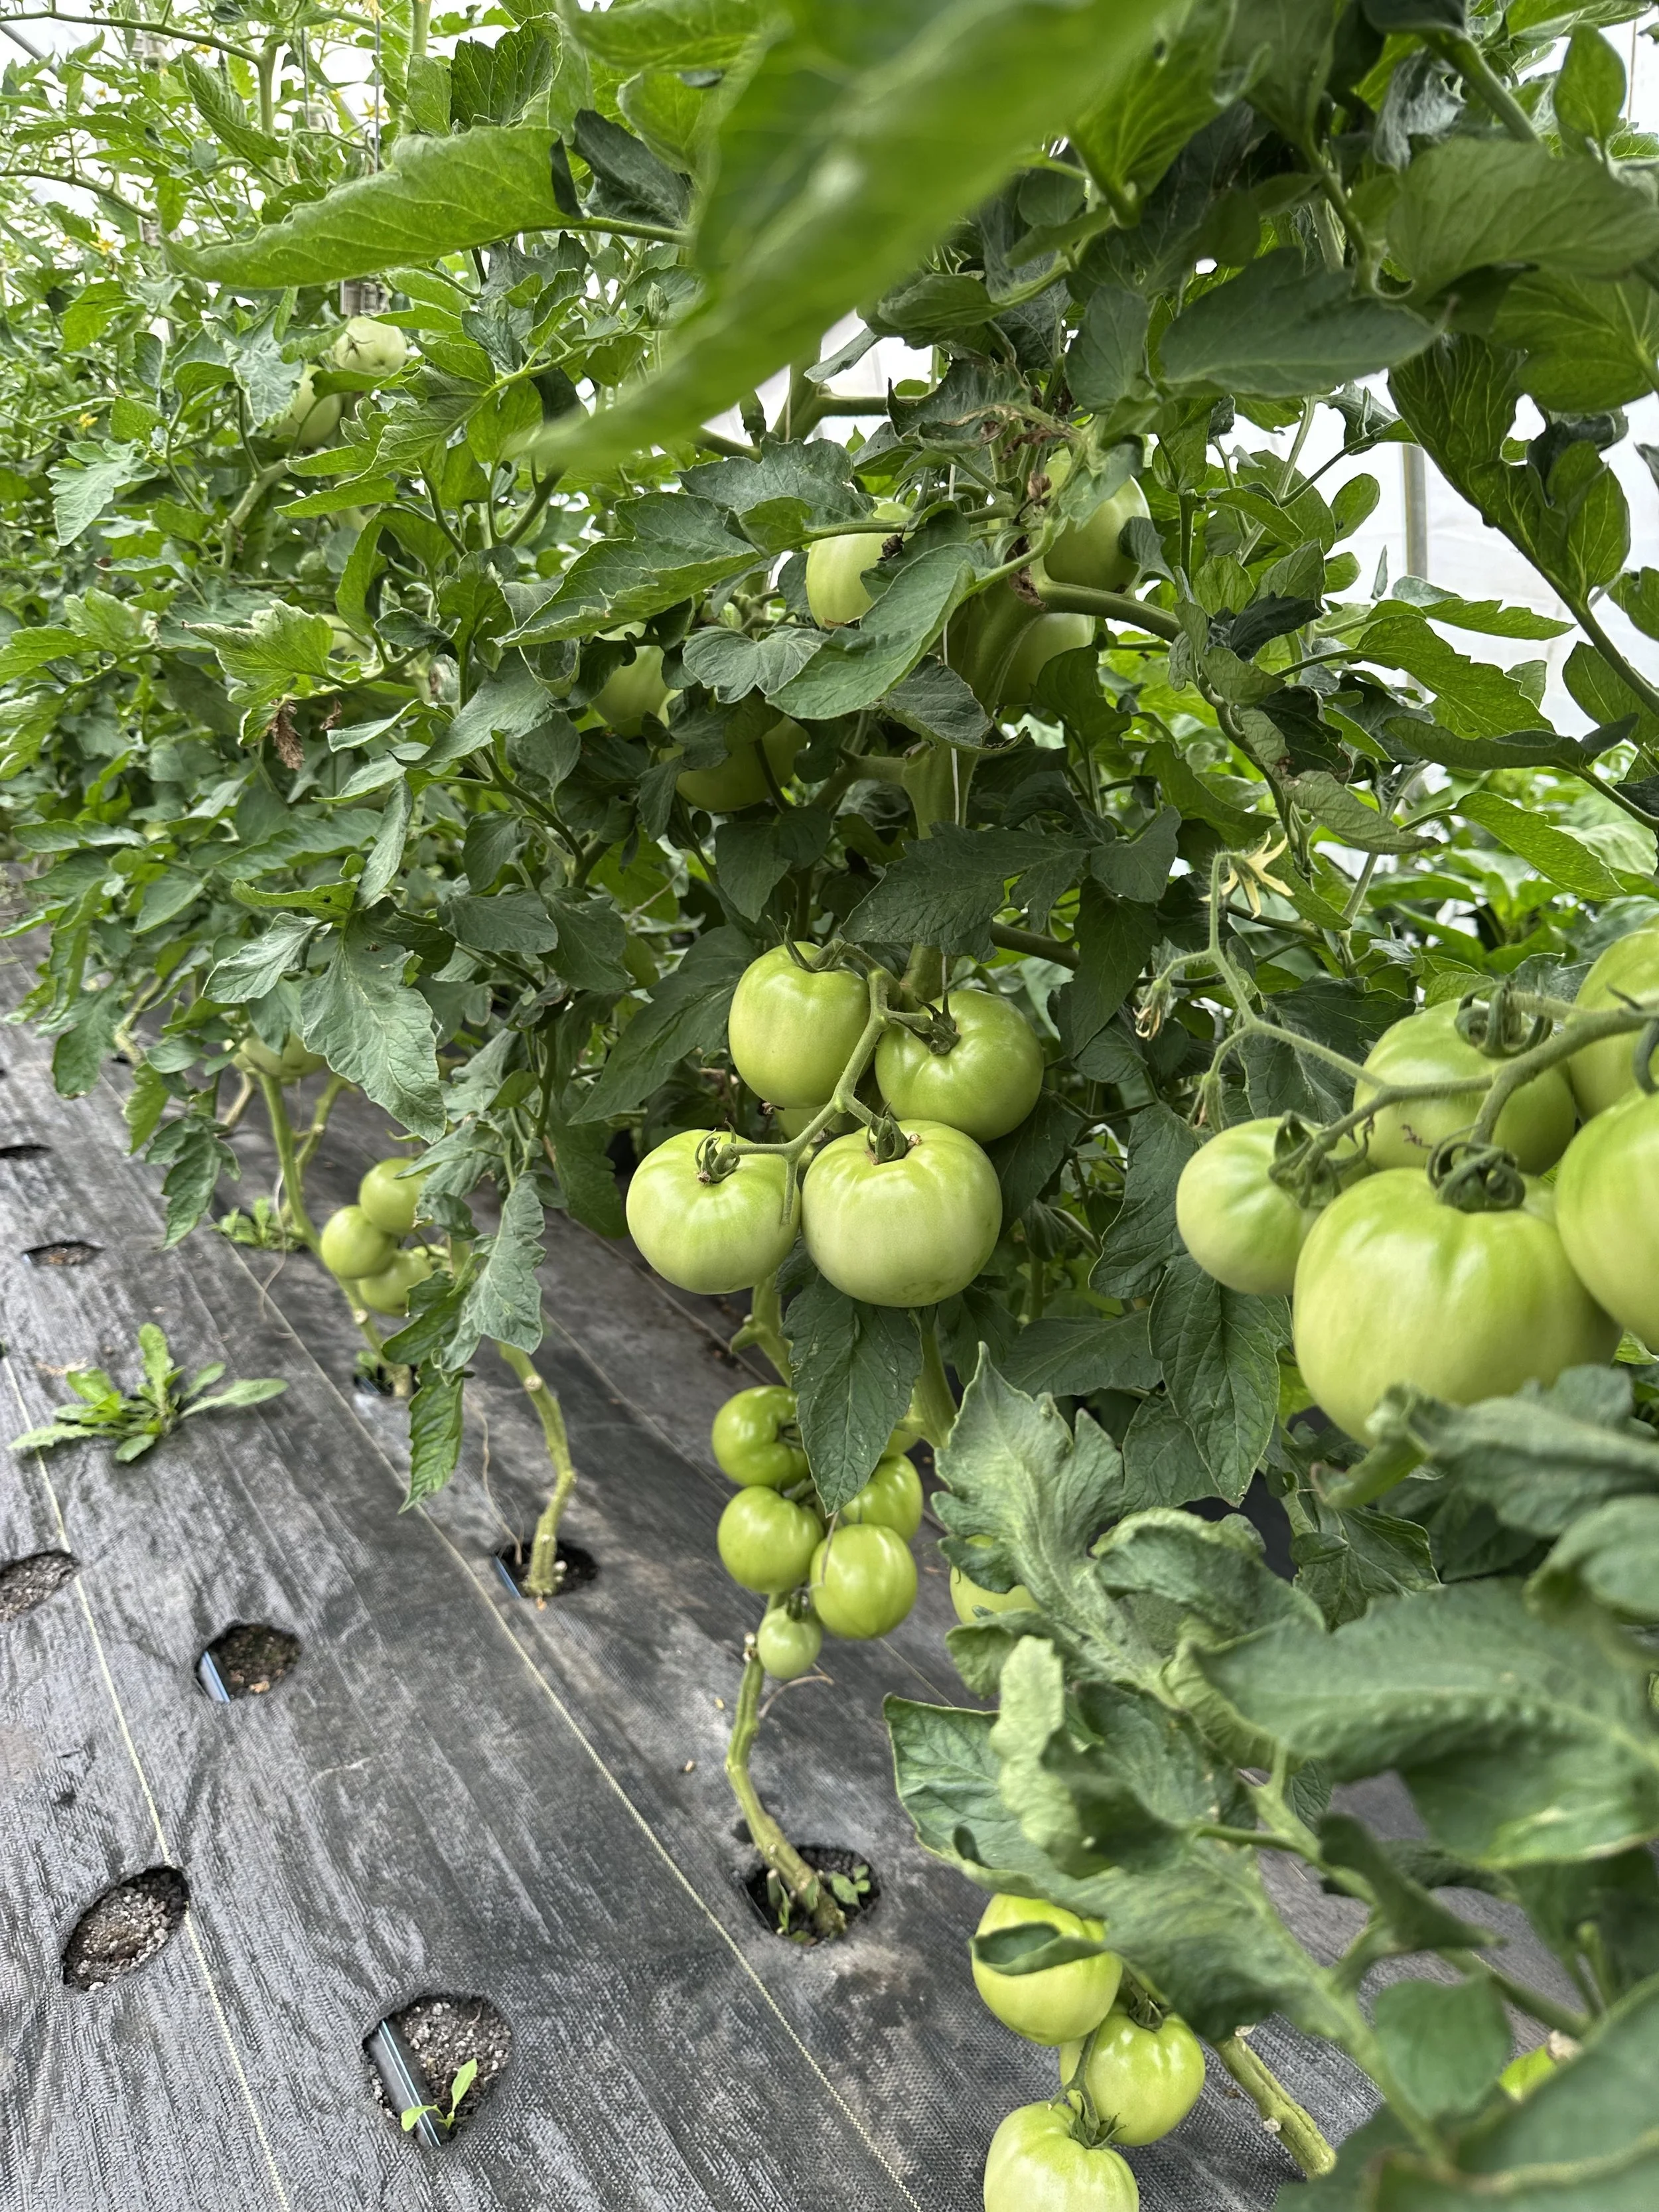
This years tunnel tomato crop. We’re very happy with the fruit set on these plants.
We’re trying the new-to-us QLIPR system for practicing the lower and lean tomato trellis system. The idea is that the growing season is long enough and that our tomato grow tall enough that we run out of vertical space in our tunnel. Because of this, we need a way to manage that height and lower the plants down and leaning them to one side or another allows us to easily manage that height.
QLIPR is unique in that it utilized two clips that leap frog each other on our weekly prune and trellis system. It also allows us to do all of our tomato management (pruning, leaning, harvesting) from the ground instead of a ladder.

Each plant gets a wire hook and two foam lined clips. The clips move along the vine as it grows allow us to keep the “business end” of the tomato at chest height. Clips can be seen on the far top right of this photo.
Tomato management has become one of my favorite things on the farm and tomatoes continue to be a very important crop on the farm. We hope to expand our tomato offerings in future years including growing some of our cherry tomatoes using this system as well as adding other heirloom tomatoes.
Our Sustainable Farming Practices
If you’ve been following and shopping with us for awhile you probably already know that we are deeply committed to sustainable growing practices on our farm. If you’ve just discovered us or are beginning to learn about us and our farm then this blog post is for you! We’ll go over just some of the many ways we use sustainable and organic growing practices on our farm. And we’ll explain why our tag line - Healthy Soil, Healthy Food, Healthy People - succinctly captures the essence of what and why we do what we do on our farm.
For us, sustainable growing practices mean the following things. First, we are trying to improve our soil over time instead of degrading our soil over time. We want the soil for next season to be better than the previous seasons. Second, we don’t use toxic chemicals for weed, disease & pest control on our farm. Finally, we want to grow a wide diversity of crops and cover crops. All of these, tie into our first goal: trying to improve our soil over time. Let’s dig into each of them.
Improving Soil Health
Soil isn’t just a medium to grow something in. It’s a complex living, breathing ecosystem filled with bacteria, fungi, insects and more. In fact, in just a single teaspoon of soil there are billions of living organisms that are responsible for cycling the nutrients that plants need to grow. We want to foster and encourage that ecosystem to thrive because if that ecosystem is off then the quality of our produce goes down.
We improve soil healthy by minimizing tillage as much as possible on our farm. Tillage disrupts and destroys the ecosystem described above and can cause things to get out of balance. While we are not 100% no-till on our farm for a variety of reasons we are very aware of the damage tillage can cause. We also plant diverse cover crop mixes to grow a wide variety of plants that can foster a diverse microbial community in our soil.
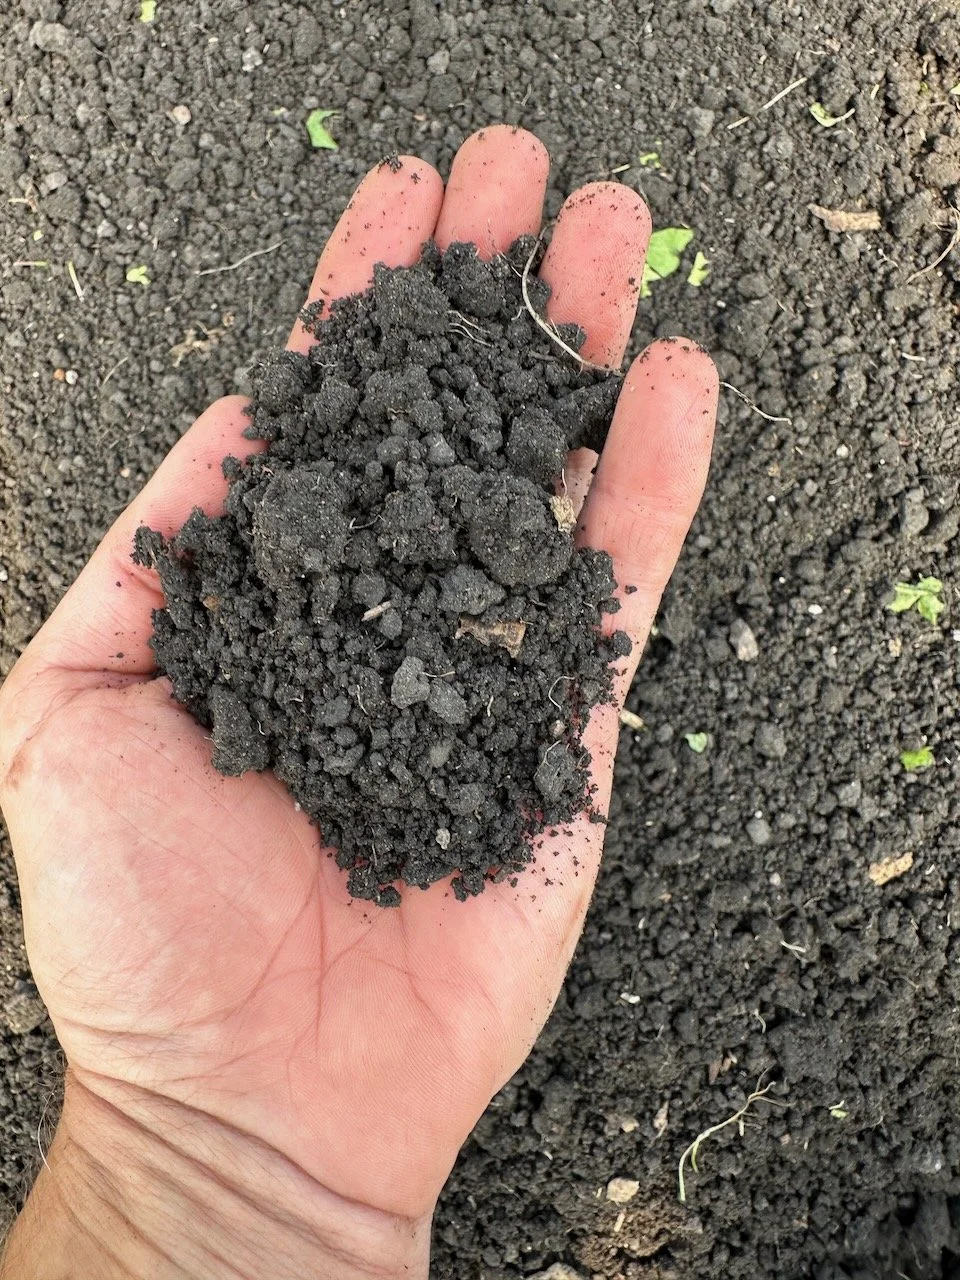
A handful of soil with billions of living organisms in it!
No Toxic Chemicals
This is basically a no-brainer. We don’t use toxic chemicals on our crops for insect, weed, or fungus control. These chemicals safety for humans is questionable at best and cancer causing at worst. We er on the side of caution and avoid their use to protect the health and wellness of ourselves, our children, our neighbors, our community as well as our soil and it’s microbial community. C
Crop Diversity
We grow over 90 varieties of produce on our farm each with their own nutrient needs. By rotating through these crops in our fields and tunnels we’re able to more closely approximate nature’s diversity which helps keep our crops healthy, lowers pest pressure, and helps to improve our soil. In addition to crop diversity we also grow diverse cover crop mixes in fallow areas of our farm. These mixes attract beneficial insects, improve our soil by increasing soil organic matter, prevent our soil from eroding from wind or rain and are a joy to observe.
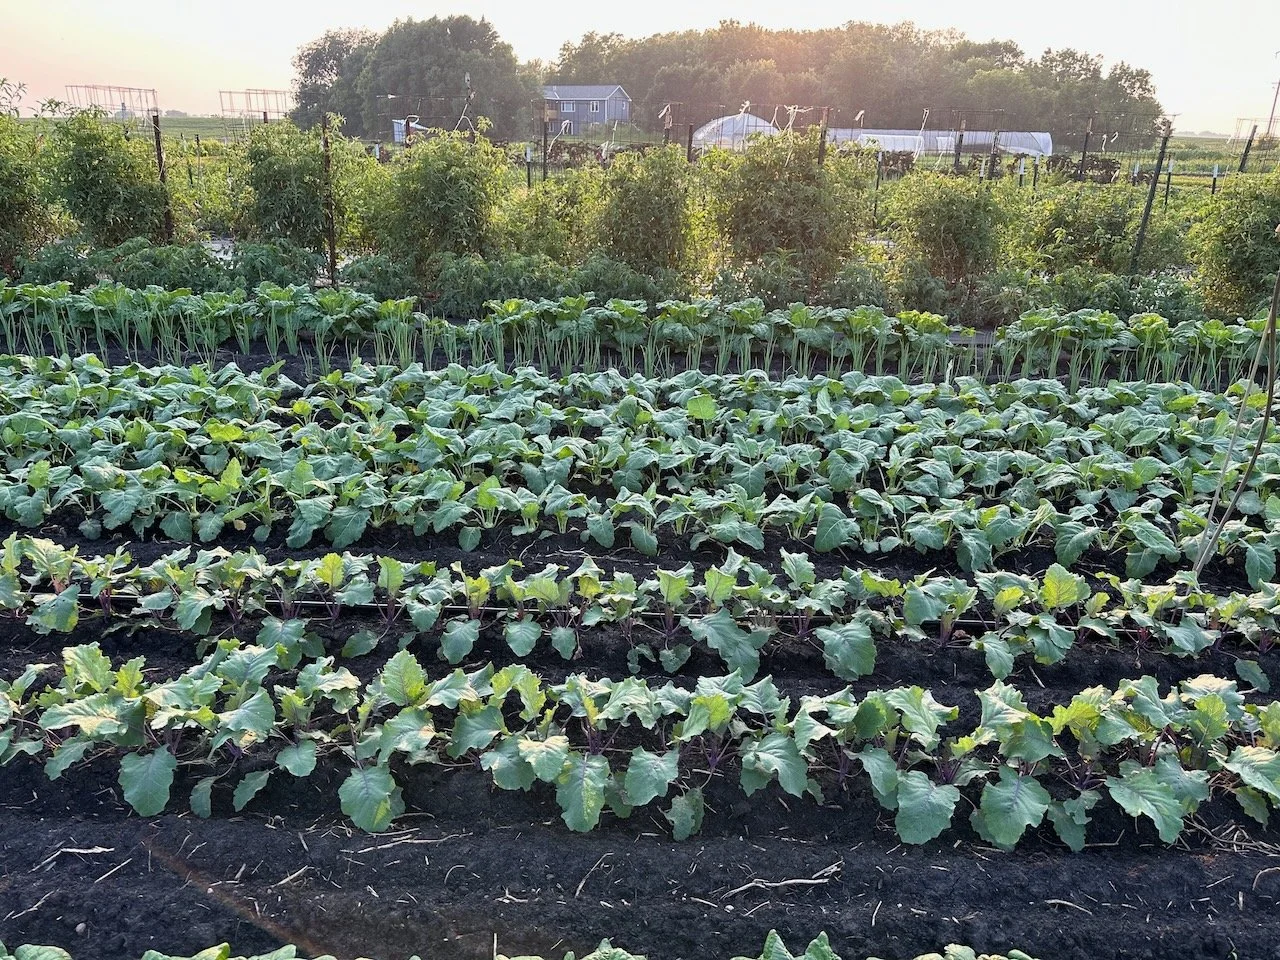
Our diverse vegetable farm. Kohlrabi, cabbage, onions, tomatoes in this photo of one small piece of our farm.
Healthy Soil, Healthy Food, Healthy People
Let’s tie it all together into our tag ling. Healthy soil is the foundation needed to grow healthy plants. Plants need more than just the standard NPK (nitrogen, phosphorus, & potassium) fertilizers sold everywhere. They are complex organisms requiring complex nutrients in order to thrive. It is similar to how humans need more than just fat, carbs, and fiber to thrive. Thus, if you have healthy soil you have a healthy plant which yields healthy food.
There is a growing body of literature that suggests that per unit of mass the fresh produce you find in the supermarket has less nutrients than produce from 50 years ago. Here’s an article for further reading: https://www.scientificamerican.com/article/soil-depletion-and-nutrition-loss/ The reason for this is depleted soil and only replacing NPK instead of thinking of soil as a living, breathing thing. If you have healthier soil then you have healthier produce.
Finally, the typical American diet is generally pretty bad (if you’re reading this blog you probably don’t have a typical American diet.) Worse, even if the typical American is buying fresh produce at the super market it’s just not as good for you (and not as good tasting either) as the produce we’re growing due to the reasons cited above. Eating nutrient dense produce that is nutrient dense because it came from healthy plants which were grown in rich, healthy soil will help you be healthier.
Thus, healthy soil = healthy food = healthy people!
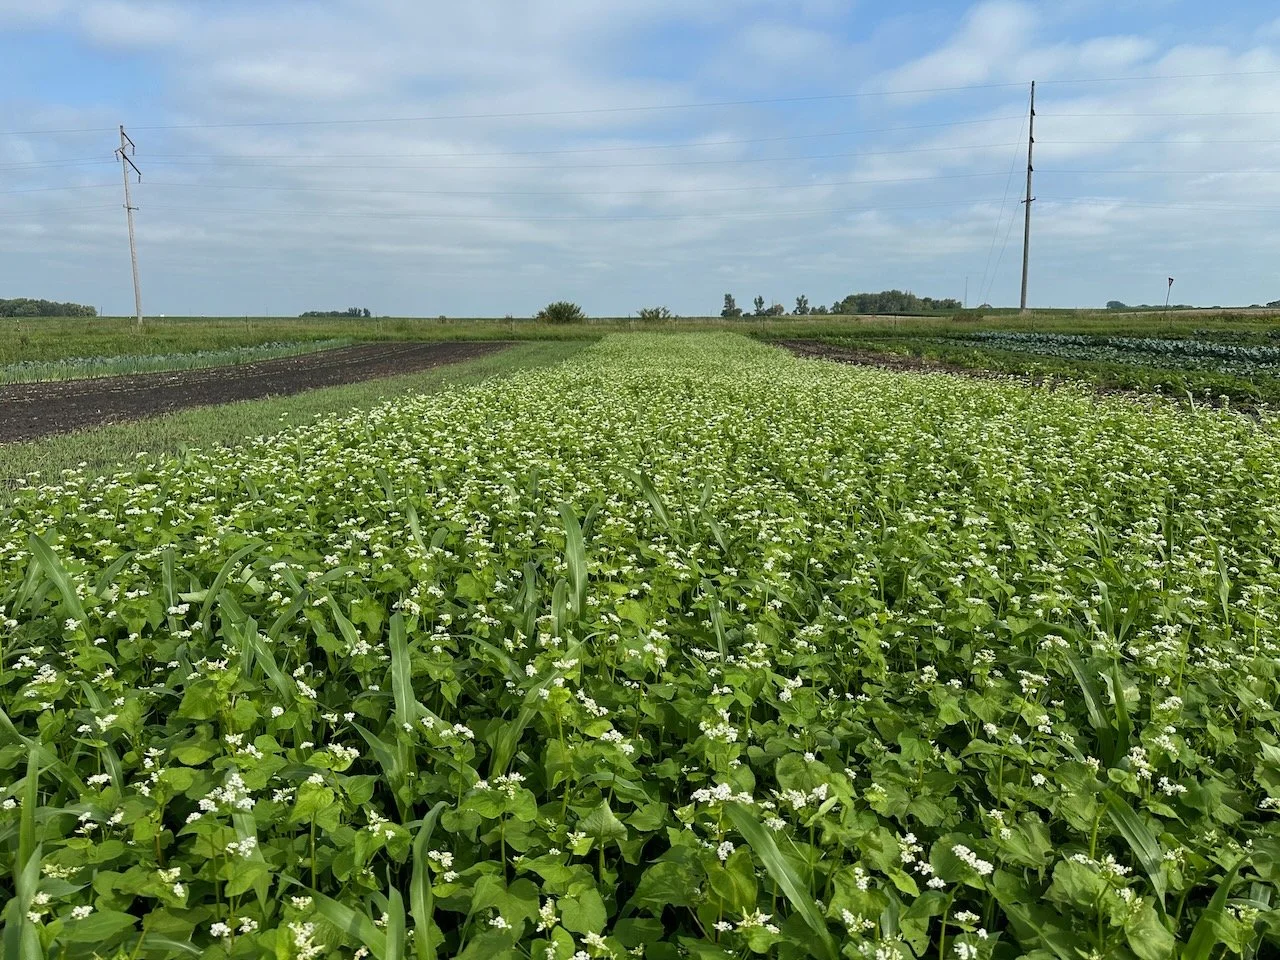
Cover crops on our farm! Buckwheat, millet, peas, sunflowers, sun hemp and soybeans, are all part of this mix!
Snap Pea Trellis Trials
Peas can be a bit of a tricky crop. They don’t like it too be too hot, or too cold or too wet or too dry. The Goldilocks zone - where everything is just right and the peas flourish - is very narrow for peas. Oh, and peas are vine crops in that they like to crawl and climb anywhere they can and don’t necessarily stand upright all on their own. That’s especially true for our sugar snap peas. The vines can grow to be 5 to 6 feet tall by the end of their productive season. With that much height it’s a requirement to trellis snap peas to reduce disease pressure, manage the height, and make them easier to pick. This weeks blog post will go over two methods we tried this year.
Method One: Trellis Netting
This method utilized plastic netting suspending by using fence posts, conduit pipe and zip ties to give the peas a nice net to climb up. In our experience this method works the best but it has some down sides. First, it’s a bit labor intensive to setup. It takes a good amount of time and back and forth trips to get all the pieces of this trellis system in place. Another downside is the plastic - the netting is discarded at the end of each season.
Overall though this method works the best when installed properly. As you can see in the photo above the peas are nice and upright climbing up the fence with ample space for us to get in and harvest the peas.
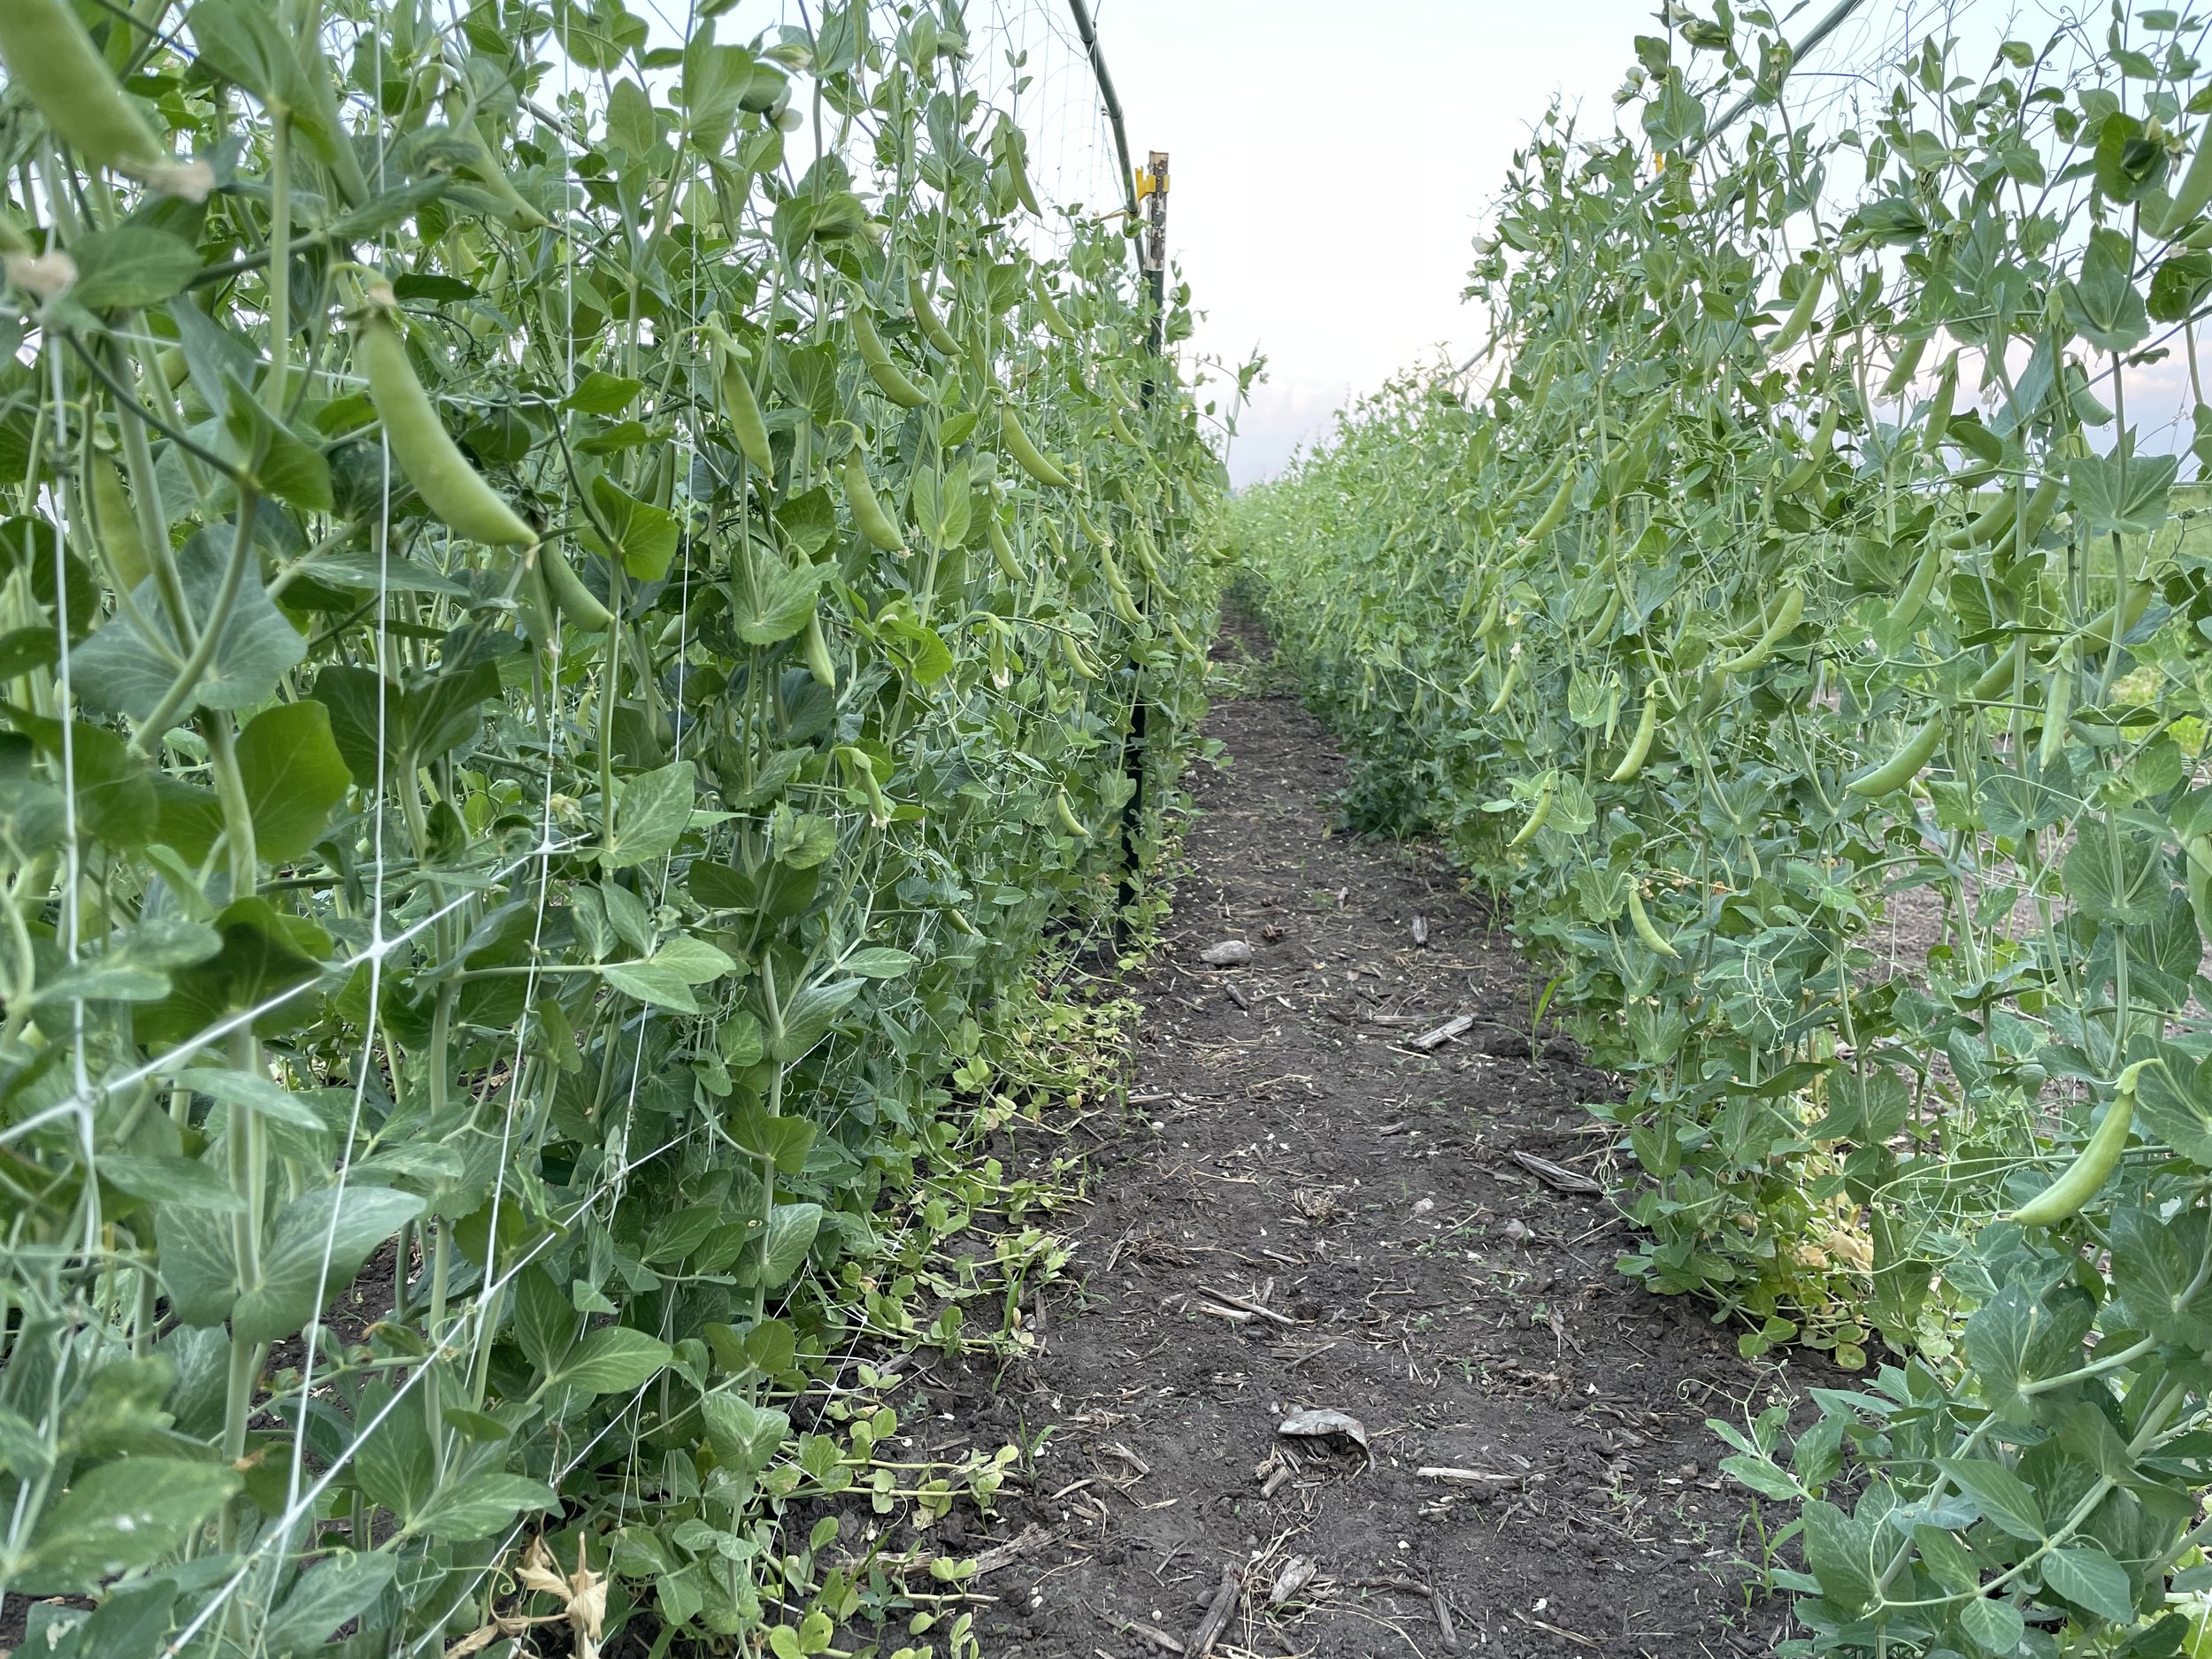
Trellis netting in action supporting sugar snap peas!
Method Two: Trellis Ropes
This method switches out the netting for ropes that get weaved between peas and fence posts. It’s simpler to set up but requires more labor overall since someone needs to add additional rope every 1-2 weeks for the peas to climb on. Our experience indicates this method doens’t work well for us. We noticed a marked increase in the number of peas that are unable to find the rope and thus just flop over onto the ground. Not ideal.
We trialed the rope method this year just to see if we liked it better. We found out that we don’t. A valuable lesson for seasons to come!
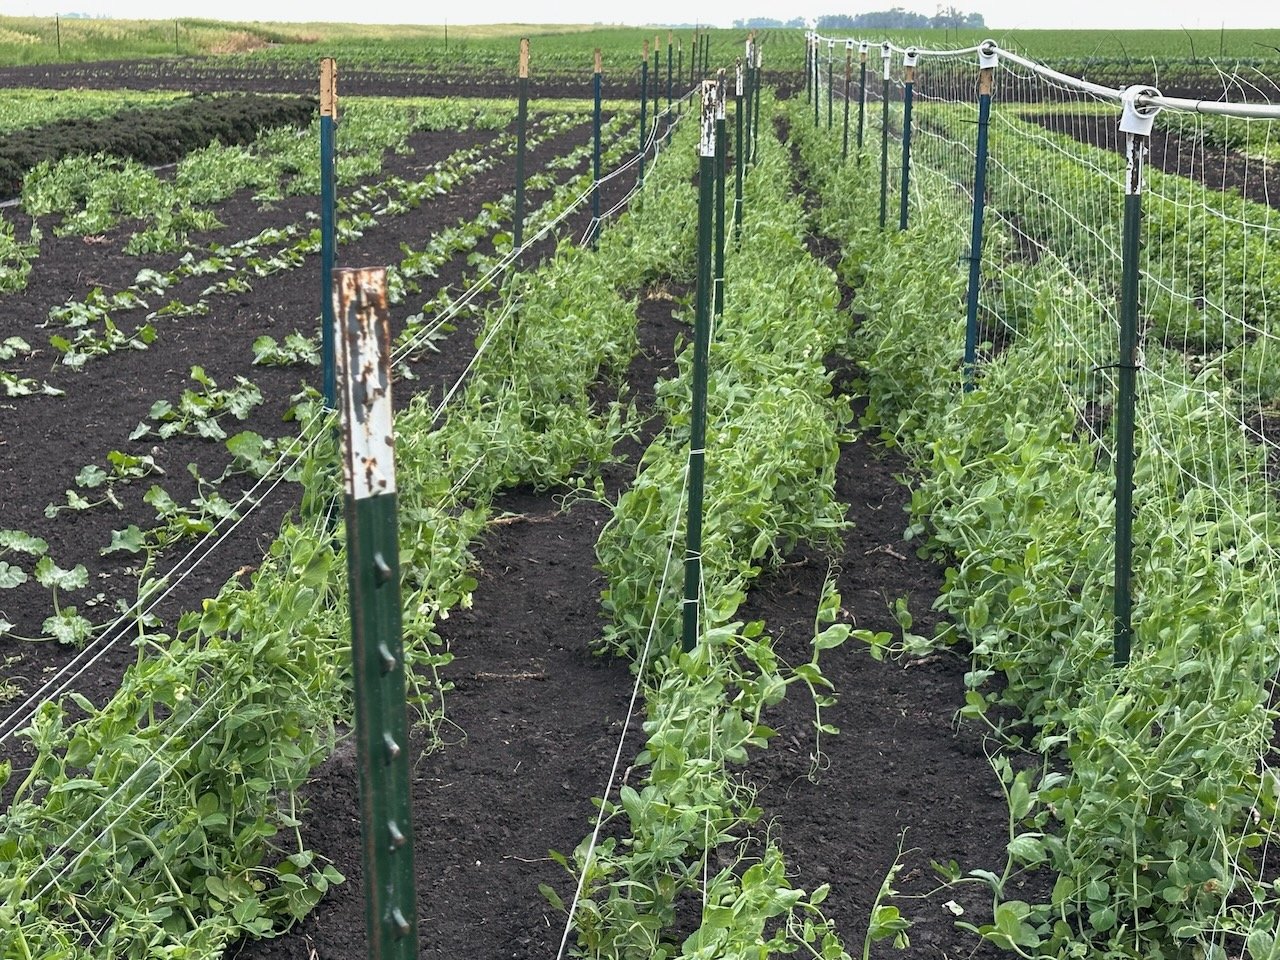
Method Two: you can see in the center of the photo how the middle row of peas is flopping to the right. Not ideal!
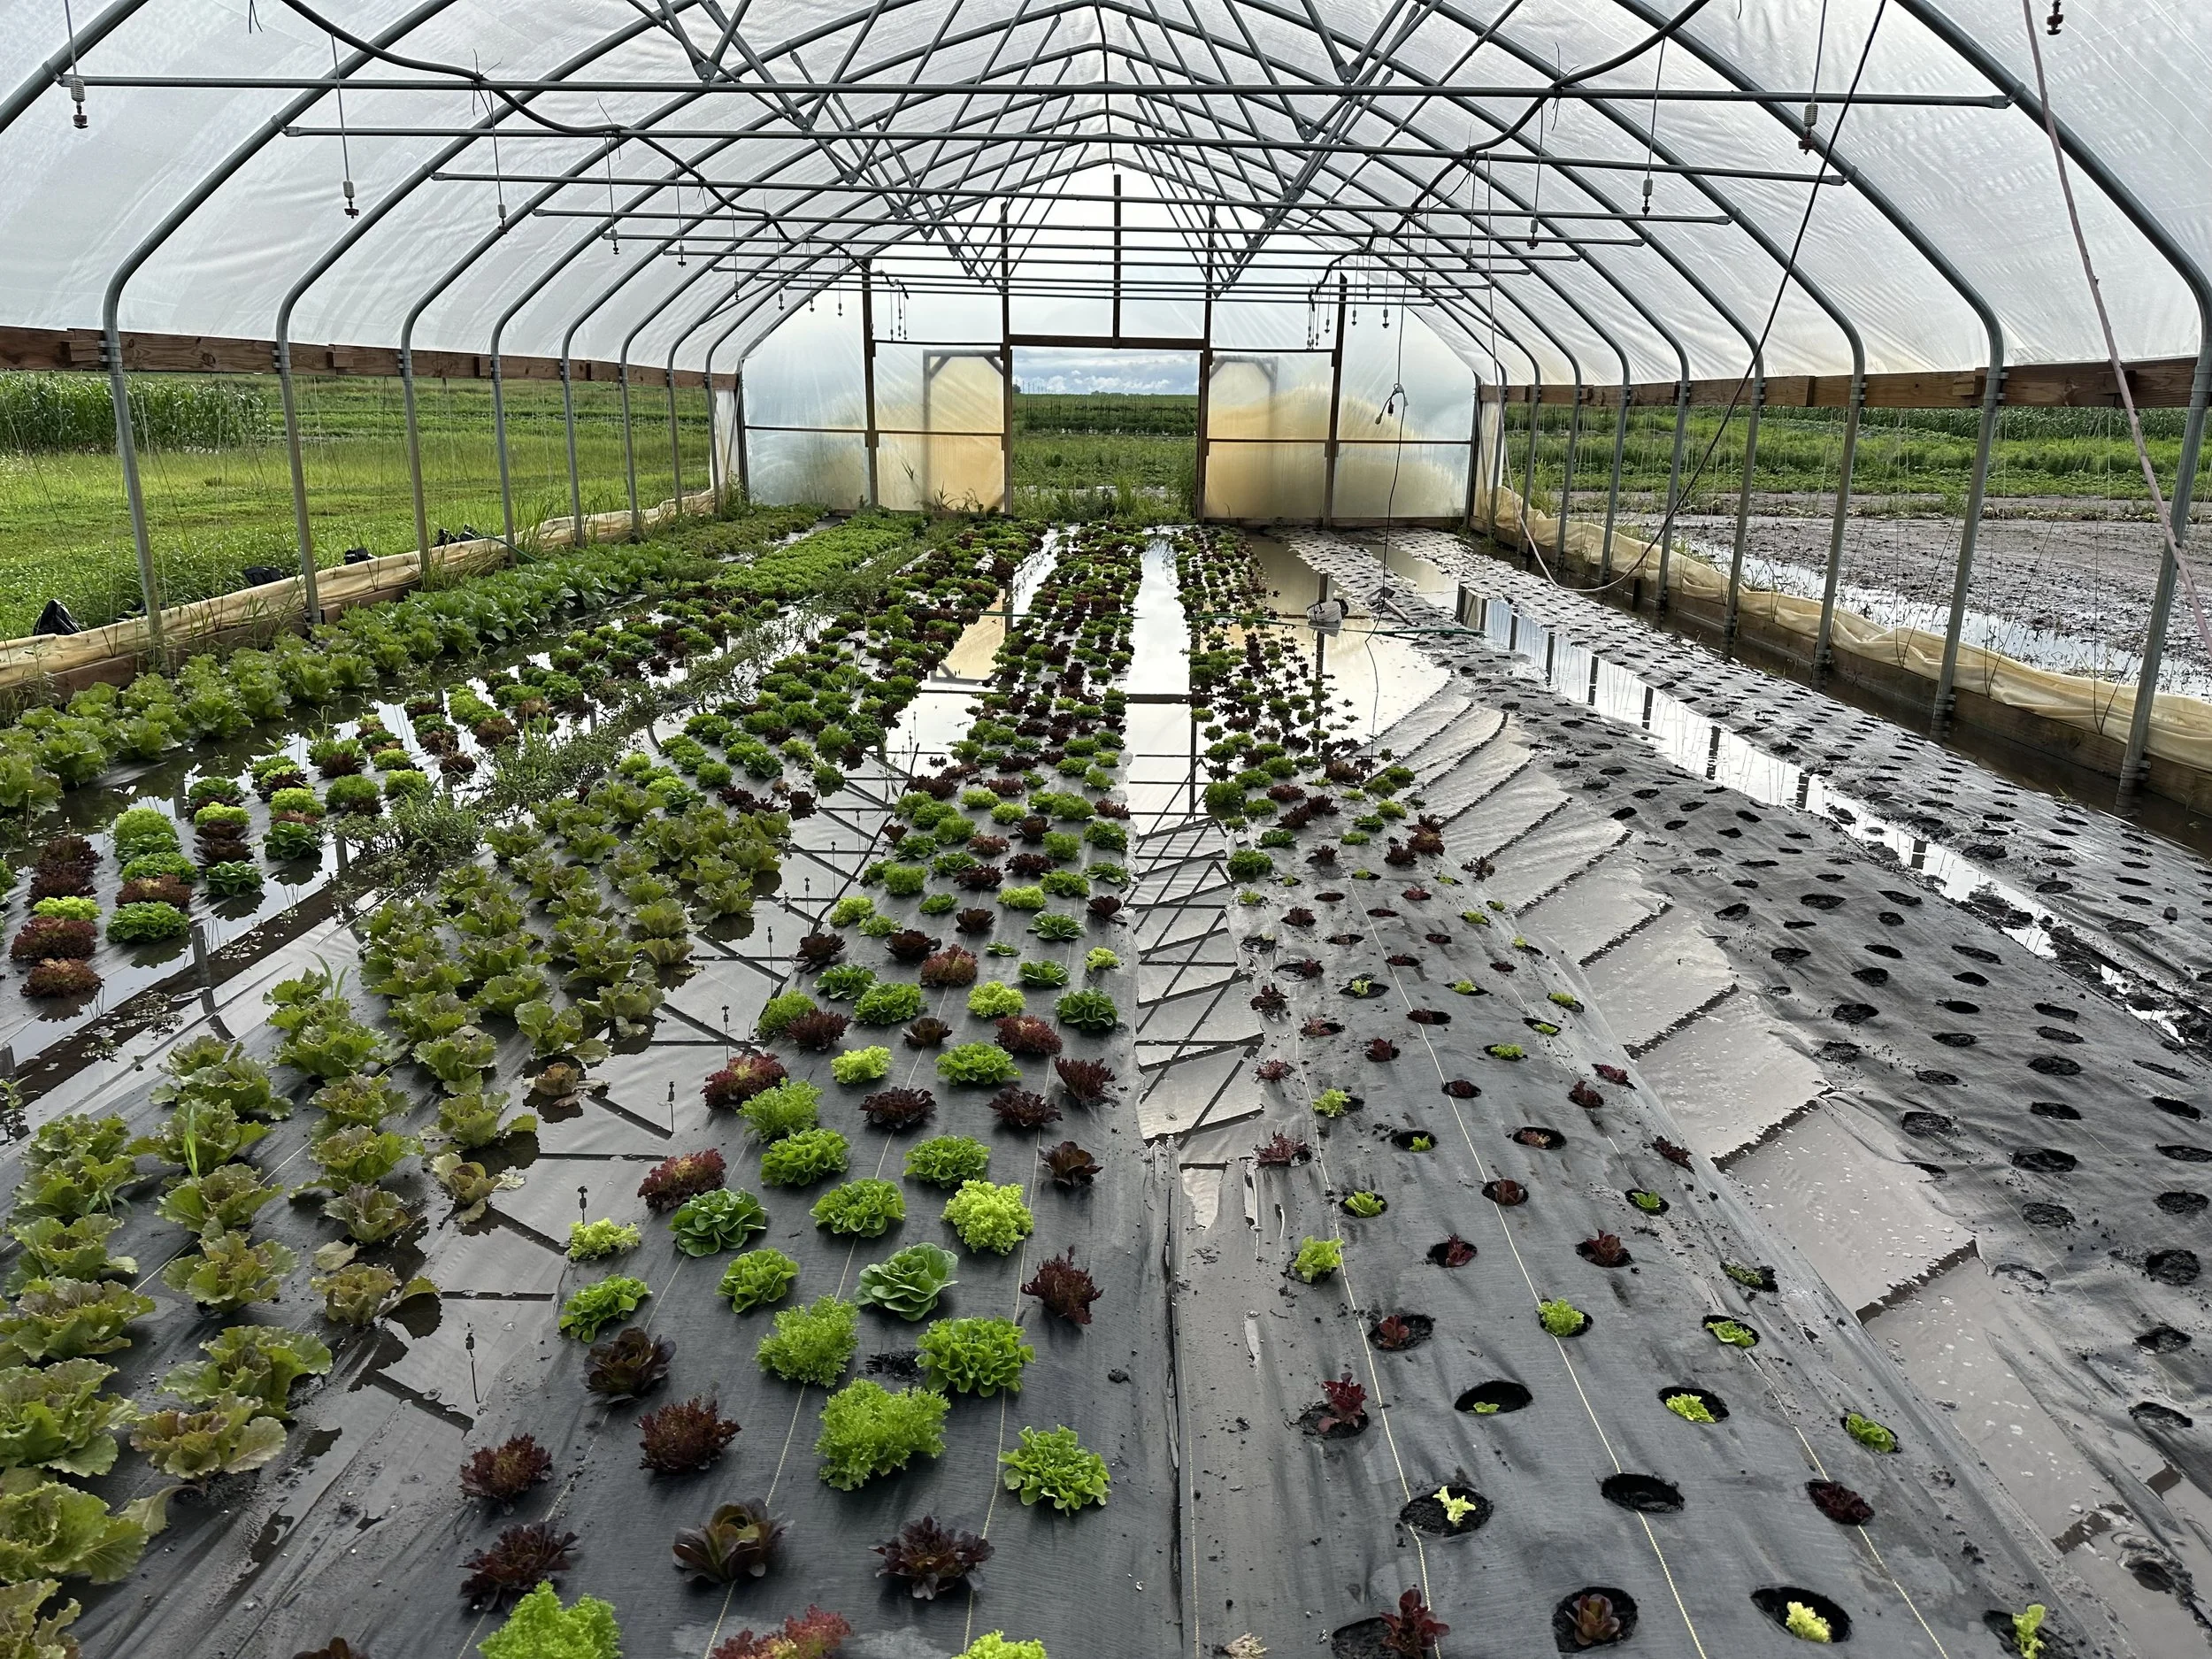
Tunnel Bed Flips & Summer Lettuce
Lettuce is one of our signature crops. We strive to grow and sell lettuce for as much of the year as we can. Currently, we reliably have lettuce available every week from early May through late December. A large part of the reason we have lettuce available for such a long period of time is our tunnels. Since we’re starting to transplant our summer lettuce this week into our tunnels we though we’d take a moment to go over our process of “flipping” beds and growing summer lettuce.
First, off: what is a bed flip? It’s a bit of market farm jargon that basically means that we are removing an old crop from a bed and preparing that bed for a new crop. In most of our tunnels we get about 3 crops per year from each bed. This helps us optimize the use of the space in our tunnels so that we can bring the largest amount of the best crops from the tunnel beds.
The photos below (from separate beds/tunnels) show the steps. First is the our finished product - lettuce mix :-). The second photo shows landscape fabric removed and the bed tilled, the third photo shows landscape fabric installation, and the fourth photo shows recently transplanted lettuce.


Here’s how we do our bed flips:
Remove old crop debris/weeds: There’s almost always some left over crop debris and/or weeds when we flip beds. We remove this material to reduce disease pressure and to help us in subsequent steps.
Remove landscape fabric: We use landscape fabric to help manage weeds and disease and keep lettuce clean. We remove landscape fabric and allow it to rest for a period of time before we reuse it.
Prepare the soil: We use a small rototiller to lightly till the soil. This helps to loosen the soil and makes it easy to transplant lettuce into. After we till, we lightly rake the bed to make it nice and smooth and uniform.
Install new landscape fabric: Now we’re ready to put landscape fabric back down and our bed is ready to go!
Summer Lettuce
We grow four kinds of summer lettuce and three of them grow pretty reliable in the heat: our lettuce mix, green curly, and summer crisp lettuces all do well in the heat. We’re experimenting with a romaine variety as well but have had mixed results. The heat of the summer can cause lettuce to both become bitter and bolt (which means is goes into it’s reproductive phase and becomes much less palatable). We use a combination of shade cloth, irrigation, careful variety selection, and landscape fabric to help manage the stress of summer.

Salad tunnel :-)