Climate Adaptation: Waterway Mix Seeding
In 2024 we experienced catastrophic flooding on our farm. We received a years worth of rainfall in just May and June. You may recall the nearby Rapidan Dam failed, downtown Mankato homes and businesses had flooded basements and many farmers experienced significant crop loss and difficulty accessing their fields. Unfortunately, climate models predict that these types of storms will only happen more frequently as the planet continues to warm.
This year we took action to help adapt our farm to climate change. We decided to take more of our lowest ground out of production and plant a cover crop that consists of a mix of species that can better withstand wet soil conditions. To compensate for the lost ground we took some of our pasture land into vegetable production.
The cover crop mix will provide a variety of benefits to the farm and the environment around us. First, it will help to reduce soil erosion during heavy rainfall events resulting in less soil ending up in the waterway. Second, it will help to reduce the amount of nutrients from our soil that are leached into the waterway. Finally, it will help suppress weeds and be relatively low maintenance - requiring mowing only a couple times per year.
A bit of history on our farm. Before the mid 20th century there was a creek that ran right through our farm. See the photo below. The powers that were decided it would be a good idea to move the creek such that it was square with the section. It wasn’t a good idea. Every time we get a heavy rainfall the creek is formed anew and precisely where it had been. Mother natures wants her creek back.

The green rectangle is where our farm is located. The dark wiggly line intersecting the green rectangle is where the creek was.
Back to the waterway mix. Below is a photo collage of the steps I took to seed the mix including a picture from last year that shows the flooding and if you look into the background of the photo you can see the “creek.” Also, not pictured is the first tillage pass I made to loosen the soil and knock down weeds.
Today, as I write this, it’s raining softly and steadily which will be perfect to get the waterway mix seeds germinated and growing! We can’t wait to see what it looks like in a couple years when it’s well established!


Weed Control 101
Weed control is something every farmer has to deal with. On our farm, we don’t spray chemicals on our crops or use pre emergent herbicides to control weeds which means we have to work really hard to control weeds on the farm. It doesn’t take long for weeds to get out of control and choke out the crops you’re trying to grow. Here’s how we do it.
Flameweeding
We use our flame weeder to burn small weeds just as they’re emerging from the soil and before our crops emerge. Because many weeds will germinate and sprout before our crops come out of the soil we can give our crops a head start by burning the weeds off. It’s been an effective tool for us especially in carrots and cilantro which have relatively long germination periods.

Our flame weeder.
Finger Weeding
No, not your fingers (although we do hand weed too). Finger weeders are discs with polyurethane “fingers” that spin and flick weeds out of the soil when they are young and vulnerable. This tools works particularly well on transplanted crops where the crop is vastly bigger than the weeds.

Finger weeders in yellow. Notice how the fingers penetrate into the soil in the row.
Tine Weeding
Tine weeding is a type of blind cultivation - that is, cultivation that is “blind” to the crop rows - that uses many small wires that vibrate in the soil and help to uproot very small weeds.
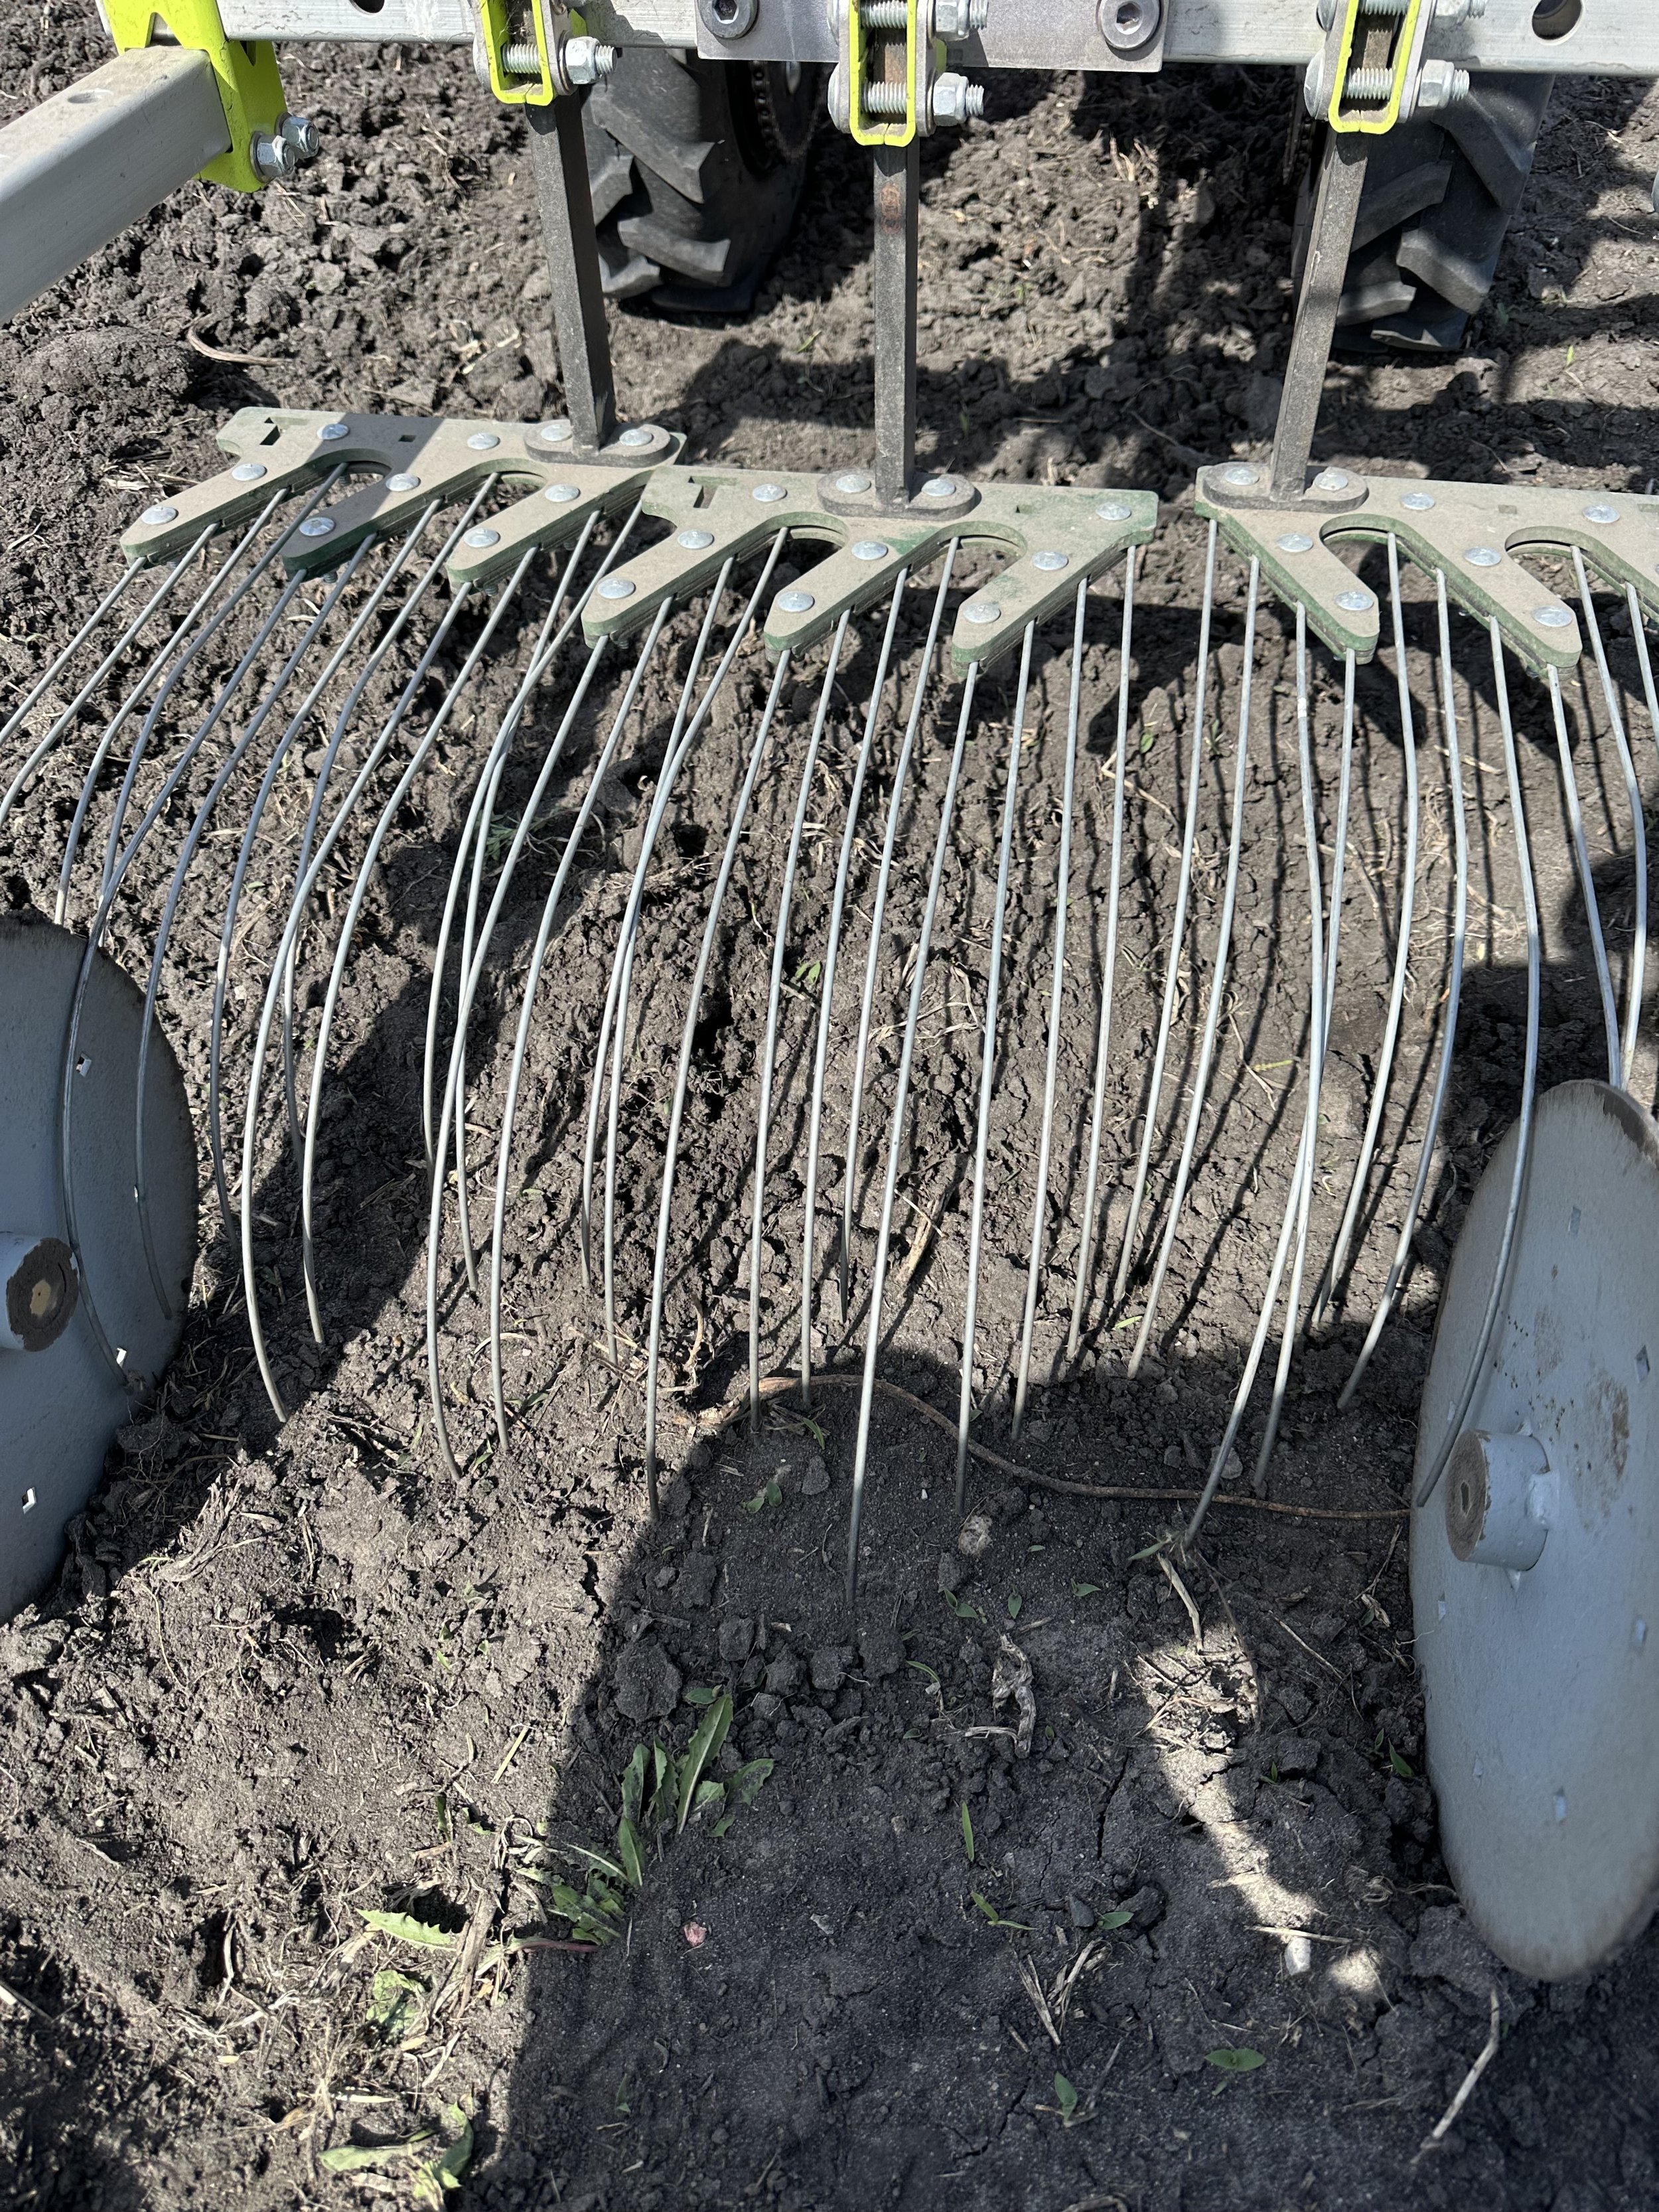
Closeup of the tine weeder.
Hand Weeding
Hand weeding is the most expensive and slowest weeding on the farm. All of the tools above help us reduce the hand weeding we have to do. We won’t completely eliminate hand weeding but in many cases we can reduce the time we spend hand weeding by 70% to 90% by using the tools above at the right time.
Finally, we take all of these tools together and apply a couple principles to them and we arrive at our weed control methodology.
Cultivate after every rain/irrigation session.
If you can see the weeds, it’s already too late to be most effective.
Stack cultivation tools as much as possible. Stacking tools means you use more than one method on each crop as often as possible.
Never let a weed go to seed.
Plant cover crops in fallow ground.
A Nice Spring Rain
We had a very much needed soaking rain over the past few days. My rain gauge said about 2.4” of rain and we needed every drop. It probably comes as no surprise that we’ve been busy planting and transplanting the past few weeks. We have a lot of seeds in the soil that were in very dry conditions and since seeds need water to germinate and spring to life we were eagerly anticipating the rain.

We do have irrigation but you may recall that last week we had a very, very windy week here on the farm. We had winds of 20MPH plus and some days as high as 45MPH which makes our overhead irrigation very ineffective. Most of the water evaporates or blows away before it hits the ground. So even though we have irrigation we could use to try to get our seeds to germinate we weren’t able to use it effectively. Further, we planted so many things in the last few weeks that we simply don’t have enough irrigation to water the entire farm. Thus, a rain was very welcome. Not to mention rainfall is always more uniform and seems to germinate our seeds much better than overhead irrigation.
Once things dry out we’ll have a flurry of tasks to complete that have been delayed because of the rain. We have a couple thousand transplants to get out into the soil, we have our next round of direct seeded crops to plant, we’ll need to make a cultivation pass across the entire farm to stay ahead of the weeds and we’ll need to continue hand weeding our crops. Luckily, we have a great farm crew this season and the weather is looking favorable for the next week or so!

Our overhead irrigation in action. You can see how a strong wind would make this very ineffective.
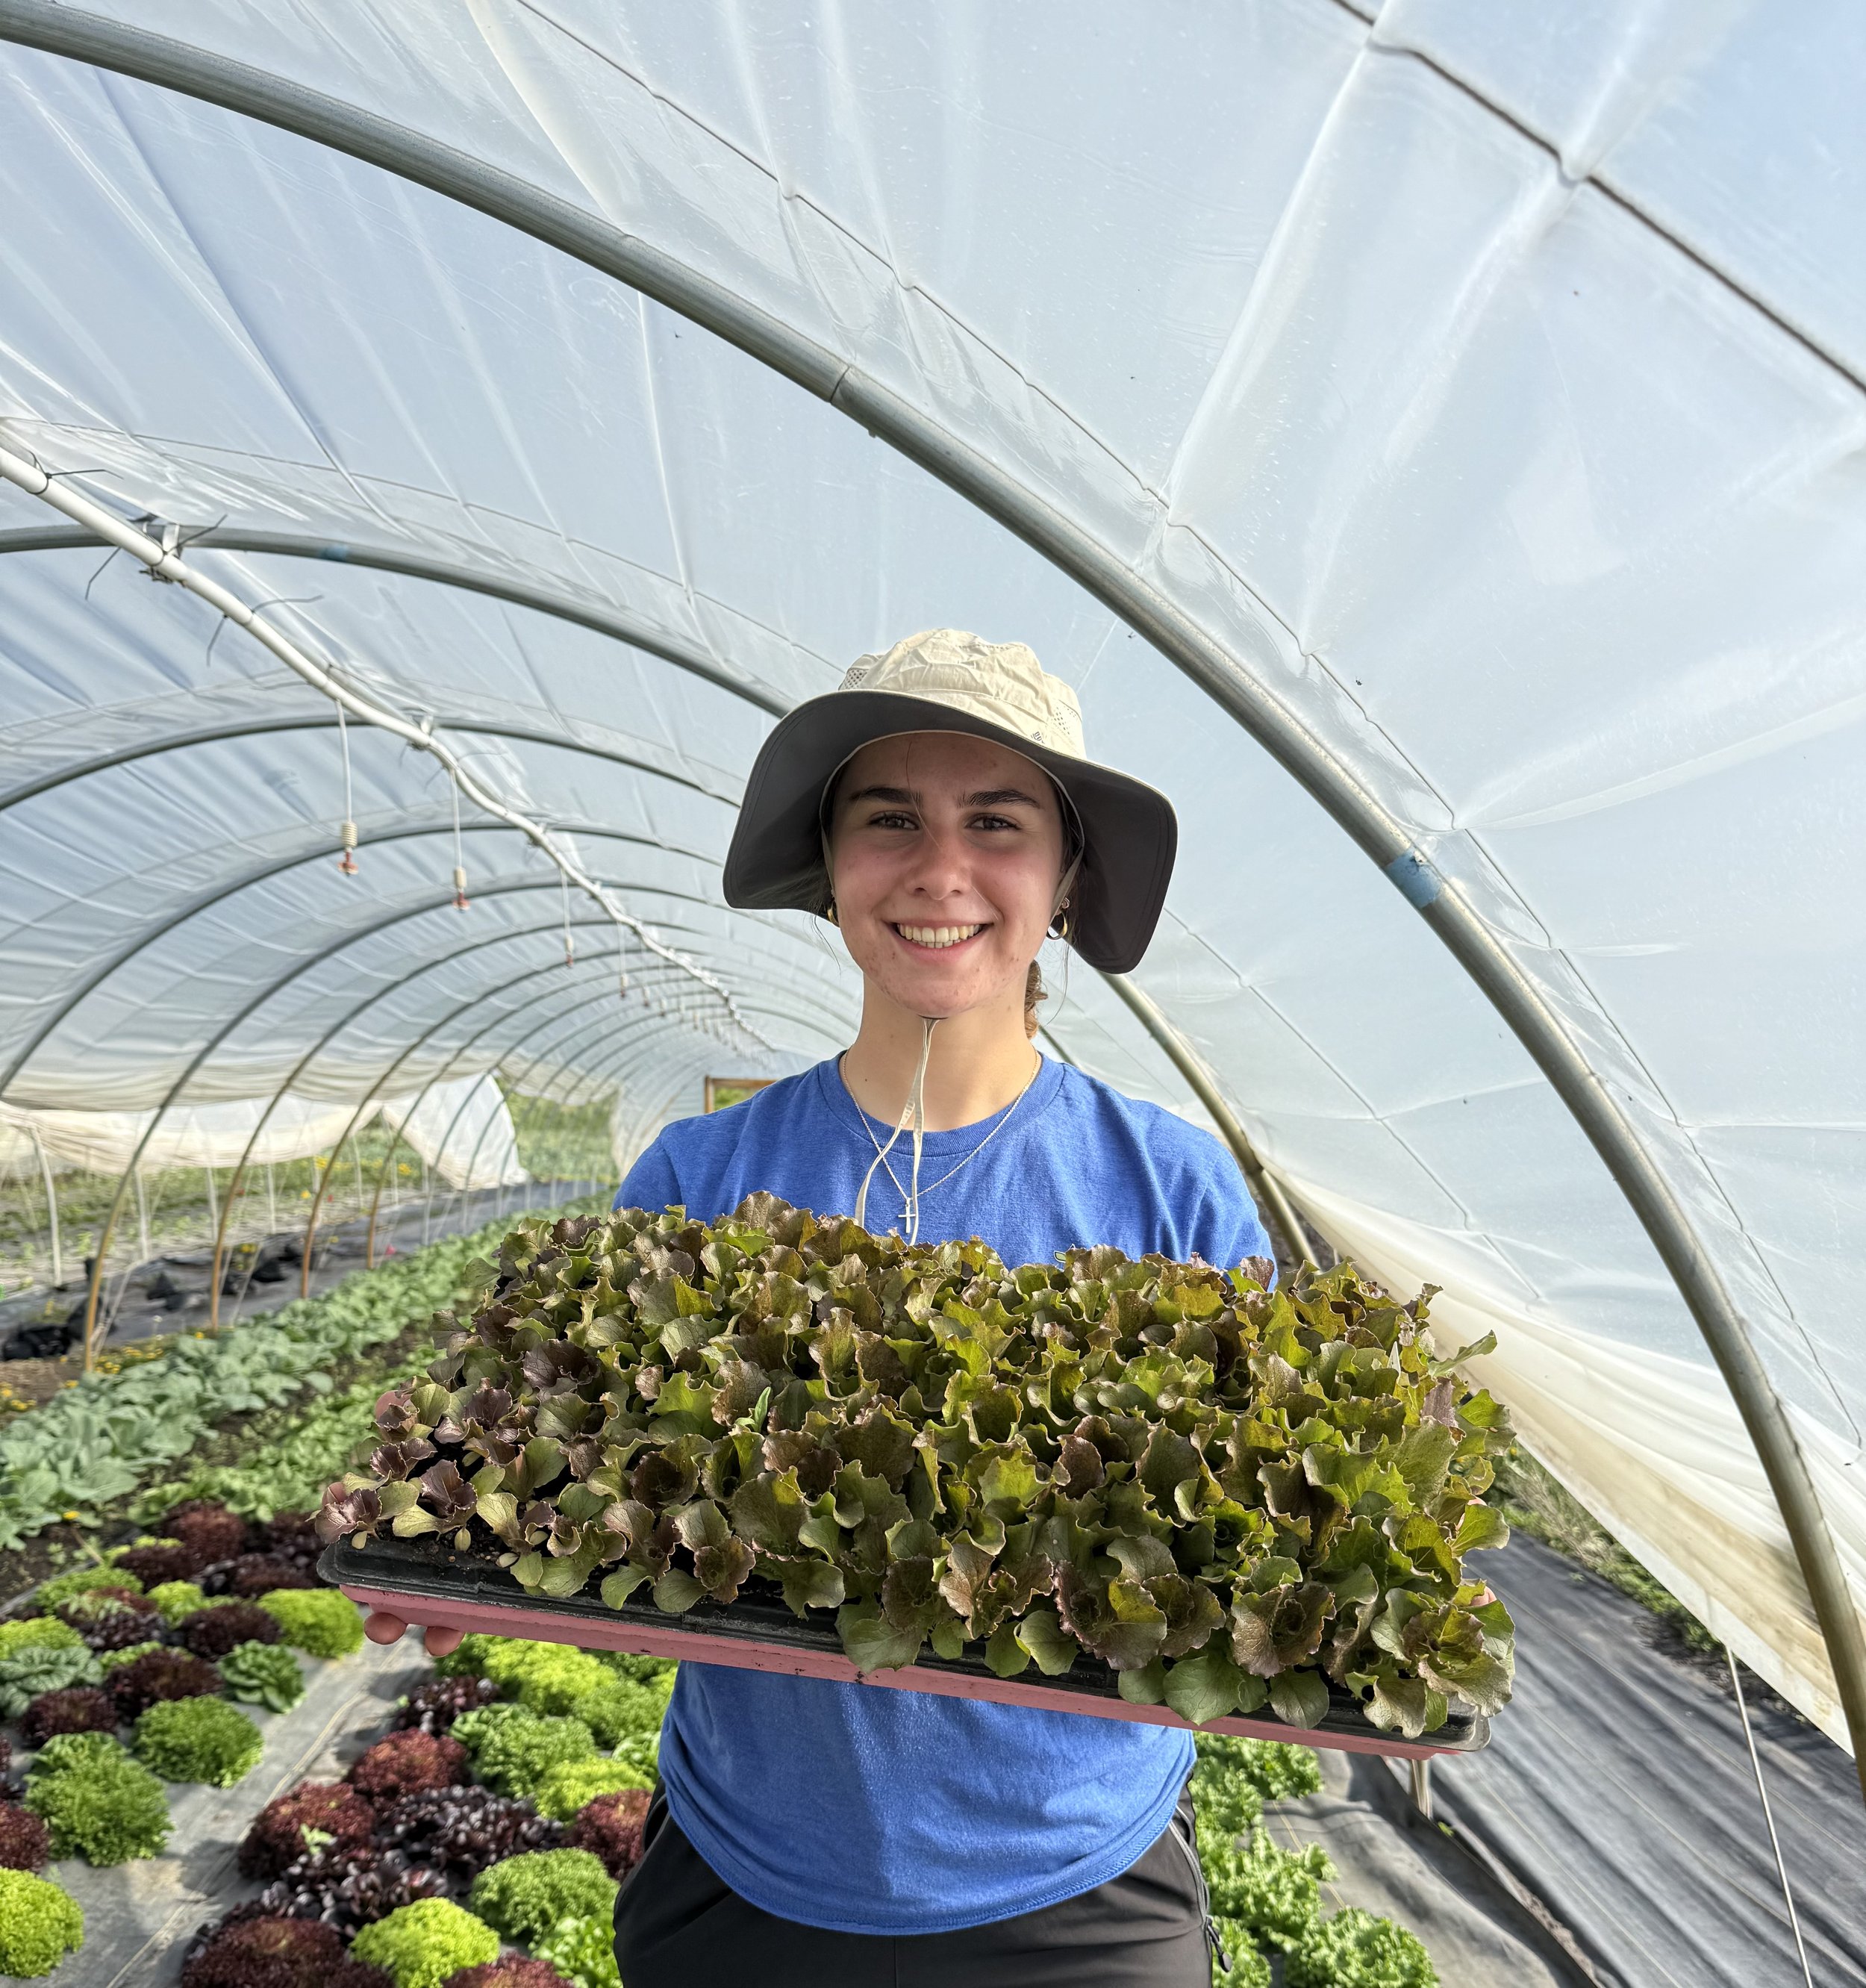
Meet Our Staff Part One
Every year we hire a small crew to help us with the work on our farm. Our staff not only work on the farm doing tasks like harvesting, weeding, and transplanting but they’ll also be present at our Farmers Market stand and help with our CSA pickup locations and delivery route. We’d like to take a moment to introduce you to some of them with additional introductions coming in part two.
Meet Katey
My name is Katey and I’m a recent graduate from the University of Minnesota. In my free time I enjoy anything outdoors including hiking, golfing, fishing, planting flowers, and especially feeding the birds! This season I’m most excited for the Farmers Market. My favorite vegetable is sweet corn!
Meet Maggie
Hi! My name is Maggie I’m currently at South Central College in North Mankato going for Agribusiness. In my free time I enjoy fishing, gardening, baking, and playing cards and games with family! This season I’m looking forward to learning more about sustainable practices. My favorite vegetable is green beans!
Spring projects continue here on the farm and it’s great to have the extra help getting these projects done.
Landscape Fabric
As a team building exercise and also a necessary job the crew laid down landscape fabric yesterday. This job was extra difficult because the wind was a little stronger than we like for installing landscape fabric.
We use landscape fabric in several ways on the farm. Landscape fabric is made over woven plastic “threads” that allow water and air to pass through but smother weeds. We use it on crops that will be in the field for a long time and are difficult to cultivate like tomatoes and peppers. We also use it on our lettuce which helps it to stay cleaner by limiting the amount of soil splash up from rain and irrigation and smothers the weeds. We’re also experimenting with using landscape fabric on our winter squash this season. We’ve always had trouble keeping the weeds out of the winter squash and we hope that the landscape fabric will make our winter squash more weed free!
Direct Seeding and Transplants
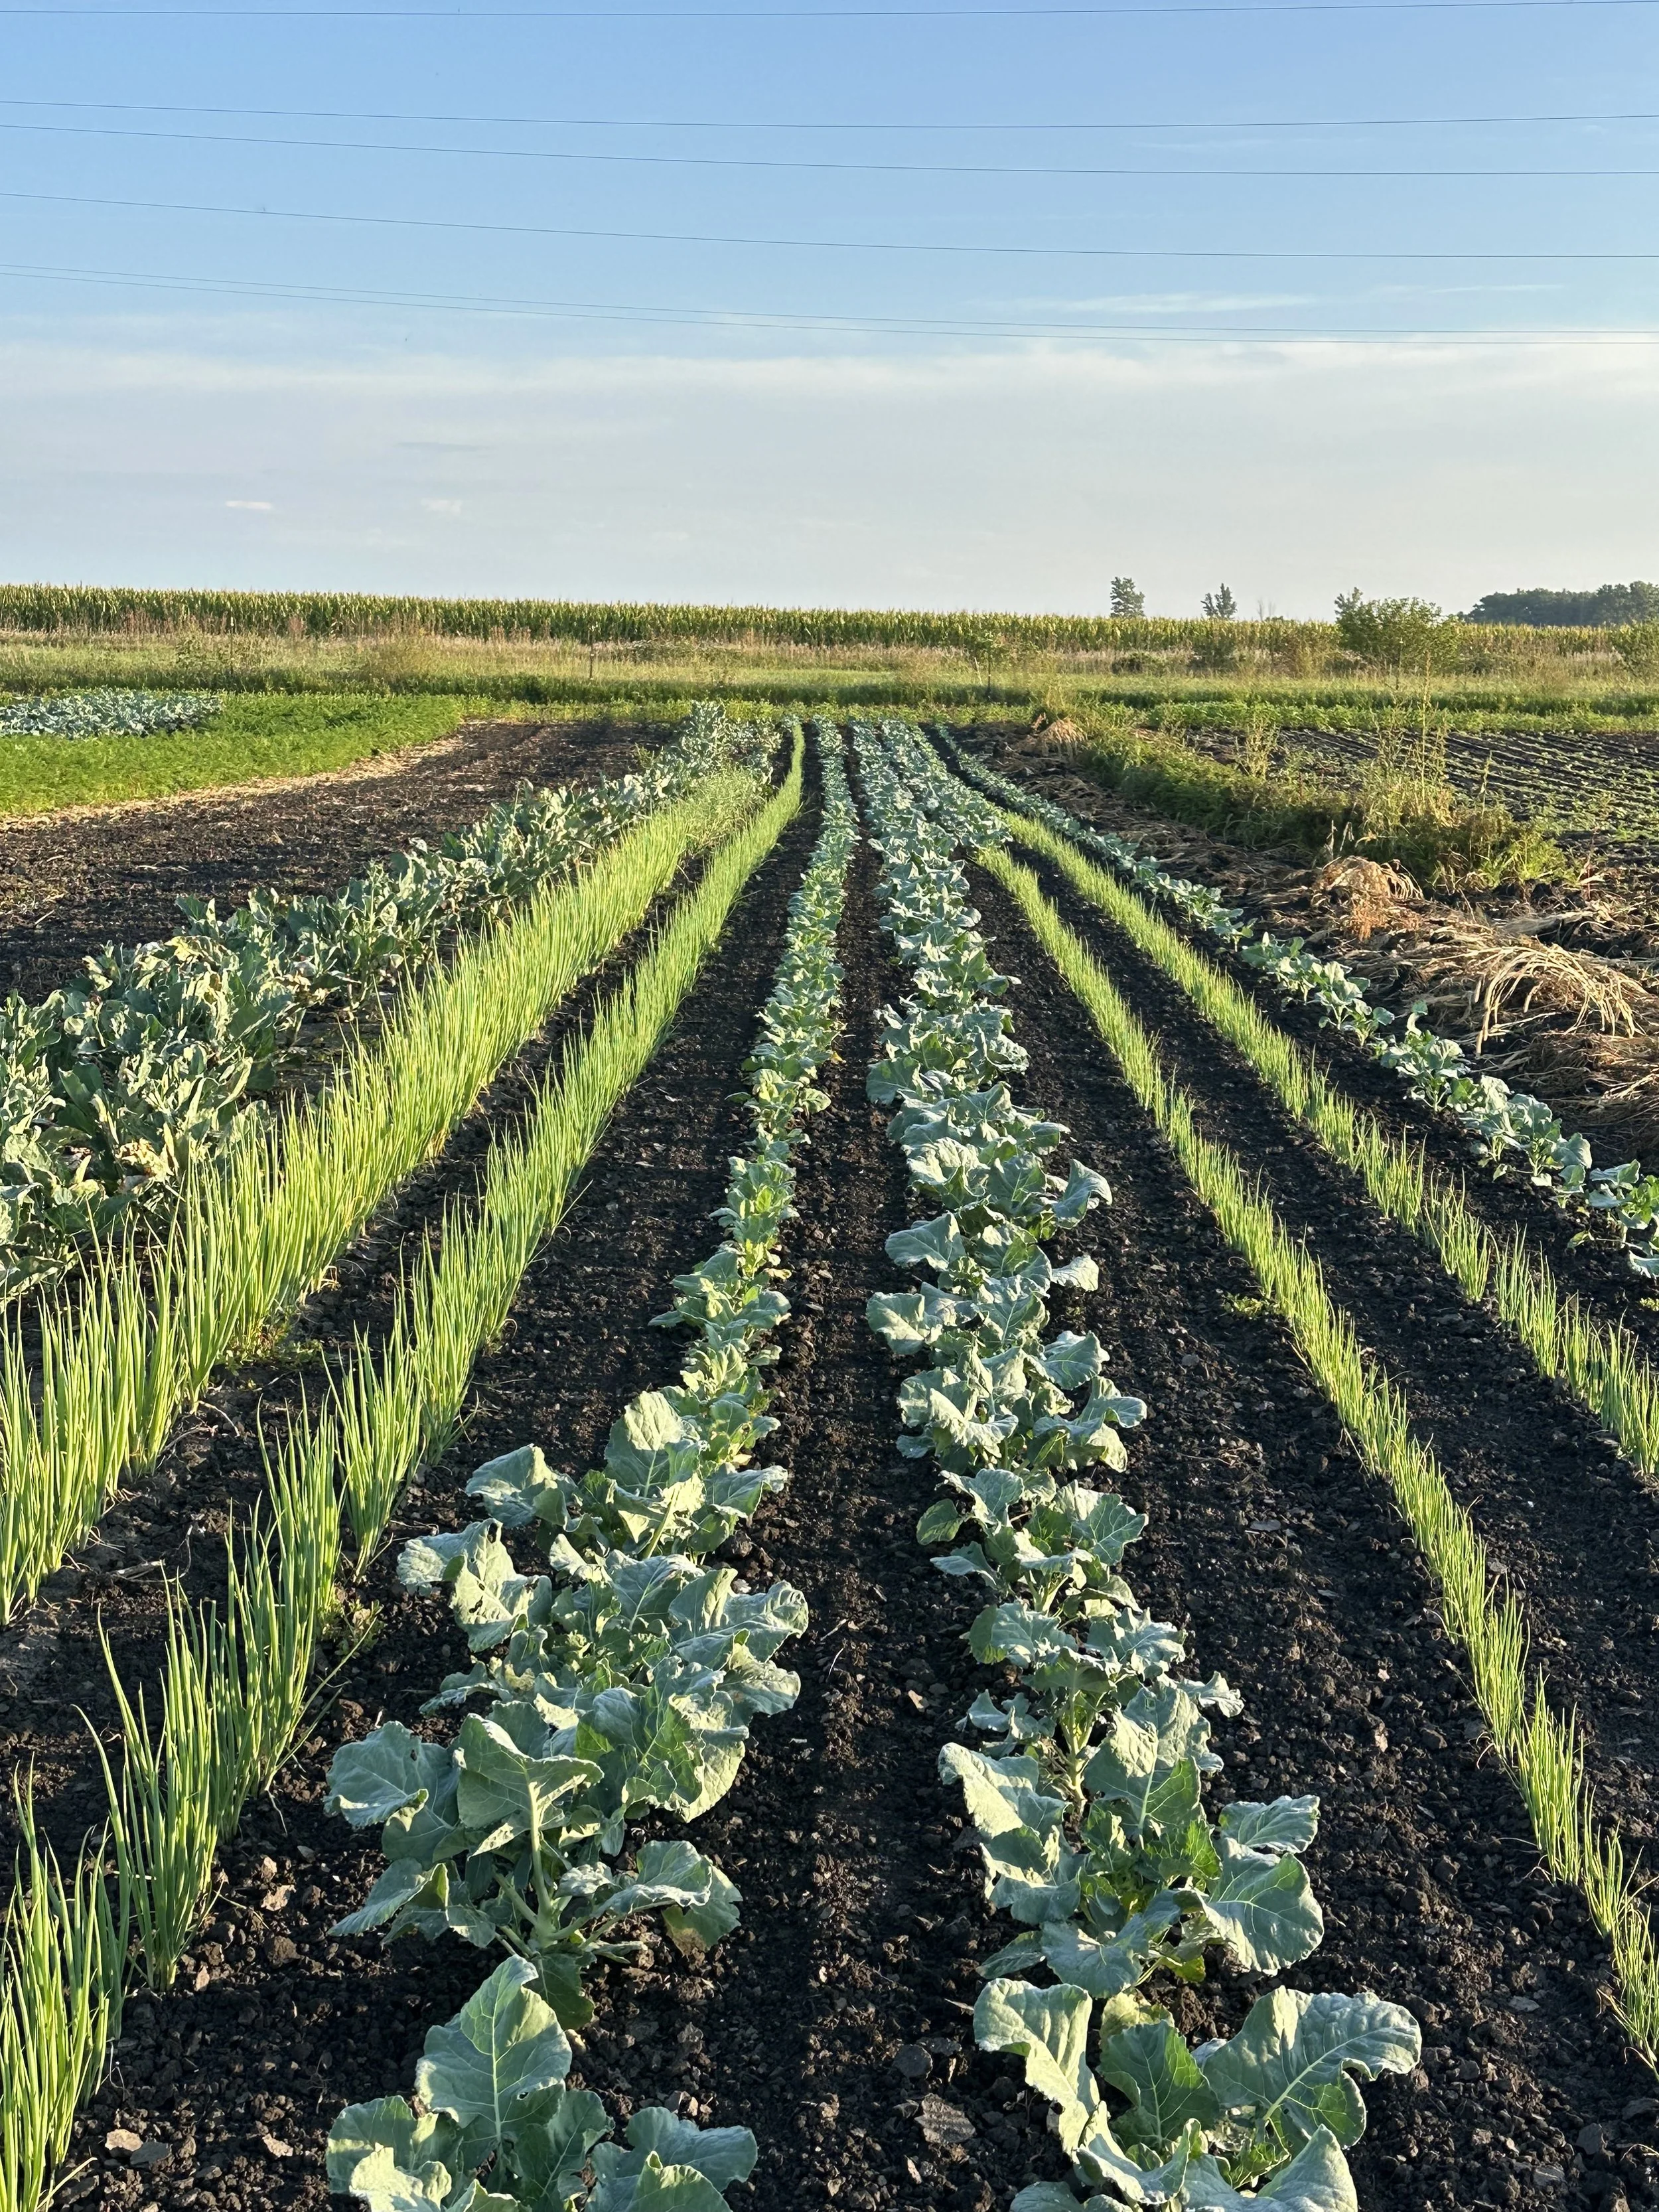
We’re on schedule with our direct seeding and transplants as we continue to experience dry weather allowing us to get a lot of field work done. The farm crew transplanted lettuce, bok choy, kohlrabi, napa cabbage, red cabbage, green cabbage, broccolini, and broccoli.
On the direct seed side I planted the next round of sweet corn, beets, carrots and cilantro as well as our vine crops including cucumbers, honeydew melon, watermelon, cucumbers, summer squash and zucchini. We really need a good shot of rain to get these seeds going.

Potatoes Planted (finally)
This week we finally were able to plant our potatoes. This is pretty late in the season for us. Most years we’ve had our potatoes planted by mid-April but the weather had other plans for us. In this blog post we’ll go over the 3 varieties of potatoes we grow, how we plant them, and why getting them in this late really isn’t too big of a problem.

Potato Varieties
There are hundreds (maybe thousands?) of potato varieties world wide. We grow three of them. Our goals are to provide something familiar but more flavorful and also have something new for you to try while having potatoes available for as much of the season as possible.
Red Norland
This is your typical red potato. They’re soft and creamy and one of the first potatoes available in the season. Our ideal size is somewhere between the size of a golf ball and a tennis ball. They are great any way you prepare them - I personally like them mashed or fried the best.
Cascade
This is your typical white potato. Very similar to a russet but with a much thinner skin. We like to grow these larger than red potatoes with ideal size being somewhere between an oblong baseball and softball. Because of their lower starch content these tend to fry up the best but are also great with any preparation method.
Amarosa
This is a fingerling potato which have become quite trendy in the culinary world in recent years. Fingerling potatoes are less round and more oblong and resemble fingers and their namesake. Amarosa fingerling potatoes have a pinkish red skin and pink flesh and they are absolutely divine roasted. They also make really good mashed potatoes. Our oldest daughter, Addie - 4, loves pink mashed potatoes!


How We Plant Potatoes
Prepare the soil: We apply fertilizer and use our field cultivator to prepare the soil for planting.
Make the furrow: We use our potato plow to dig a furrow.
Plant the potatoes. Did you know that the “seed” for potato is actually potato tubers from the previous season?
Cover them up!
We used to do almost all of this by hand but by making use of our potato plow and disc hiller attachments for our tractor we are able to drastically reduce the physical toil of this job!

Planting Late
The reason we were so late to planting potatoes this year is largely on account of the wet April we had. After about April 10th it was too wet to get out into the field with our tractor to plant potatoes. We decided to work on other tasks like transplanting onions and taking care of our tunnel crops while we waited for things to dry out.
This won’t have too big of an impact on timing and availability of potatoes this season. The potatoes will grow quickly now that it’s warm and we pre-sprouted them to help them get a little head start on growing before they went into the ground. We anticipate beginning to dig potatoes in mid-July starting with our red potatoes.
Improving Seedbed Prep
This week we’re going to go over a deep dive into seedbed preparation and go over some steps we’re taking this year to try to improve seedbed prep. Seedbed preparation is critical to the success of the farm. Optimal seedbed preparation gives the seeds we plant the best chance at becoming healthy and productive plants.
Historically, we’ve used a rototiller for our seedbed preparations. There are some big benefits to rototillers as well as some really huge drawbacks. The biggest benefit is that after rototilling you are left with a smooth, flat, and “fluffy” soil that is easy to work with. Unfortunately, that comes with a major drawback. Tilling is incredibly destructive to the soil as it essentially takes the top layer of soil and runs it through a blender which destroys soil health and structure. It also increases the chances that after a heavy rain fall our soil will crust over making it more difficult for our seeds to sprout.
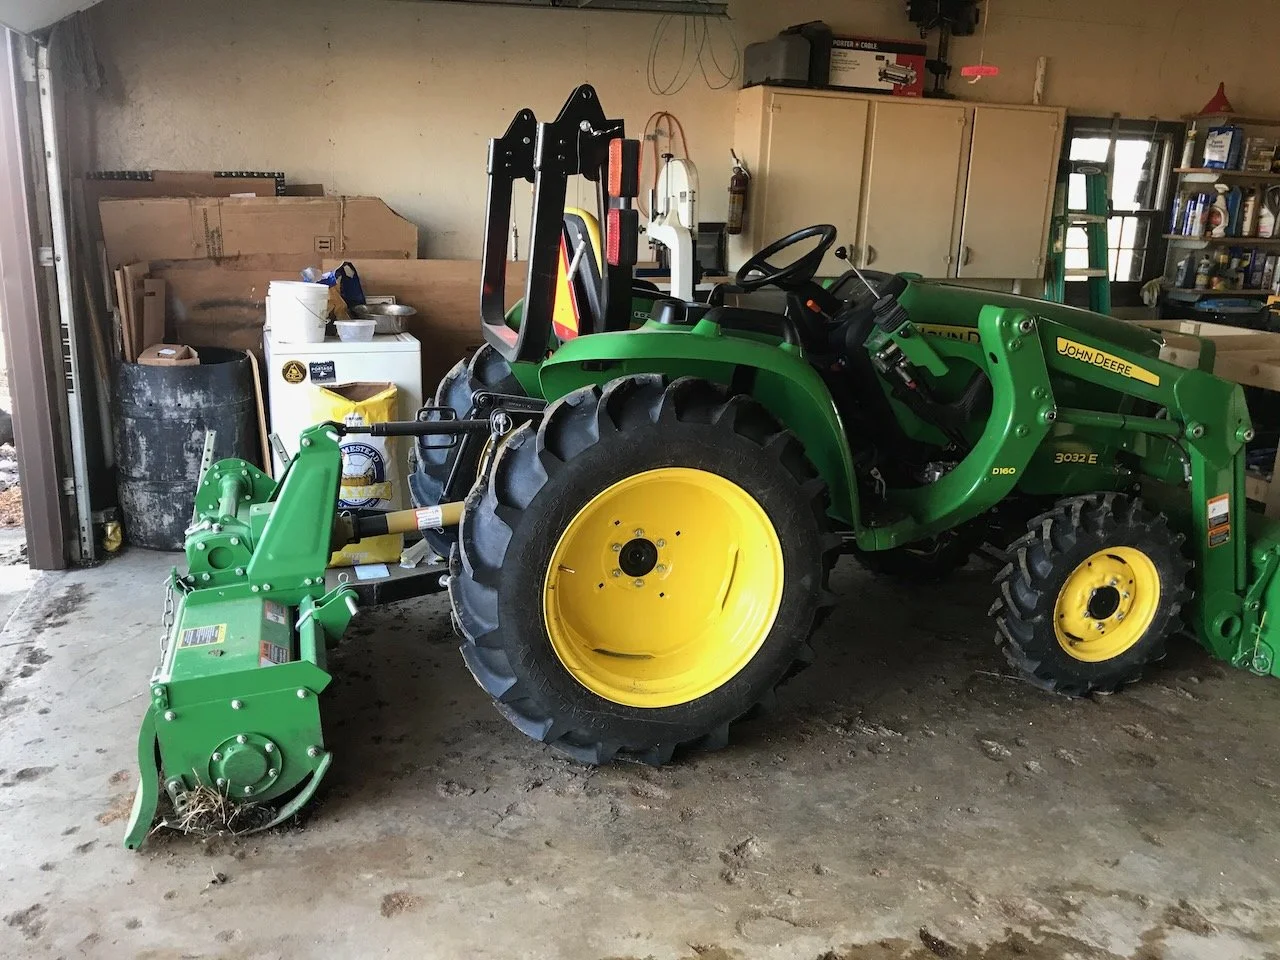
Our tractor with rototiller attached.
We are planning to address this issue by using a different seedbed preparation tool: a field cultivator with harrow section. A field cultivator has many shanks with shovels (sometimes called sweeps) at the end of each shank. The shanks vibrate, dig up, and loosen the soil. While it’s still destructive it is much less destructive than the rototiller. The harrow section runs behind the shanks and levels the surface so it’s a little easier for us to use our seeders. We like to have a relatively flat surface because it makes all the follow-up work like weeding much easier.
We had this small field cultivator that my grandpa had built. It didn’t have a harrow section so we scoured the internet and found a company in Wisconsin that made a small harrow section that would work with our field cultivator. We’re planning to put this to use this year in an effort to improve our seedbed prep.
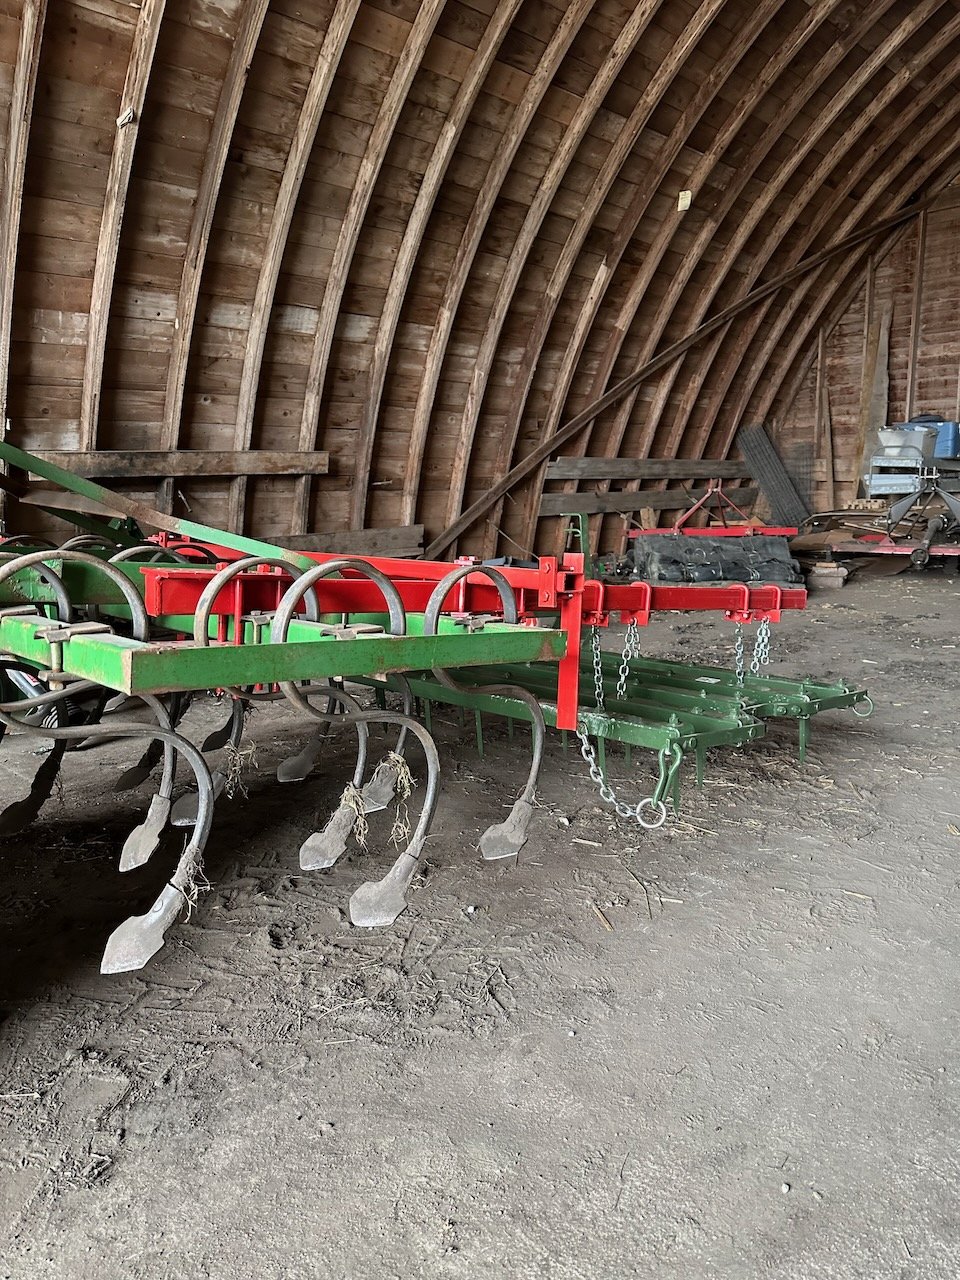
Field cultivator with ‘goosefoot’ shovels and harrow mounted on back.
The end goal is that we will preserve more soil structure while still having a seedbed that’s easy to work with our manual push seeders. We’ll know if this is successful or not by experience and observation. As we’re planting this spring we’ll be asking ourselves if our tools are easier to get through the soil or not. We’ll also be observing what happens after rain events. Are our seeds able to push through the top layer of soil easier or not?
We do foresee a couple problems and a couple additional benefits. One problem we might encounter is when we’re dealing with plant residue from last season. The rototiller does a good job of chopping up and burying old plant residue. We expect that the field cultivator will not work as well in this case. On the other hand, the field cultivator will be faster allowing us to cover more ground in a shorter period of time and with less fuel.
Our New Winter Tunnel Project
Those of you who have been following us for awhile know that for the past 4 or 5 years we’ve been dabbling in winter growing here in Minnesota. We’ve made some important observations and gained a lot of experience over the past few years and we have a good feel for which crops could survive our sometimes harsh winters and which do not. Combining that experience with work from other farms and farmers like us we’re planning to construct a new high tunnel designed specifically with winter growing in mind. In this post we’ll go over the features of this new tunnel, the crops we expect to grow, and the areas of uncertainty we have with this project.
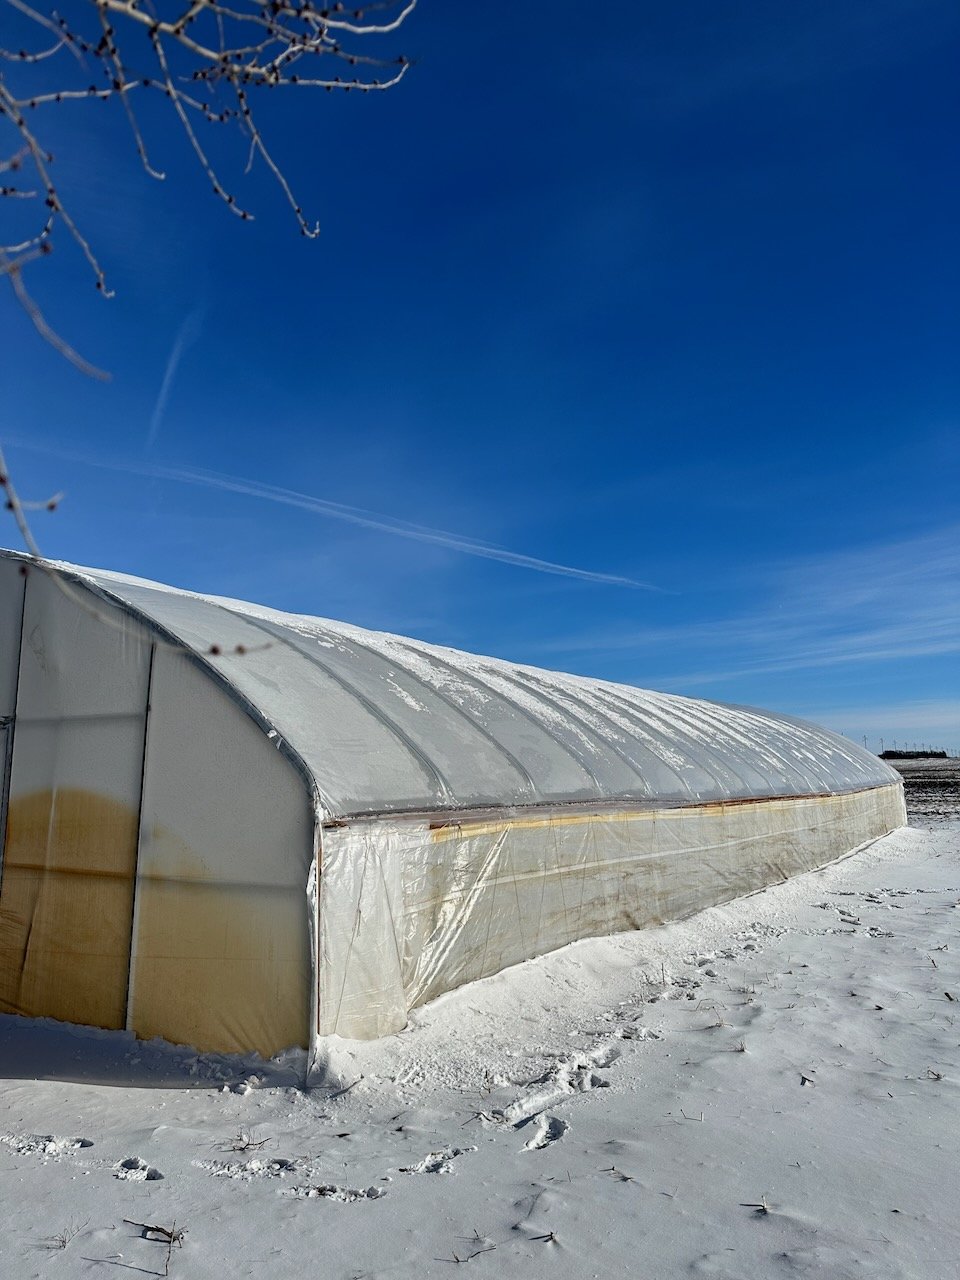
Our biggest tunnel on a cold winter day.
There are several features of this winter high tunnel that will separate it from our other tunnels on the farm. Let’s go over them.
Double plastic layer. Our winter high tunnel will have two layers of plastic and be equipped with a blower to blow air in between the layers of plastic. This will give this tunnel a small amount of insulation to help the heat stay in the tunnel on the coldest of nights.
Swedish Skirt. This is an additional insulation layer around the perimeter of the tunnel designed to help keep the frost out of the tunnel. We’ll bury foam insulation board around the entire perimeter. The ground is an incredible heat bank and by slowing or eliminating frost from getting in the tunnel we’ll be able to continue growing further into the winter.
“Minimally Heated.” Over the past few years of winter growing we’ve discovered that many crops will survive temperatures below freezing. Crops like lettuce, scallions and bok choy can survive temperatures as low as single digits. By utilizing a high efficiency propane heater, convective tubing, and row cover we will heat the tunnel to 30-35* to keep these crops alive throughout the winter with minimal heating costs.
We’ve touched on this already but the crops we plan to grow include some of our most popular crops like lettuce, scallions, bok choy, cilantro & kohlrabi. Our goal here is to hit the best intersection of popular, high demand crops and cold tolerance. The ultimate goal then is to offer a all winter CSA that combines storage crops like beets, carrots, potatoes, onions & cabbage with winter crops like spinach, lettuce, bok choy to offer a really well rounded share even in the depths of winter.

Winter crops inside our biggest high tunnel
There are some unknowns here. First, we basically no experience with a heated tunnel which brings up some concerns. First, we’ll closely monitoring condensation inside the tunnel which can be a vector for disease for our winter crops. Second, we’ll be closely monitoring pest issues - last season we noticed aphids in our crops and we think that our mild winter combined with the protection of our tunnel allowed the aphids to survive when they normally wouldn’t. Finally, we’ll be monitoring heating costs - we’ve run the numbers through a thermal unit calculator which indicates it will be relatively cheap to run but the numbers are just an estimate and real world experience is what really matters.
Weather Forecasts: The Unsung Hero of The Farm
It should come as no surprise that we check the weather forecast multiple times per day here on the farm. This weeks blog post is going to be a deep dive into how we use forecasts on the farm for our decision making and how that plays a critical role in our ability to grow healthy, sustainable produce for your family.
Before we get into the decision making side of weather forecasts we need to understand a few basics about how meteorologists create forecasts in the first place. I am by no means a meteorologist nor an expert on the intricacies of forecast models but I’ve spent enough time reading weather blogs (thanks Updraft from MPR News) to understand more than the average person.
All forecasts you see come from complex supercomputer models that are constantly fed observational data from weather stations across the globe. These models spit out weather forecasts based on the observational data fed to them. That’s why weather forecasts constantly change day to day and why the further into the future you try to forecast the less accurate that forecast is.

3 different snapshots of a weather forecast for this weekend. Notice how all models are in agreement that the area just southeast of Mankato - where our farm is located - is not favored for the heaviest snowfall.
You can see a list of the models, courtesy of Wikipedia, here. The two that are referenced the most in the Updraft blog are the GFS model and the European Model. What’s useful about this is that the models aren’t always in agreement on what the forecast is. When the models ARE in agreement it signifies that whatever weather they’re predicting is significantly more likely to occur.
A little sidebar about GFS; this forecasting model is owned and operated by the United States Government under the National Oceanic and Atmospheric Administration’s National Weather Service which was recently cut significantly by Elon Musk and his goons at DOGE. Obviously, we care deeply about having the best, most accurate weather forecasts available so we can make good decisions on our farm and we are wholly against the cuts to the National Weather Service among the other agencies on the chopping block.
Anyway. Now that you have a basic idea of the behind the scenes on how weather forecasts work we will dive into which weather forecasts we use the most and how we use them to make decisions on the farm.
My favorite weather forecast tools are the Updraft from MPR News, weather.gov, and Weather Underground on my phone. Of the three I find Weather Underground to be the least accurate but it’s useful for seeing forecast temperatures which are usually pretty accurate and its radar is good for day-of storm tracking. Weather.gov is great for a couple reasons. First, it has a graph view where you can see the probability of various weather events like wind speed, wind direction, temperature, precipitation potential and more on an hour by hour view. I particularly like this when I try to determine if we should set up our canopy tents at the farmers market or not. Finally, Updraft from MPR News is my favorite because they not only give you a forecast but they talk about the “behind-the-scenes” science that informs the forecast as well as talking about the differences in the GFS and European forecast models.

Knowing wind speed, timing and directions can help us avoid costly mistakes like this ripped tunnel plastic. $800 in plastic and half a day of labor for 4 people required to repair.
To put a bow on this weather forecast blog post let’s talk about the different types of decisions we make based on weather forecasts.
High Tunnel Management: Our tunnels require accurate weather forecasts for proper management. We need to know wind speed and direction to know where we should vent tunnels to minimize risk of damage. We need to know temperature and cloud cover to know if we should open our tunnels, close tunnels or apply shade cloth. We need to know when a storm is coming so we can shut our tunnels completely if a severe storm is forecast.
Planting Dates/Times: Our planting schedule is complex and long and in order to have as consistent supply of our produce as possible we need to plant on schedule. Knowing that it’s going to rain for a week allows us to plant our crops before the rain comes so that we can stick to our schedule as much as possible. We also need to know if we should set up our outdoor irrigation or not and weather forecasts allow us to do that. Knowing there’s a 80% chance for rain means we don’t need to spend the labor setting up irrigation.
Staff Safety: Knowing when and where a severe storm will hit allows us to keep ourselves and our staff safe during severe weather. Further, knowing temperature and heat advisory allow us to plan ahead and start work early to try and beat the heat.
Canopies at the Market: Knowing wind speed, direction and timing allow us to set up our canopy tents at the farmers market more safely. Often if a forecast calls for high winds it’s likely that the winds won’t pick up until the afternoon so knowing precise timing of when winds are forecast to increase to unsafe levels for our canopy tents allow us to make the best, safest decision regarding our canopies.

Rainbow over our farmers market stand after a short rainfall just before we opened for the day.
Behind the Scenes: Government Farm Programs Stuck in Limbo
Today’s blog post is going to be about some government farm programs that we participate in and that help farmers and farms like ours and are being affected by executive orders in D.C. I’m going to try to keep this as matter-of-fact as possible and allow you space to judge whether or not these programs should exist and to what extent they should exist. I’m also only going to write about programs that we have direct experience with. Here we go.
Alright so the first program I want to talk about is tucked away in the NRCS (Natural Resources Conservation Service) called EQIP (Environmental Quality Incentives Program). As usual, there’s enough alphabet soup in government agencies to feed a family of 5. I digress. EQIP has whole host of management practices that it provides funding for and one of the management practices is the use of high tunnels. NRCS through EQIP provides funding to construct high tunnels for farmers across the nation. We applied for an EQIP high tunnel in December 2024 and the application seems to be stuck. We’re guessing that the funding was frozen as a result of the recent executive orders but we aren’t able to get information other than our application is pending. We’ve reached out to our congressperson to try to get more information.

One of the high tunnels on our farm. High tunnels allow us to grow more and for a longer period of the year.
The second program I want to talk about is called “produce bucks.” Here’s how it works. Produce Bucks is a way that folks who receive SNAP benefits can further their benefits. When participants use their SNAP benefits at the farmers market they get matching “produce bucks” to spend at the market. So if they spend $10 of SNAP benefits they get an additional $10 in produce bucks for a total of $20 that they can spend on healthy produce from local farmers. It’s a win for everyone. Sadly, “produce bucks” is frozen as a result of the executive orders from D.C. This means that SNAP recipients (who, as far as I know, are still able to use SNAP benefits) don’t get that additional matching money for fresh fruits and vegetables. A loss for both them and farmers.
Broadband. I’ll be upfront and say I don’t have all the information here. What I do know is that one of our local Internet Service Providers received a grant to install fiber for our house among many others in Waseca County. There are several potential sources of funding from both state and federal government. We don’t know for sure but there is a good chance that the funding for this project is frozen as a result of executive orders from D.C.
How is broadband a farm program? Well technically it’s not but if you think about modern life and modern farming you soon realize that the internet is another necessary utility to run a farm. We have internet connected temperature sensors. We use the internet to communicate with our community in various forms including social media, emails, website updates & more. Having fast, reliable internet is necessary for modern business.
My take on all of this is as follows: the funding for all of the programs mentioned here was ALREADY appropriated by congress through various acts including the infrastructure plan, the Inflation Reduction Act and others. If the executive wants to remove this funding then, per the constitution, congress needs to vote to remove or change that funding.
I think these programs are good. They help rural communities be stronger. They help farms and farmers build their businesses so we can feed our community. They help both farmers and folks with food insecurity. These are all wins for our communities.
Behind The Scenes: CSA Edition
I think one of the reasons many folks enjoy our newsletter is that we go behind the scenes on certain aspects of our farm operation. One area we’ve never really gone behind the scenes on is our CSA Farm Share program. People have written entire books on Community Support Agriculture so it will be nigh impossible to condense that down into a digestible newsletter but this will get us started.
To put it succinctly: planning and executing a successful CSA program is extremely complicated. We’ll break it down into some easy to think about categories that will shed some light on the inner workings of our CSA.

I love the contrast here between the orange carrots and their green tops set against the charcoal colored soil.
Type of CSA Matters
Did you know there are tons of different types of CSAs? Everything from the traditional farmer choice CSA to our totally customizable CSA is possible. We chose a customizable CSA because we know that almost everyone has that one vegetable they just don’t care for. And even if you do like every vegetable you might get tired of a vegetable or have too much of it stocked up in your fridge. We want our CSA members to get the produce they want, need and like week after week to minimize the amount that goes unused.
Customization Needs Software
Running a totally customizable CSA, in our opinion, requires software to handle the logistics. Imagine taking 100 different orders every week, harvesting for the changing quantities of produce per CSA member requests, and packing 100 different shares every week while also juggling members vacations, missed share pickups, and all of the other things that come up during our busy lives. We decided that software could be the solution to all of this and we now use GrownBy for our CSA.
GrownBy handles all the ordering, label printing, and rescheduling things that come up during the season. All I have to do is put in an estimate of what I think we’ll have available, give our CSA members a day or two to customize their share, and then GrownBy prints out a list of what I need to harvest AND generates labels for us so we can pack 100 shares where no two are the same. On top of that, GrownBy offers the ability for you to change your pickup location and claim vacation days if you’re going to miss a pickup.

GrownBy is our trusty farmer-owned CSA Software.
Deciding What To Plant
I think this is a case where constant iteration has made what is a complex system into something very manageable. Through a combination of record keeping on harvest dates and totals, survey responses, and interaction with our CSA members we have a good feel for the crops people want and in what quantities. Couple that with building slowly starting with 8 CSA members back in 2015 (up to 100 now) we’ve been able to refine and iterate on our crop planting so we’re growing the crops our CSA members want.
Marketing Our CSA
This amounts to telling people about our CSA and how it can make their lives better. I’m not a salesperson by nature: I don’t feel comfortable being pushy, I’m honest, and I genuinely care that people feel like the CSA is valuable to their life. So when we talk about our CSA we talk about it in a way that highlights the positive ways our CSA has impact our CSA Members lives and we try to help potential new CSA members “self select” so that the new members we get have a high chance of enjoying the CSA.
The truth is that CSA is not for everyone. If you know that you don’t enjoy cooking at home and have no interest in learning how then a CSA share is probably not for you. If you’re gone regularly during the growing season on vacation and away from a kitchen then CSA probably isn’t for you. If you’re not willing to learn new recipes, cooking techniques or ways to prepare and eat vegetables then CSA is probably not for you.

Just a small sample of all the wonderful produce we grow.
A Sneak Peak into a CSA Week
Assuming all of the above goes well then we can jump into what the week of the CSA looks like from the farmers perspective. Early in the week (Monday or Tuesday) we do a visual assessment of our crops so we can make an estimate on what will be available for that weeks CSA. Once we have our estimate we add that information to our inventory list in GrownBy, our CSA software. Then, an email is sent out automatically to all CSA members reminding them that it’s time to customize their CSA share. Our CSA members use GrownBy to craft the perfect share before the share customization deadline.
Once the deadline hits we have a concrete list of exactly what we need to fill the CSA shares for that week. We then create a harvest list and head out to the field with our Farm Hands to bring in the harvest. This happens the day before you receive your CSA. Then, on CSA day we print out labels for all of our CSA members and setup our CSA packing station and get to work packing your shares. It’s a tight deadline: we pack all 100 CSA shares the morning of the delivery day but with the help of our Farm Hands and our CSA software we’re able to accomplish this with relative ease.
So there’s a little glimpse into the behind the scenes of our CSA. Is there something we missed or something you’d like to know more about? Drop us a line in the comments below or reach out!